03 Products and catalog
This chapter shows how to set up what the till sells: categories, products with price and VAT rate, sizes (variants), extras, deposits, combos and open-price products. All pages are under Menu › Catalog Management. Your catalog may also be maintained centrally by your Vectis service partner – if so, agree with them who makes changes.
How the catalog is organised
Each venue has exactly one catalog. The catalog you are editing is the one of the venue selected in the header (field Venue, here "Demo Restaurant"). If you only have one venue, there is nothing to do here.
A catalog contains:
- Categories – the groups on the order screen, e.g. "Antipasti", "Pasta", "Birre".
- Tax groups – the VAT rates, e.g. 7 % and 19 %.
- Products – everything you sell. Every product has at least one variant (initially "Standard") that carries the price.
- Ingredients and ingredient categories – for fixed ingredients and paid extras.
- Combos – set menus with choice groups (e.g. main course + drink).
- Deposit rules and tags.
All catalog pages are visible in the menu only for the Admin and Manager roles. Waiters and cashiers only see the catalog on the order screen.
Note: Some catalog windows are labelled in English only, whatever the till language (for example the windows for catalog, categories, tax groups, ingredients, tags and the combo editor). This manual quotes the labels exactly as they appear on screen.
View the catalog
Goal: Check which catalog belongs to your venue and whether it is active.
Who can do this: Admin, Manager.
- Open Menu › Catalog Management › Catalogs.
The Catalog Management page shows one catalog per venue with Name, Status (Active / Disabled),
Venue, Description and Statistics (number of products and categories). In the example this is
"Speisekarte Demo Restaurant" with 167 products in 19 categories.
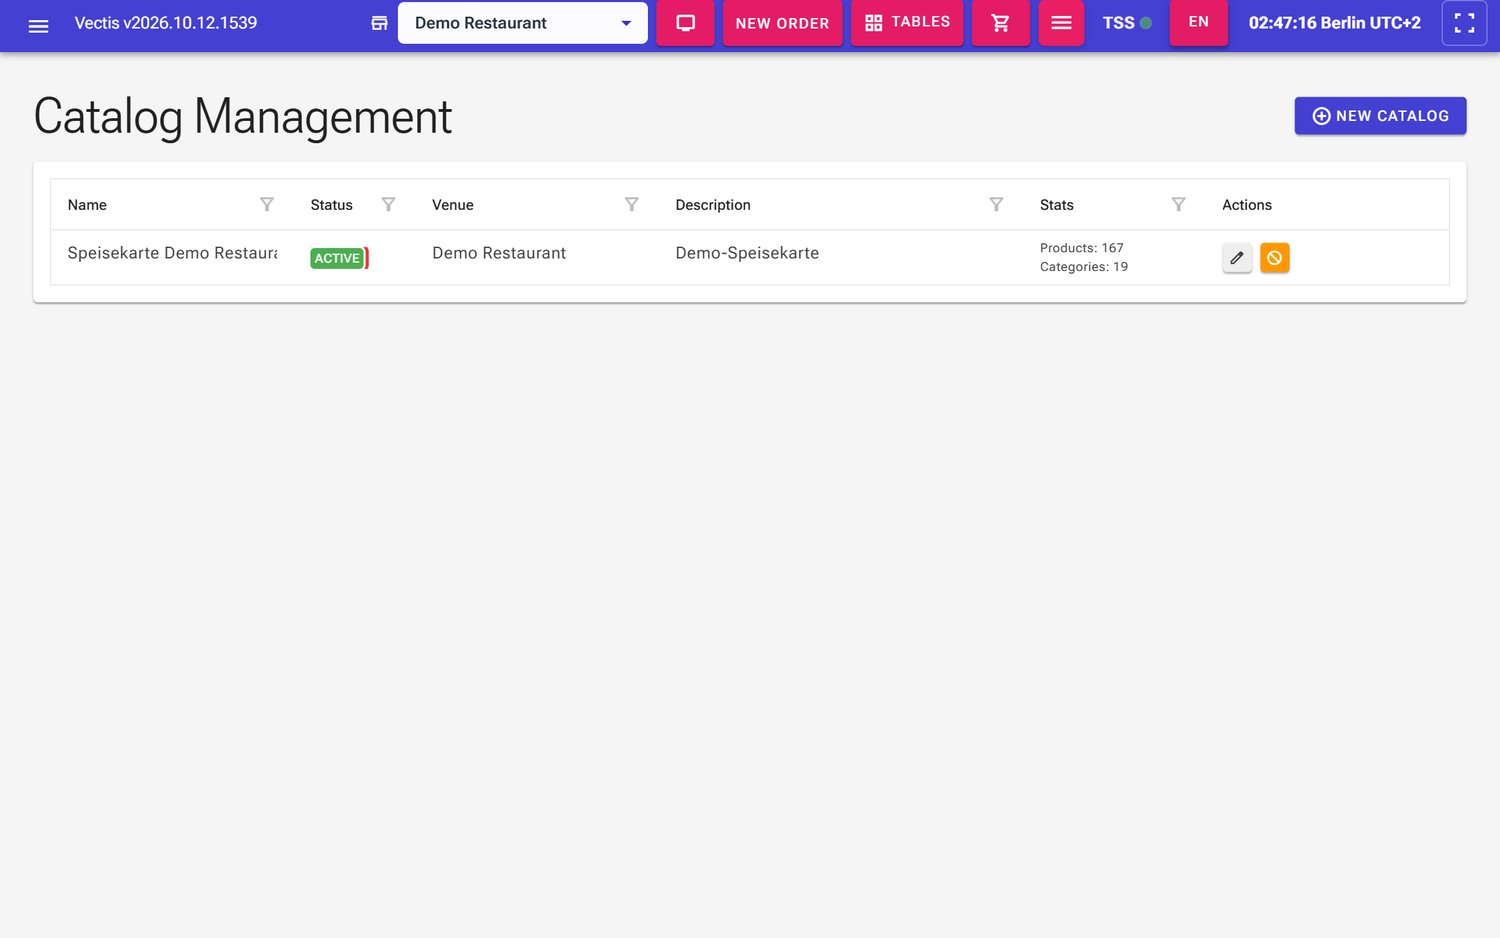 Catalog list with "Speisekarte Demo Restaurant", status Active and statistics
 - To change the name or description, click the pencil icon in the row (Edit Catalog). In the "Edit Catalog" window change Name, Description and the Status switch, then click Save.
- If your venue has no catalog yet, click New Catalog, pick the Venue, enter a Name and click Save.
Caution: Do not deactivate the catalog during service. The orange Deactivate icon (circle with a bar) sets the whole catalog to Disabled.
Add and sort categories
Goal: Create groups for the order screen and set their order.
Who can do this: Admin, Manager.
- Open Menu › Catalog Management › Categories.
The Categories Management page shows all categories as a tree. The red number next to a name is its product count
(e.g. "Pizza 19"). Each category has three icons: green plus, pencil and red bin.
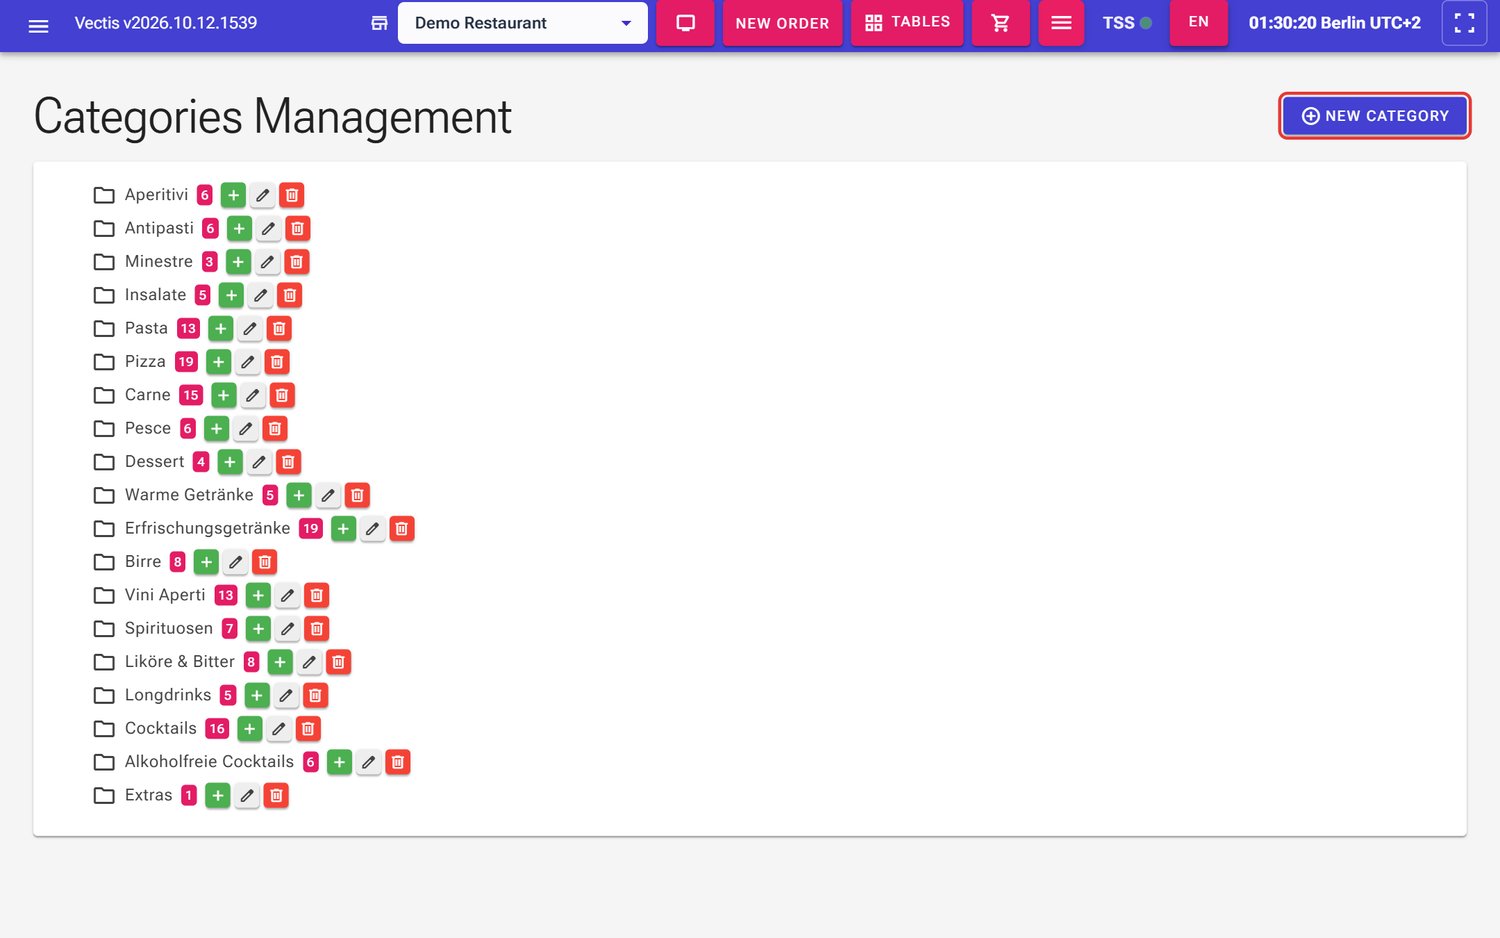 Category tree with the "New Category" button (outlined in red)
 - Click New Category. The "Create New Category" window opens.
- Enter a Name, e.g. "Nachspeisen" (desserts), and, optionally, a Description.
- Enter a number in Display Order. Lower numbers appear first ("Lower numbers appear first"). Tip: number in steps of
ten (10, 20, 30 …) so you can slot a category in between later.
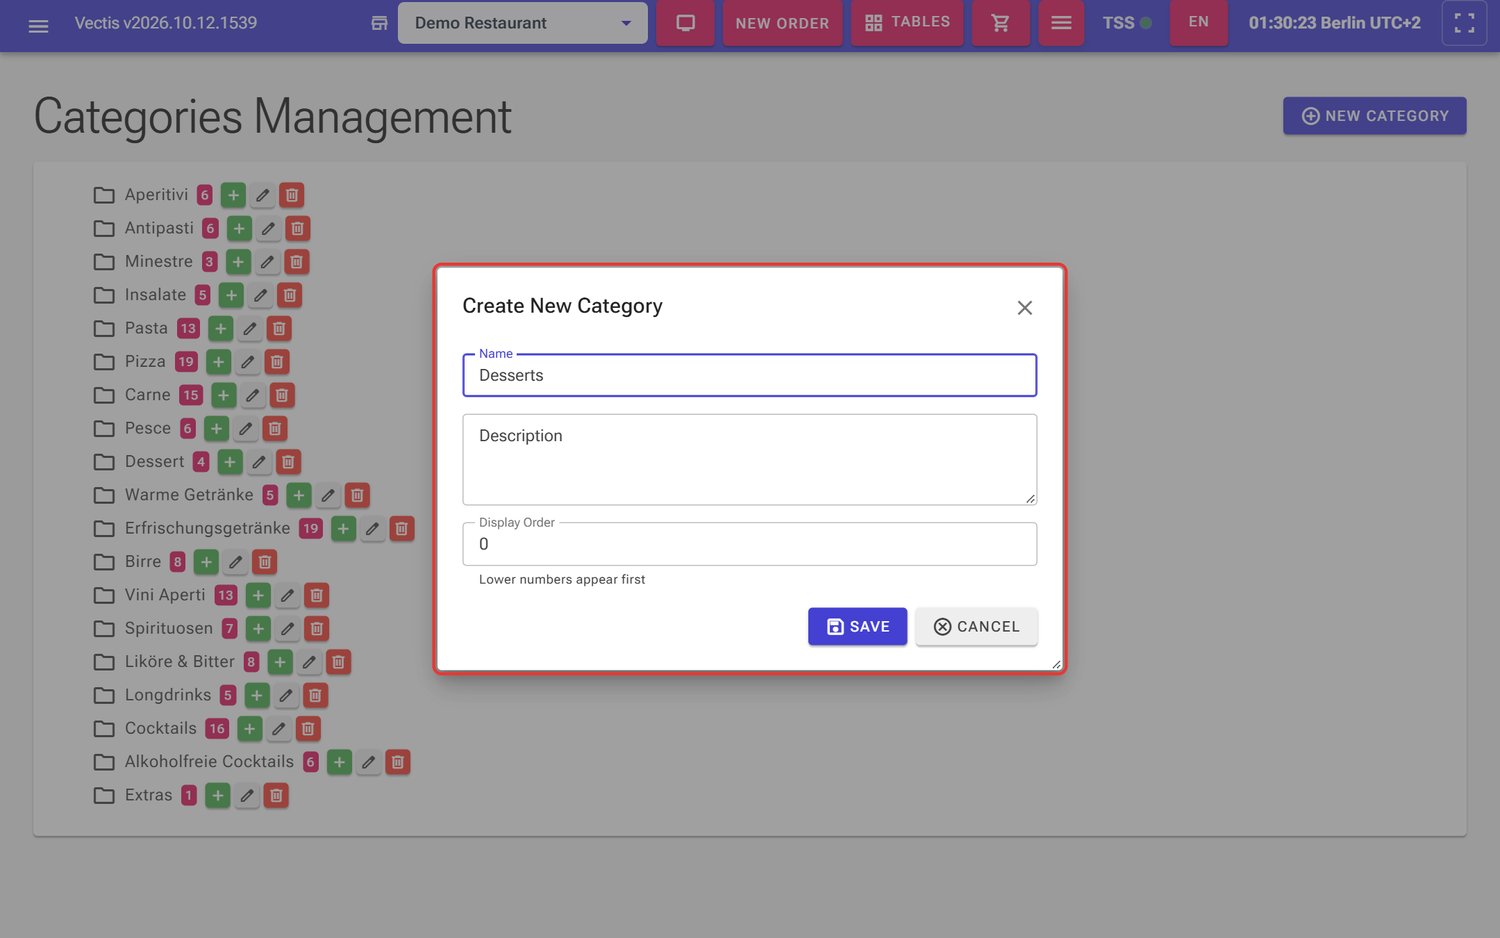 Create New Category window with name and display order
 - Click Save.
- For a subcategory (e.g. "Red wines" under "Vini Aperti") click the green plus in the parent row (Add Subcategory) and fill in the window the same way.
Note: To change the order, edit a category (pencil icon) and change its Display Order. Drag and drop is not available.
Rename or delete a category
Goal: Change a category or remove an empty one.
Who can do this: Admin, Manager.
- Open Menu › Catalog Management › Categories.
- To change it, click the pencil icon (Edit), change Name, Description or Display Order and click Save.
- To delete it, click the red bin icon (Delete) and confirm Are you sure you want to delete this category? with Yes.
Note: A category can only be deleted when it is empty – no subcategories and no products. Move the products to another category first (see "Change a product"). Categories have no "deactivate" switch.
Set up tax groups
Goal: Create the VAT rates you assign to products.
Who can do this: Admin, Manager.
- Open Menu › Catalog Management › Tax Groups.
The Tax Groups Management page shows Name, Rate, Country, Tax Key, Description and Status.
In the example there are two tax groups: "Reduced VAT" at 7.00 % (tax key 2) and "Standard VAT" at 19.00 % (tax key 1). The
tax group with the Default badge – here "Reduced VAT" – is pre-selected for new products.
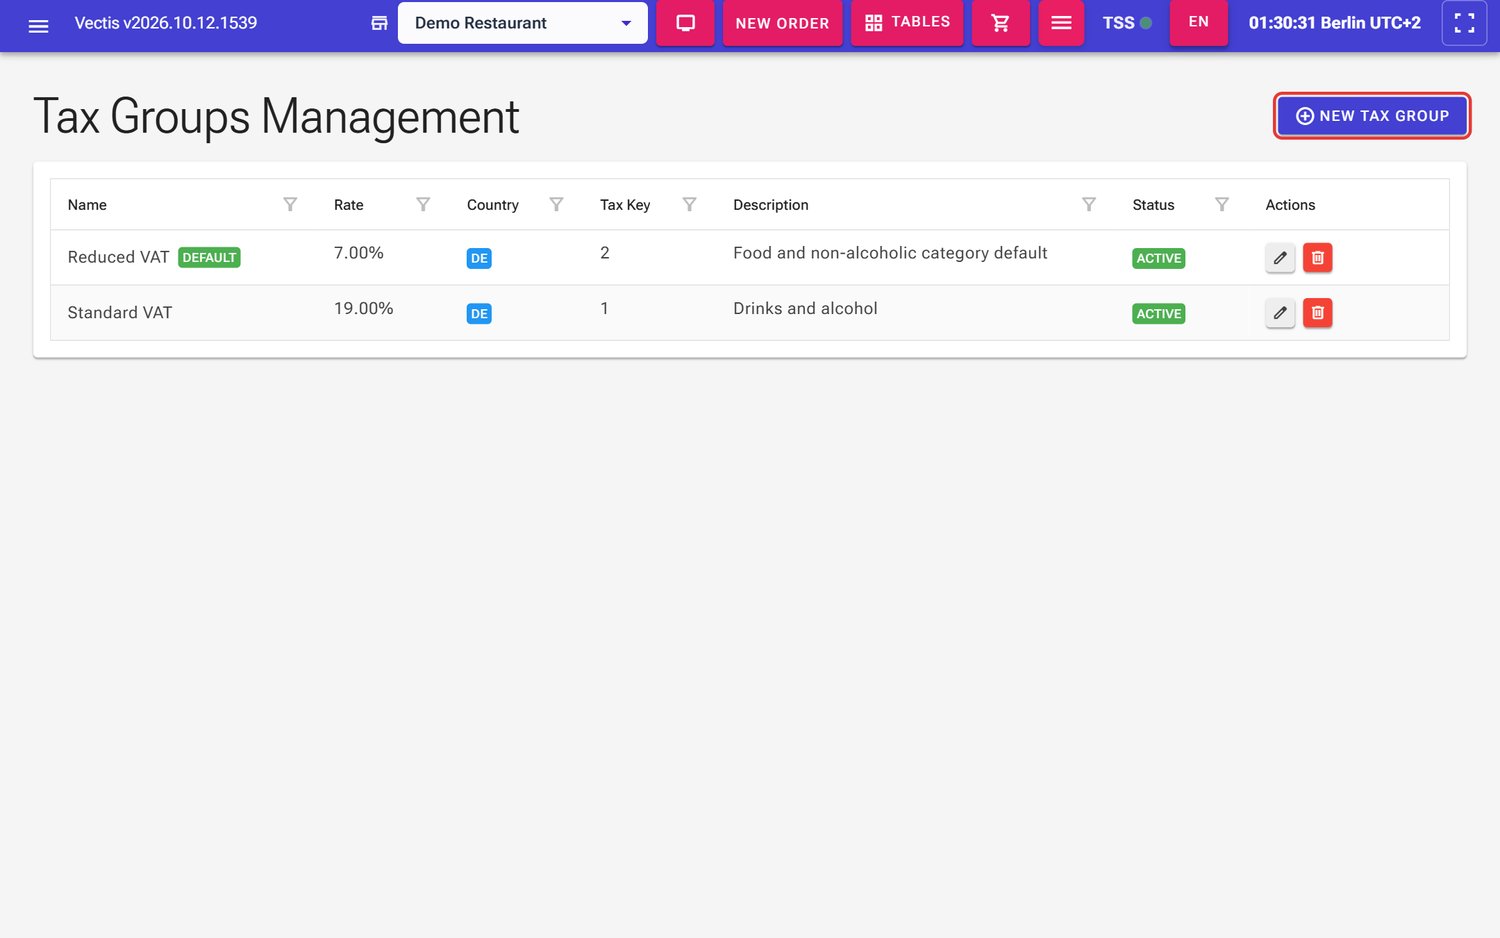 Tax groups "Reduced VAT" (7 %, default) and "Standard VAT" (19 %)
 - For another rate click New Tax Group. The window is pre-filled with 19 %, country "DE" and tax key "1".
- Enter a Name.
- Check Tax Rate (%), Country Code (two letters, e.g. "DE") and Tax Key Code. The tax key is the VAT key used in the DSFinV-K export: "1" for the standard rate (19 %), "2" for the reduced rate (7 %).
- Tick Set as default for this country if needed and click Save.
Caution: Which VAT rate applies to which product (food, drinks, takeaway) is a question for your tax adviser. Vectis always uses the tax group stored on the product. There is no automatic switch between eat-in and takeaway.
Caution: Change the rate of an existing tax group only when the law changes – the change applies to every product in that group. A tax group that is still used by products cannot be deleted.
Add a new product
Goal: Create a product with price, VAT rate and category, e.g. "Wiener Schnitzel" for €18.90.
Who can do this: Admin, Manager.
- Open Menu › Catalog Management › Products.
The Products Management page lists all products with Status, Type, Category, Classification,
Tax, Base Price and the number of variants. Each row ends with four icons: pencil (Edit Product), blue
two-sheets icon (Manage Variants), red cutlery icon (Manage Ingredients) and orange circle with a bar
(Deactivate).
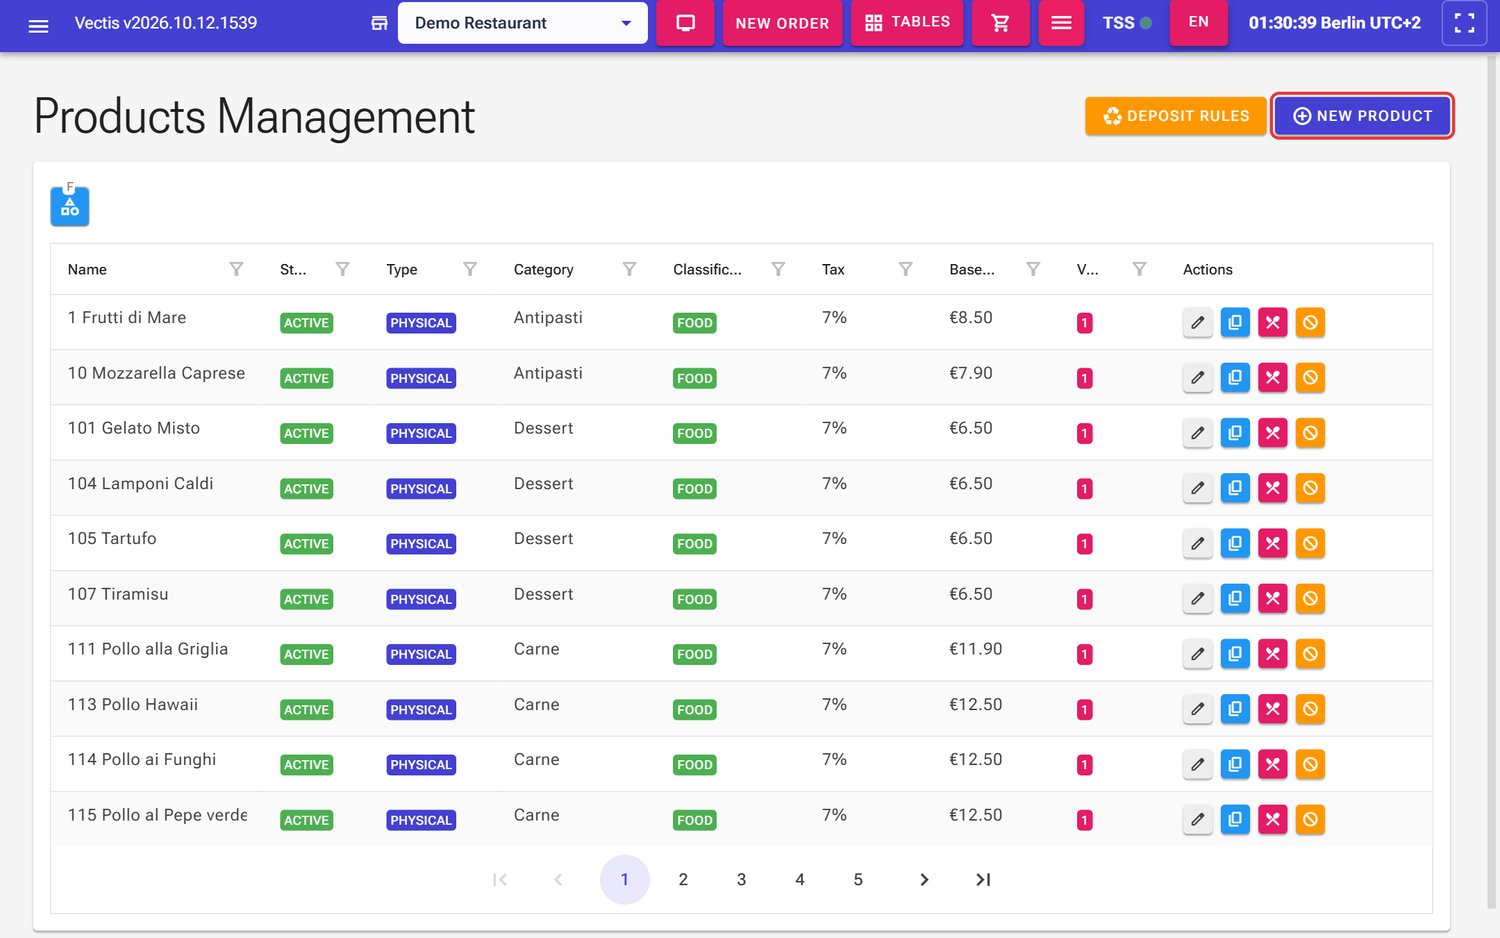 Product list with the "New Product" button (outlined in red)
 - Click New Product.
- Enter the Name (e.g. "Wiener Schnitzel") and, optionally, a Description (e.g. "with potato salad").
- Leave Product Type on Physical unless it is a service.
- Pick the Classification: Food, Alcohol or Non-alcoholic. It decides on which kitchen or bar ticket
the product is printed.
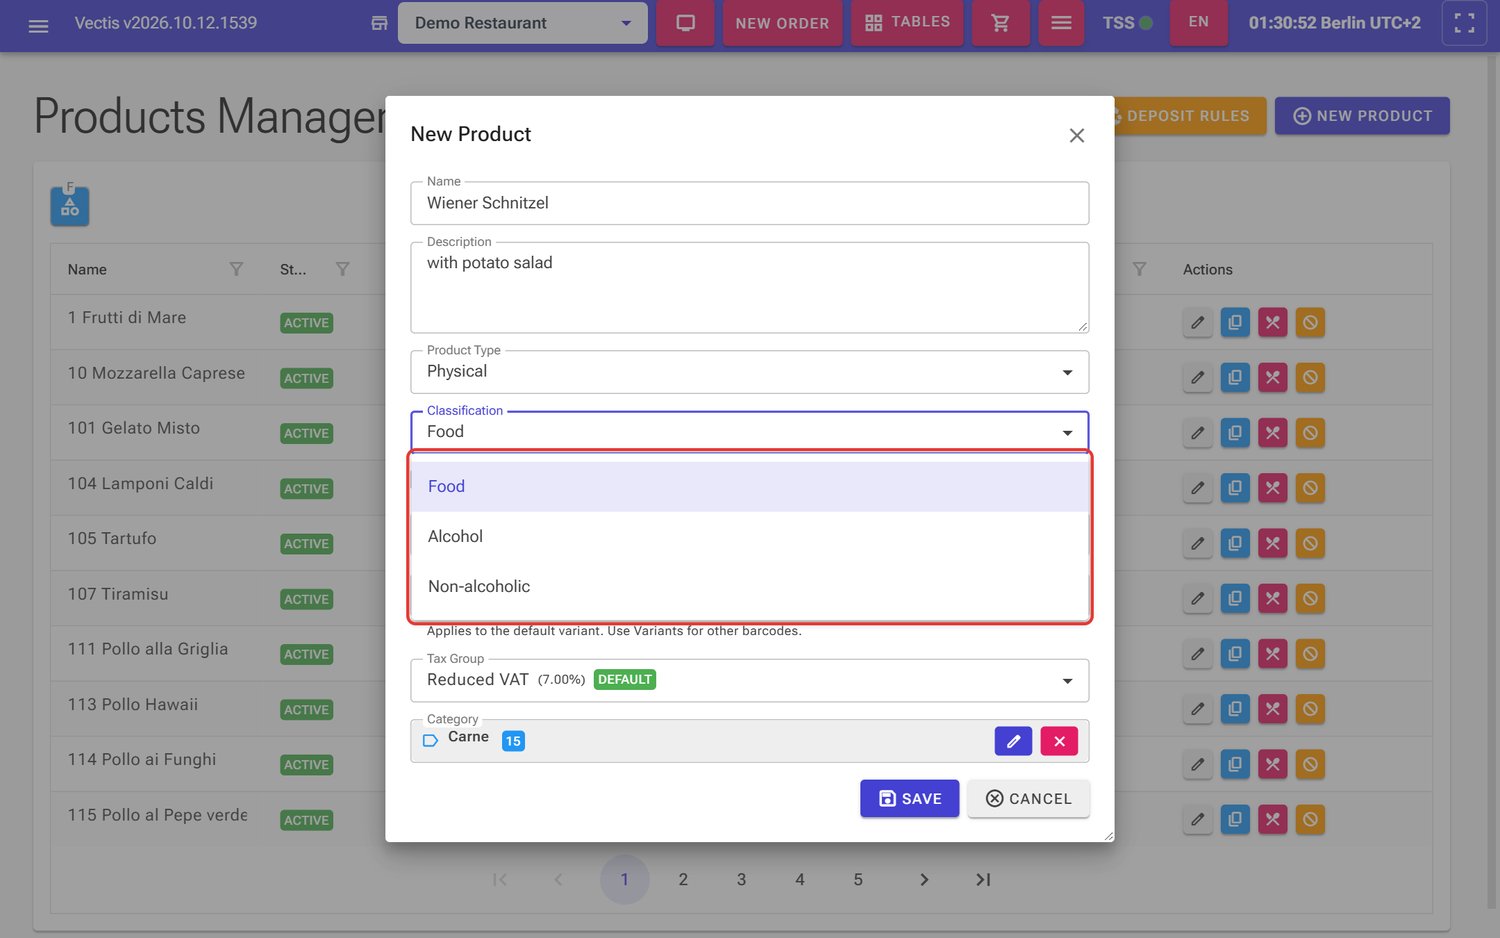 Classification list opened
 - Enter the Default Price including VAT, e.g. 18.90. The price must be greater than 0.
- Optional: enter the Barcode / GTIN (see "Add a barcode").
- Pick the Tax Group. Each entry shows its rate; the default tax group is marked. For the schnitzel the example uses
"Reduced VAT (7.00%)".
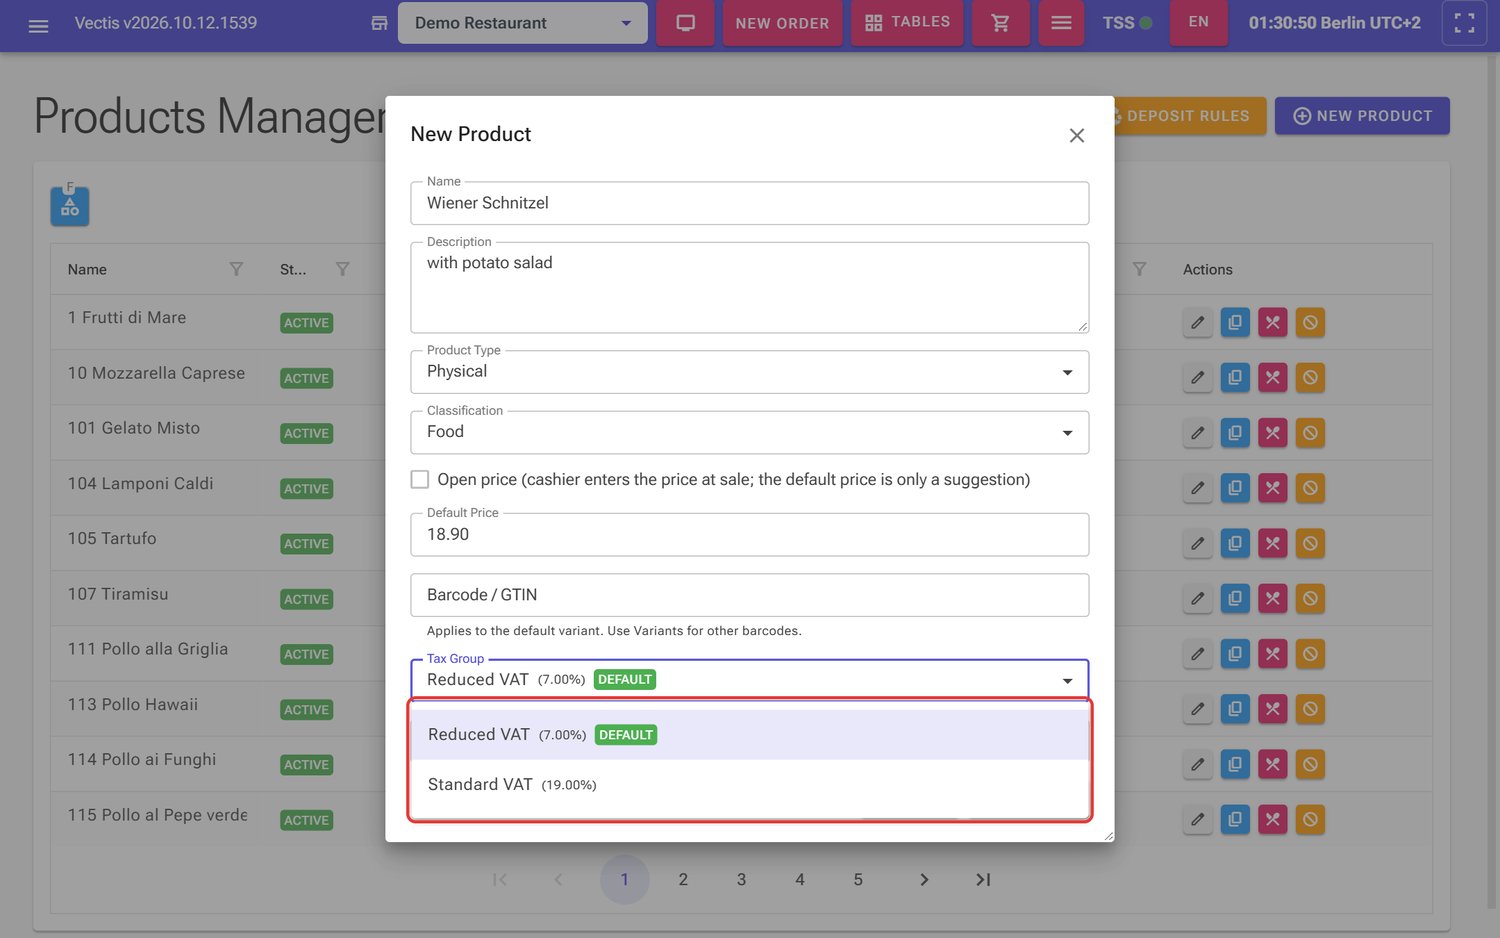 Tax group list opened: Reduced VAT (7.00%) and Standard VAT (19.00%)
 - Under Category click Select Category..., find the category in the Select Category window and click it (in the example "Carne"). The pencil next to it picks a different category, the × clears it.
- Click Save. The message Product created successfully. appears.
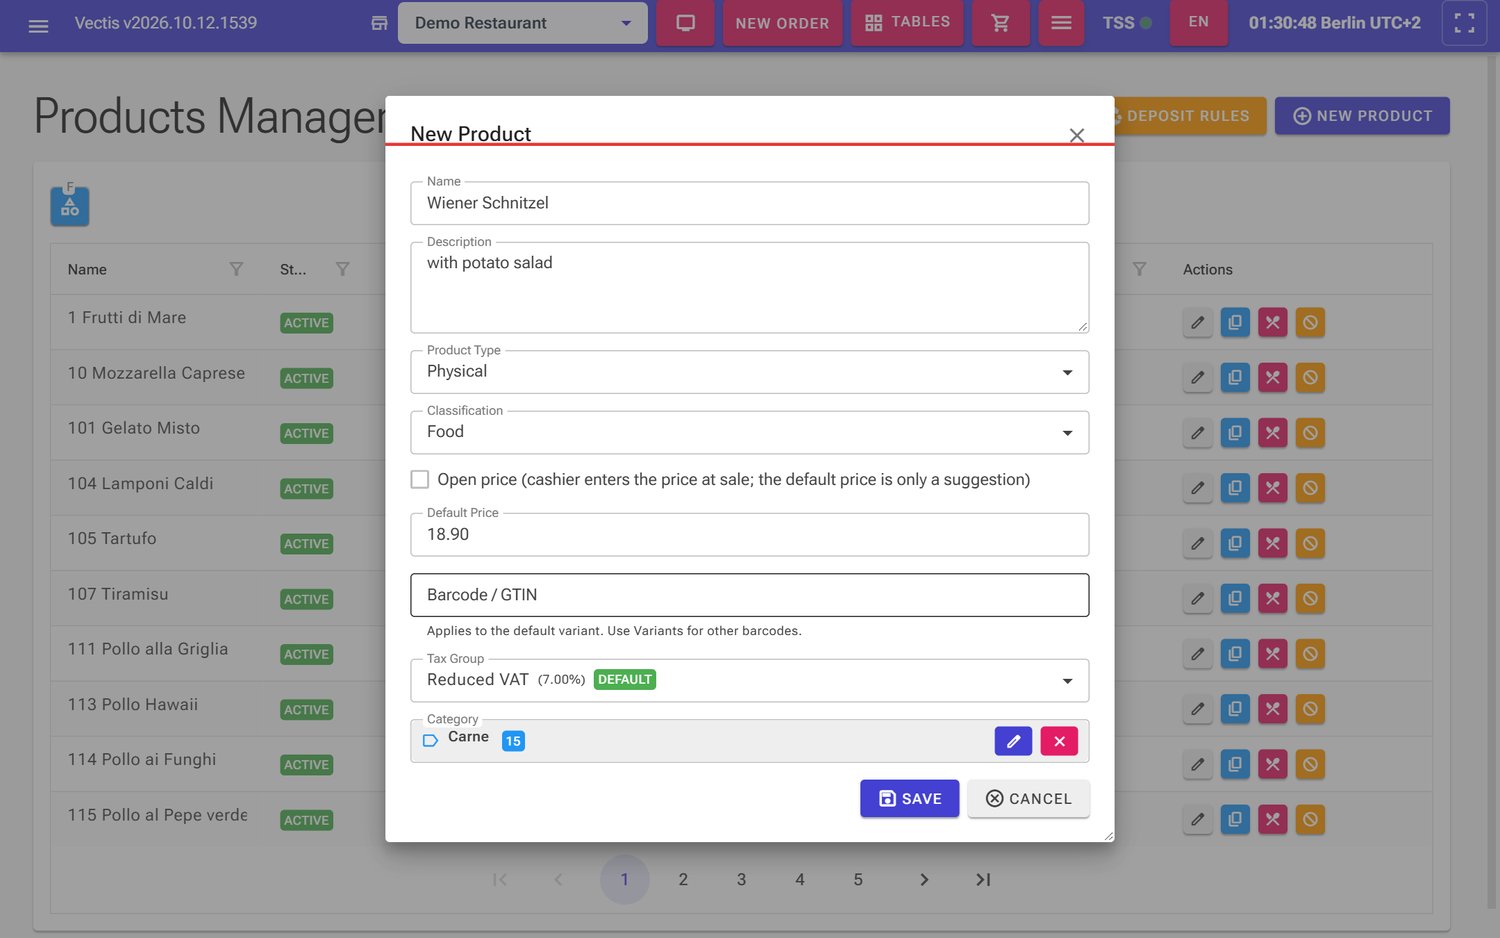 Filled-in "New Product" window for the Wiener Schnitzel
Note: If you see No tax groups configured instead of the tax group list, first create at least one tax group under Menu › Catalog Management › Tax Groups.
Note: When you create a product, Vectis automatically creates a variant called "Standard" that carries the price. You can upload an image only after the product has been saved.
Change a product
Goal: Change the name, category, tax group or classification of a product.
Who can do this: Admin, Manager.
- Open Menu › Catalog Management › Products.
- Narrow the list with the category filter (blue button at the top left above the list, Filter by Category) if needed, or use the filter (funnel) above the Name column. The list shows 10 products per page; page through at the bottom.
- Click the pencil icon in the row (Edit Product).
- Change the fields and click Save. The message Product updated successfully. appears.
Note: In the Edit Product window the Default Price is greyed out, with the hint Edit prices in the Variants dialog – see the next section.
Change a price
Goal: Adjust the selling price of a product.
Who can do this: Admin, Manager.
- Open Menu › Catalog Management › Products.
- Click the blue icon with two sheets in the product row (Manage Variants).
The window shows the product with its Default Price and all its variants. The Wiener Schnitzel has only the
variant "Standard" at €18.90.
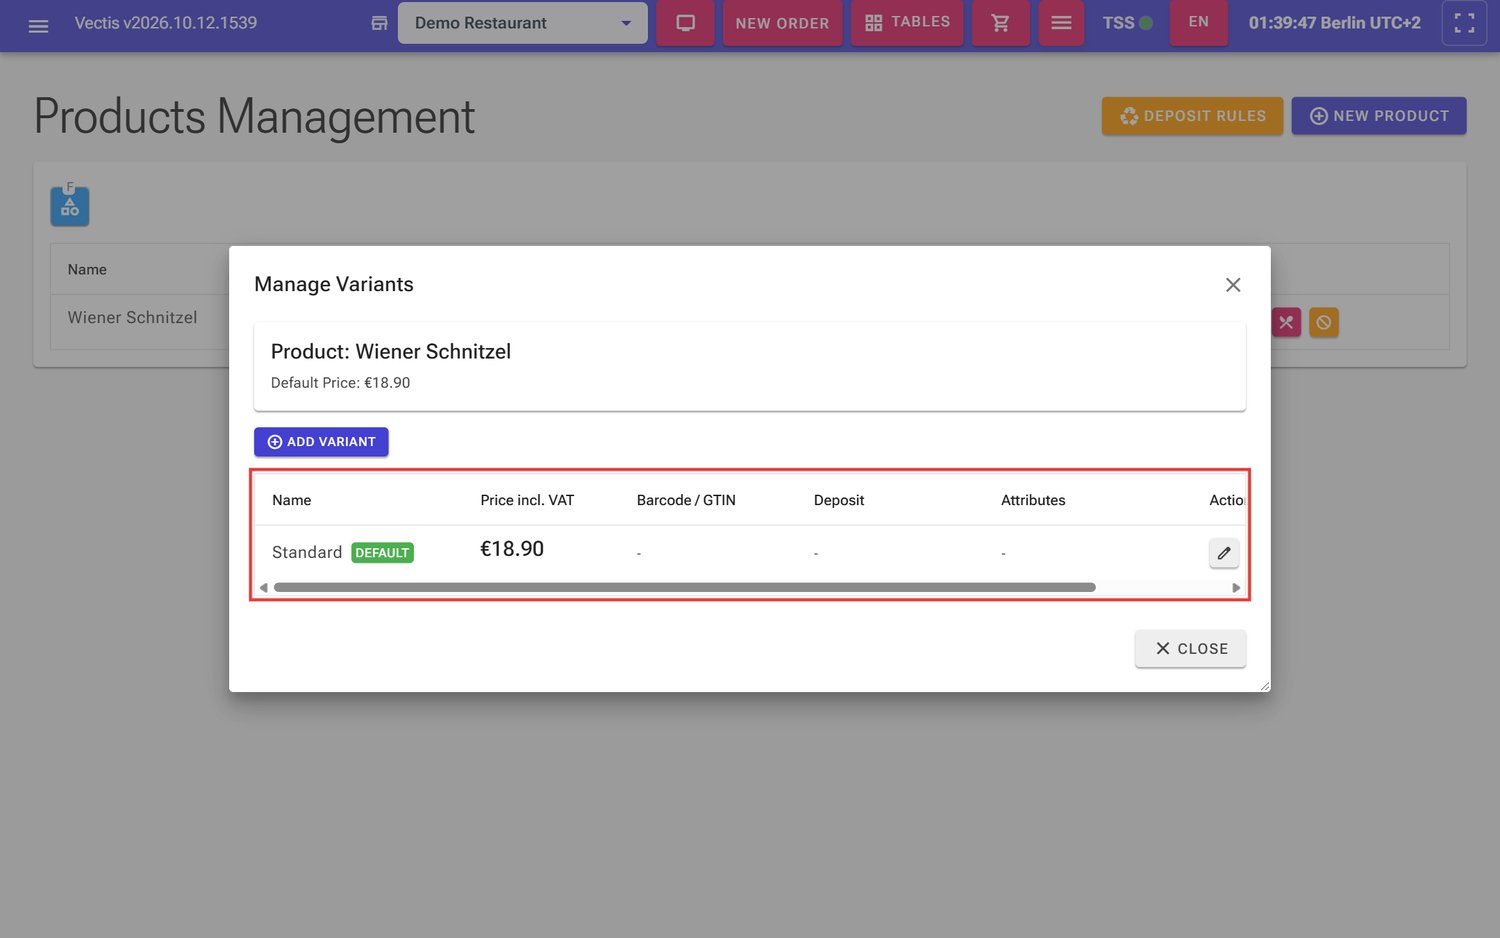 Manage Variants window for the Wiener Schnitzel with the variant "Standard"
 - Click the pencil icon (Edit) in the row of the variant. The Edit Variant window opens.
- Enter the new price under Price incl. VAT (EUR) and click Save.
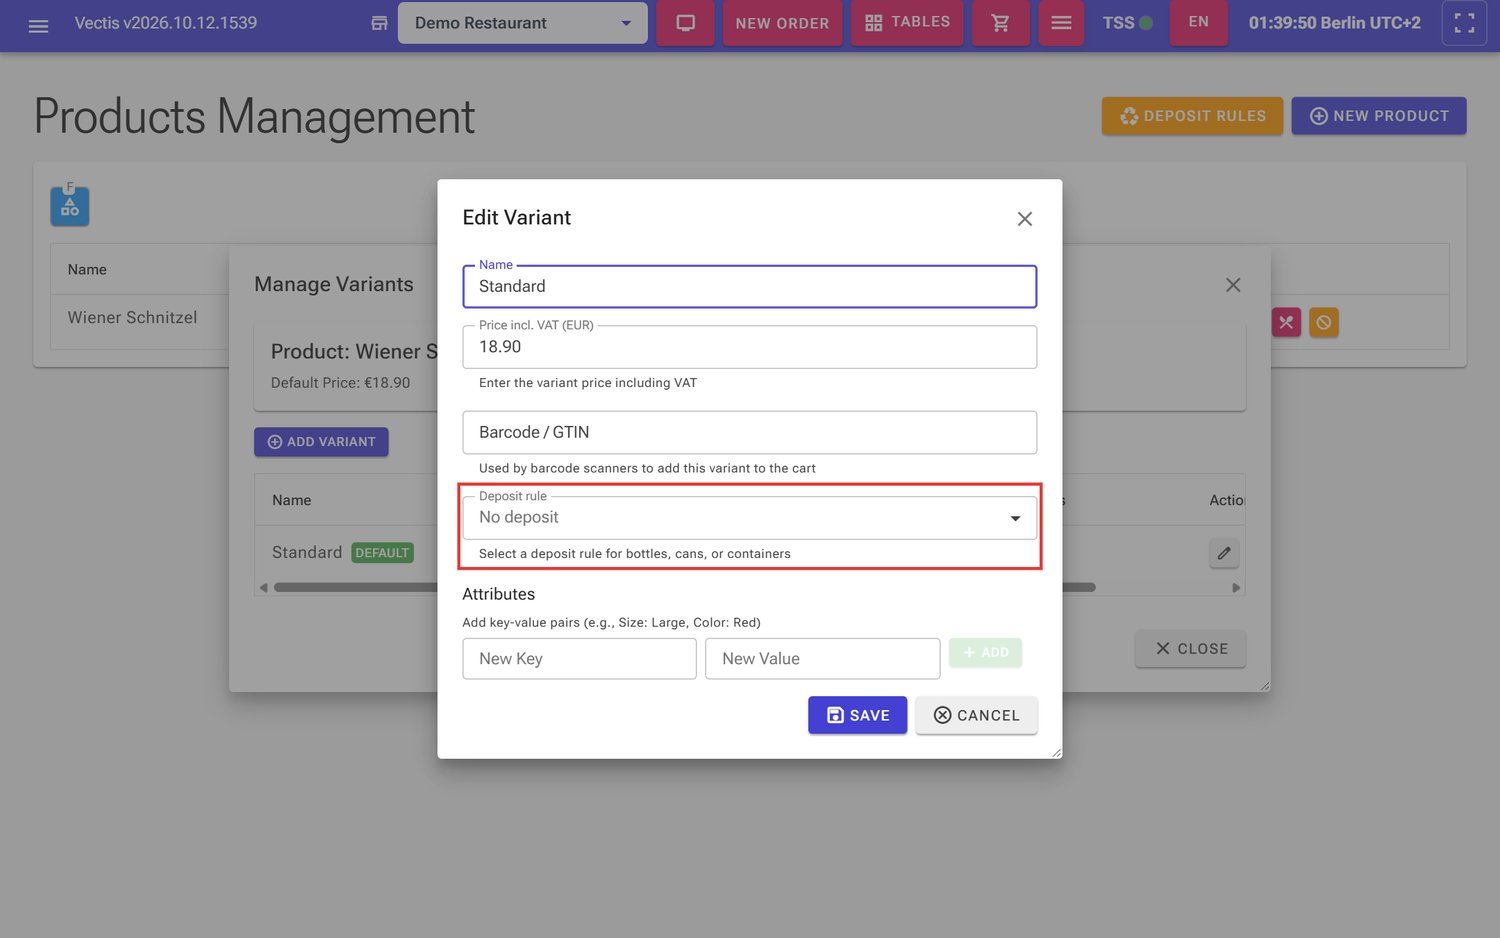 Edit Variant window with price, barcode and deposit rule
 - Close the window with Close.
Note: The price of the variant with the Default badge is the Base Price shown in the product list. Change prices preferably outside opening hours, when no orders are open.
Upload a product image
Goal: Give a product a picture.
Who can do this: Admin, Manager.
- Open Menu › Catalog Management › Products and click the pencil icon of the product (Edit Product).
- The Image field first shows "No image". Click Upload image and pick the file. JPEG, PNG, WebP and SVG up to
10 MB are allowed.
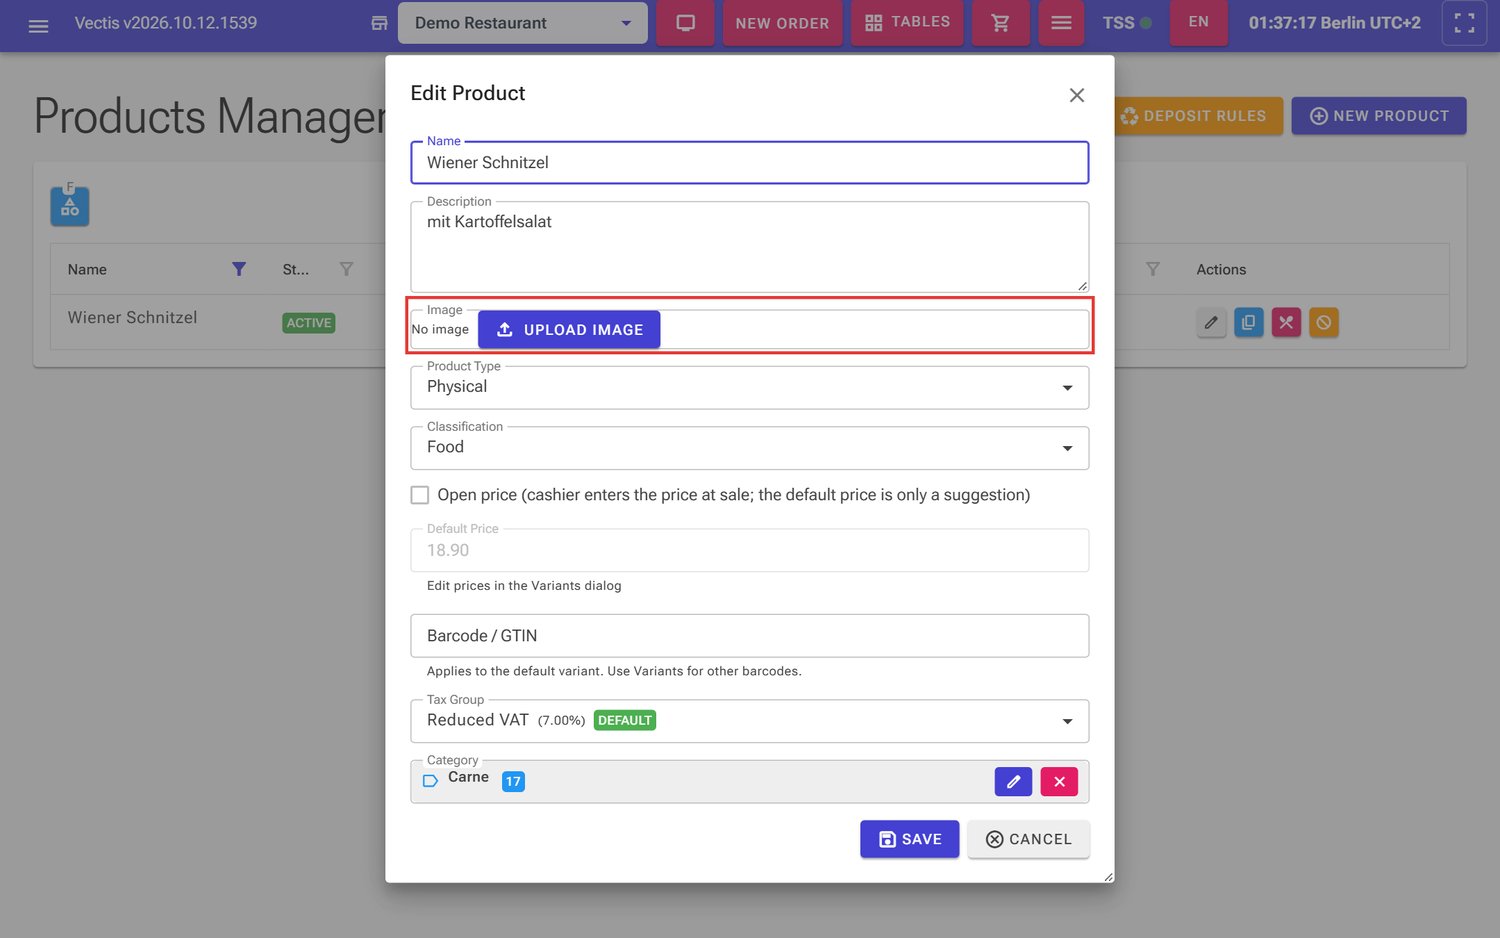 Edit Product window with the Image field and the "Upload image" button (outlined in red)
 - After the upload you see a preview. Replace uploads a different picture, Remove deletes it.
Note: The image is saved immediately when you upload it – even if you then close the window with Cancel. The Image field only appears when editing, not when creating a new product.
Add variants (sizes)
Goal: Offer a product in several sizes or versions with their own price, e.g. cola 0.3 l and 0.5 l.
Who can do this: Admin, Manager.
- Open Menu › Catalog Management › Products.
- Click Manage Variants (blue icon with two sheets) in the product row. The window lists all variants with Price incl. VAT, Barcode / GTIN, Deposit and Attributes (see the picture in "Change a price").
- Click Add Variant.
- Enter a Name (e.g. "0.5 l") and the Price incl. VAT (EUR).
- Optional: Barcode / GTIN, Deposit rule and Attributes (New Key and New Value, e.g. "Size: Large", then Add).
- Click Save.
- To have a different variant pre-selected when ordering, click the star in its row (Set as Default).
- Close the window with Close.
Note: The default variant cannot be deleted. Set another variant as default first. When ordering, staff pick the variant in the order line.
Note: In the demo catalog every product has only the variant "Standard". Drinks in two sizes are set up there as two separate products (e.g. "220 Coca-Cola 0,3 l").
Add a barcode
Goal: Add a product to an order with a barcode scanner.
Who can do this: Admin, Manager.
- Open the product with the pencil icon (Edit Product).
- Enter the code under Barcode / GTIN (up to 128 characters) and click Save. This field applies to the default variant ("Applies to the default variant. Use Variants for other barcodes.").
- For other sizes, enter the barcode in the variant (Manage Variants › pencil icon › Barcode / GTIN).
You set up the scanner itself under Menu › Devices › Barcode Scanners: click Identify & Save and scan any barcode with the scanner you want to add. If this does not work, your Vectis service partner will help you set it up.
Set up deposits (Pfand)
Goal: Charge a deposit automatically for bottles, cans or containers.
Who can do this: Admin, Manager.
- Open Menu › Catalog Management › Products and click the orange Deposit Rules button at the top.
- In the Manage Deposit Rules window click Add Deposit Rule.
- Enter a Name (e.g. "Einwegpfand €0.25") and the Amount.
- Pick the Deposit Type (Einwegpfand = one-way or Mehrwegpfand = reusable), the Container Type (Can, Glass Bottle or Plastic Bottle) and the Country. Leave Active ticked and click Save.
- Assign the rule to the variant: Manage Variants › pencil icon › Deposit rule (initially "No deposit") › Save.
Note: The deposit is shown separately next to the price in the order line. If you delete a deposit rule, products using it no longer have a deposit.
Ingredients and extras
Ingredients are created once in the catalog and then assigned to products. For each product you decide whether an ingredient is a Mandatory Ingredient (always included) or an Optional Ingredient (a paid extra).
Create an ingredient
Goal: Create an ingredient, e.g. "Extra cheese".
Who can do this: Admin, Manager.
- Open Menu › Catalog Management › Ingredients and click New Ingredient.
- On the "Basic Info" tab fill in Name, optionally Description, Price Per Unit and Measurement Unit (e.g. Gram, Piece, Portion).
- Optionally pick a Category (ingredient category) and tick Removable, Allergen or Optional.
- On the "Nutritional Info" tab you can enter nutrition values per 100 g.
- Click Save.
Create ingredient categories (e.g. "Cheese", "Sauces") under Menu › Catalog Management › Ingredient Categories with New Ingredient Category. To stop offering an ingredient for a while, switch it off and on again with the eye icon in the ingredient list.
Note: The demo catalog uses generic extras with the surcharge in the name: "Extra 1,00", "Extra 1,50" … "Extra 3,00" and "Wunsch 0,00" (a request at no charge). This saves maintaining one entry per ingredient; staff write what exactly is meant in the item note.
Assign ingredients to a product
Goal: Define what a dish contains and which extras are offered.
Who can do this: Admin, Manager.
- Open Menu › Catalog Management › Products.
- Click the red cutlery icon in the product row (Manage Ingredients).
The window lists the assigned ingredients with Quantity, Nutrition (per serving) and Flags. In the example
("113 Pollo Hawaii") "Wunsch 0,00" and "Extra 1,00" to "Extra 3,00" are assigned as Optional.
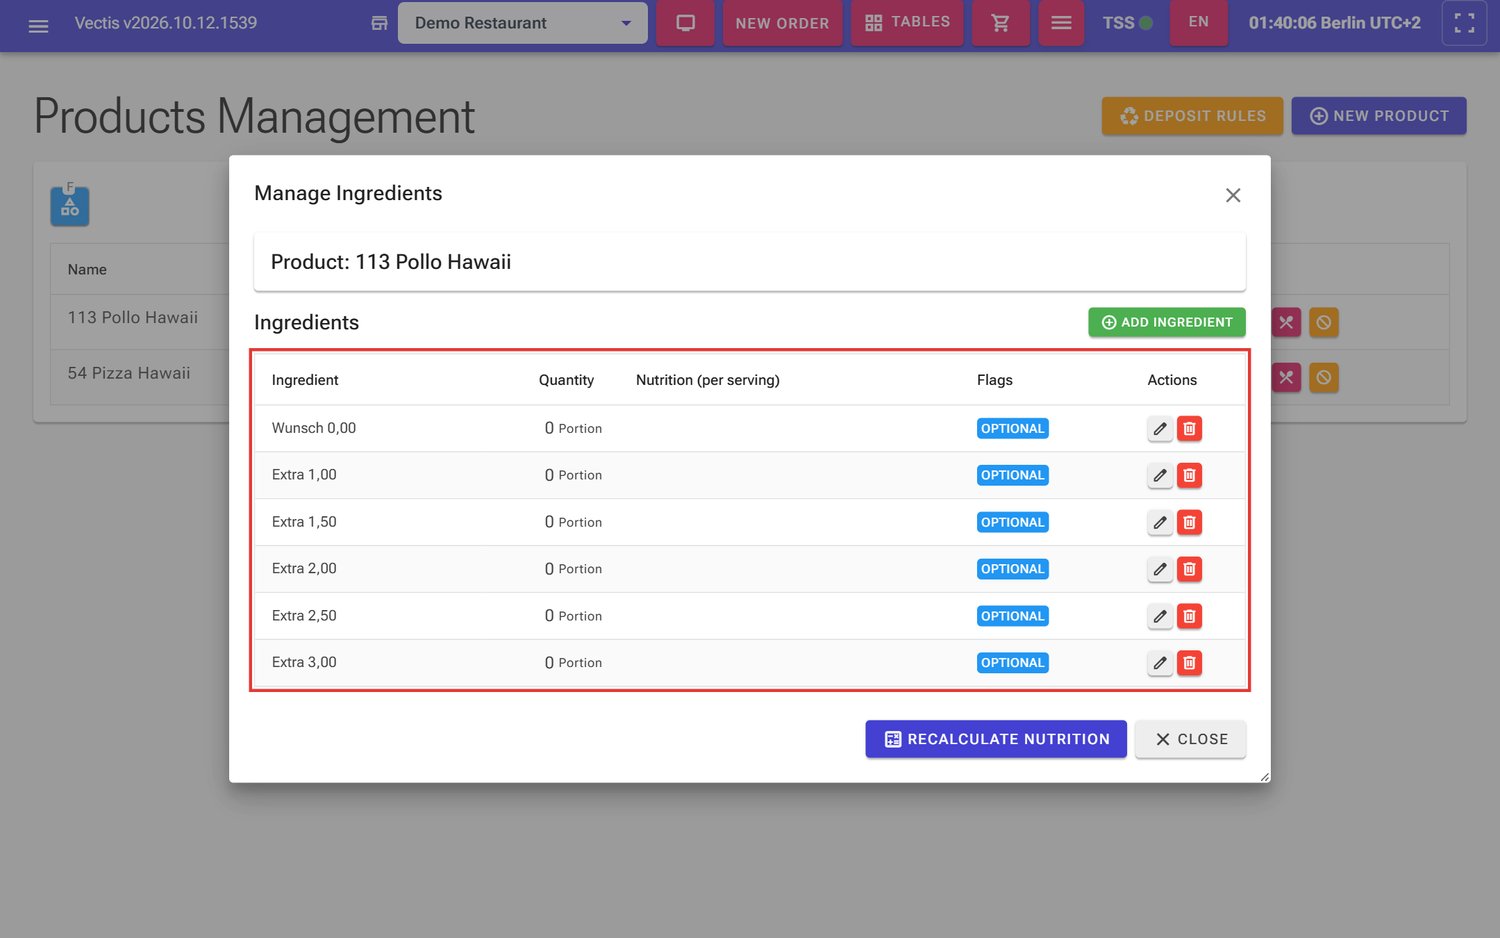 Manage Ingredients window for 113 Pollo Hawaii with optional extras
 - Click Add Ingredient and pick the ingredient under Ingredient. To change an assigned ingredient, click the pencil icon in its row (window Edit Ingredient).
- Choose the Ingredient Type:
- Tab Mandatory Ingredient: enter the Quantity (grams). Mandatory ingredients are always included.
- Tab Optional Ingredient: enter the Portion Size (grams per portion) and the Price Per Portion (the
charge for one extra portion, e.g. €1.50).
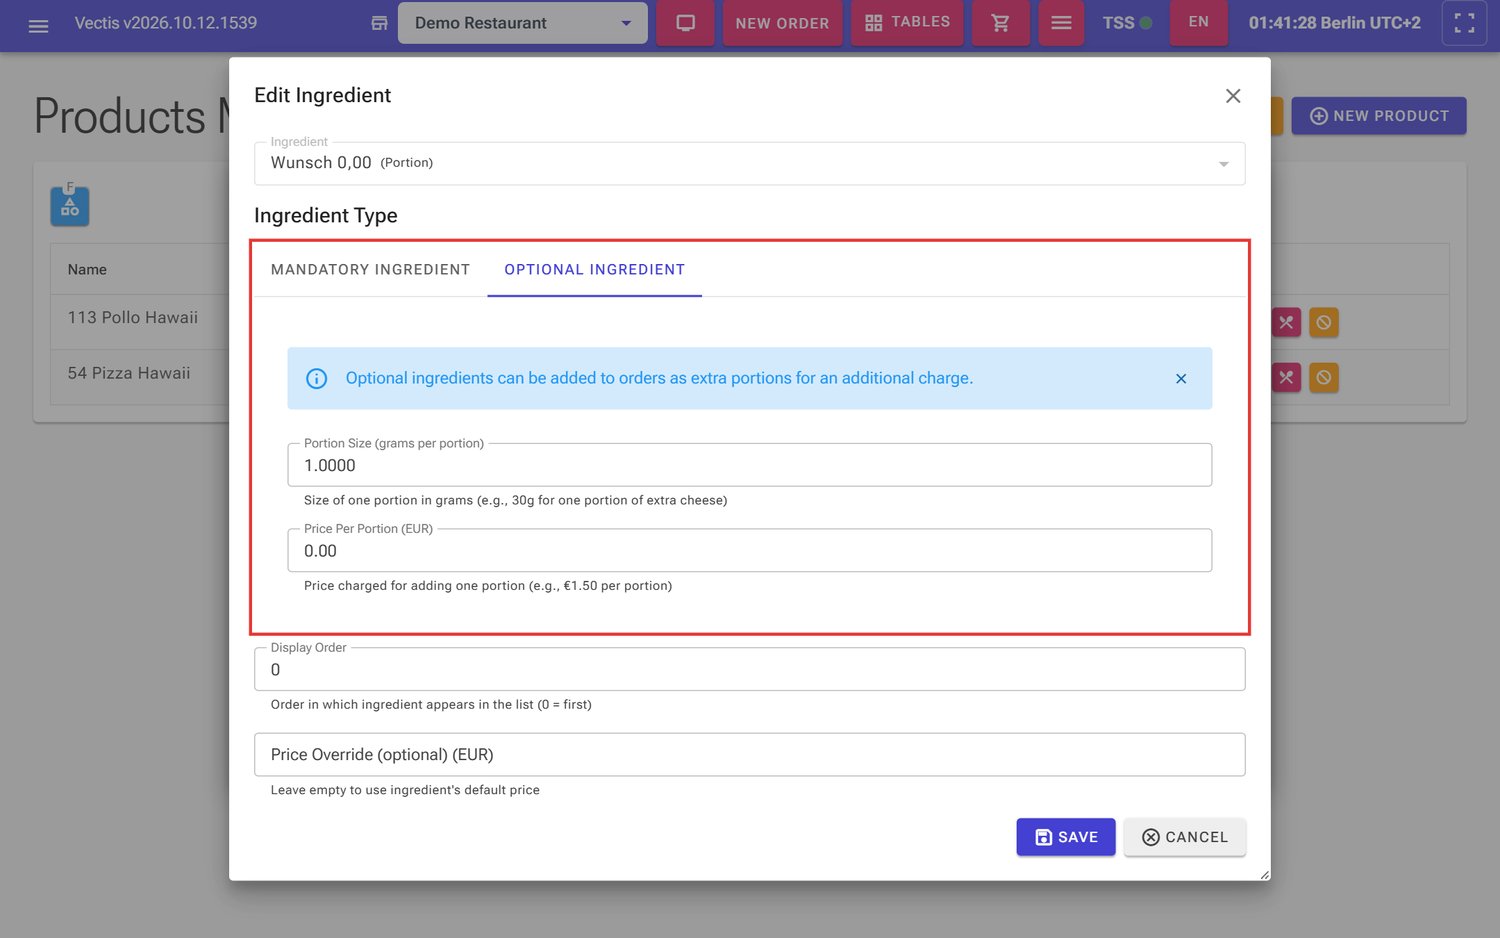 Optional Ingredient tab with portion size and price per portion (outlined in red)
- Optional: Display Order (0 = first) and Price Override (optional). Leave it empty to use the ingredient's default price.
- Click Save and close the Manage Ingredients window with Close.
When ordering, optional ingredients appear in the order line under Show extra ingredients. Staff raise or lower the number of extra portions there; the extra charge is added automatically. Example: "54 Pizza Hawaii" at €4.90 with one "Extra 1,00" costs €5.90.
Note: The order screen has no separate "without …" button to leave out an ingredient. Requests such as "no pineapple" go into the Item note, which is printed on the kitchen ticket.
Create combos
Goal: Create a set menu with a fixed base price and choice groups, e.g. "Lunch menu" = main course + drink.
Who can do this: Admin, Manager.
- Open Menu › Catalog Management › Combos and click New Combo. The "New Combo" page opens.
- In the "General" section fill in Name, optionally Description, the Base price (in EUR, before upcharges)
and the Category (initially "No category"). Leave Active ticked. Hidden in Self-Checkout hides the combo on
self-service kiosks.
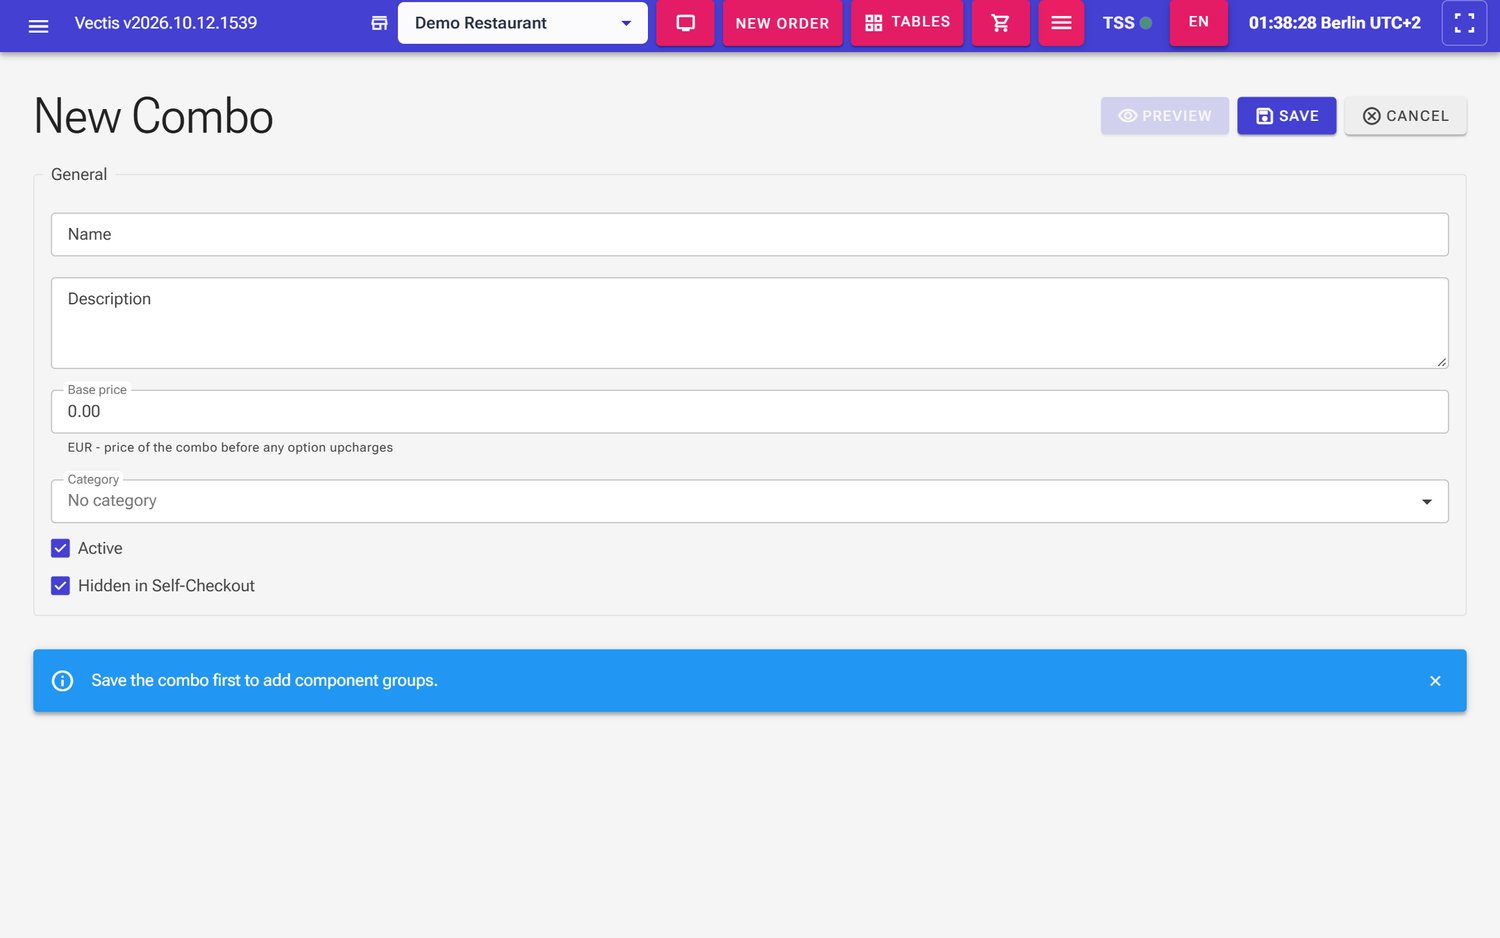 Empty "New Combo" page with the hint "Save the combo first to add component groups."
 - Click Save at the top. Only then does the "Component Groups" section appear – until then the page says "Save the combo first to add component groups." and Preview is grey.
- Click Add group. Enter a Name (e.g. "Main course"), tick Required if the guest must choose here, and set Min selections and Max selections. Click Save.
- In the group click Add option, pick the Product and, if needed, the Variant, and enter an Upcharge (0 = included in the combo price). Click Add.
- Repeat steps 4–5 for every group (e.g. "Drink").
- Preview shows how the choice looks when ordering. Finally click Save.
Note: For VAT, the combo price is split proportionally across the chosen products; each share is taxed at the rate of its product. Make sure the products in a combo have the correct tax group. In the combo list you switch a combo off with the Deactivate icon and on again with Activate.
Open-price products
Goal: Create a product whose price is entered at the time of sale, e.g. "Tagesgericht" (dish of the day) or "Voucher".
Who can do this: Creating: Admin, Manager. Entering the price at sale: everyone who takes orders.
- Create the product as usual (see "Add a new product") and tick Open price (cashier enters the price at sale; the default price is only a suggestion).
- Enter a suggested Default Price (greater than 0), e.g. 9.90 for the "Tagesgericht", and click Save.
- At sale, staff tap the product. It is added to the order at the suggested price; the price is shown in orange.
- Staff tap the price in the order line (Edit price). A number pad opens with the product name as its title.
- They type the price and confirm with OK. Digits count as whole euros until the decimal key is tapped: for €12.50
tap 1, 2, decimal key, 5, 0. (Without the decimal key, 1, 2, 5, 0 would give €1250.00.) Cancel
keeps the old price.
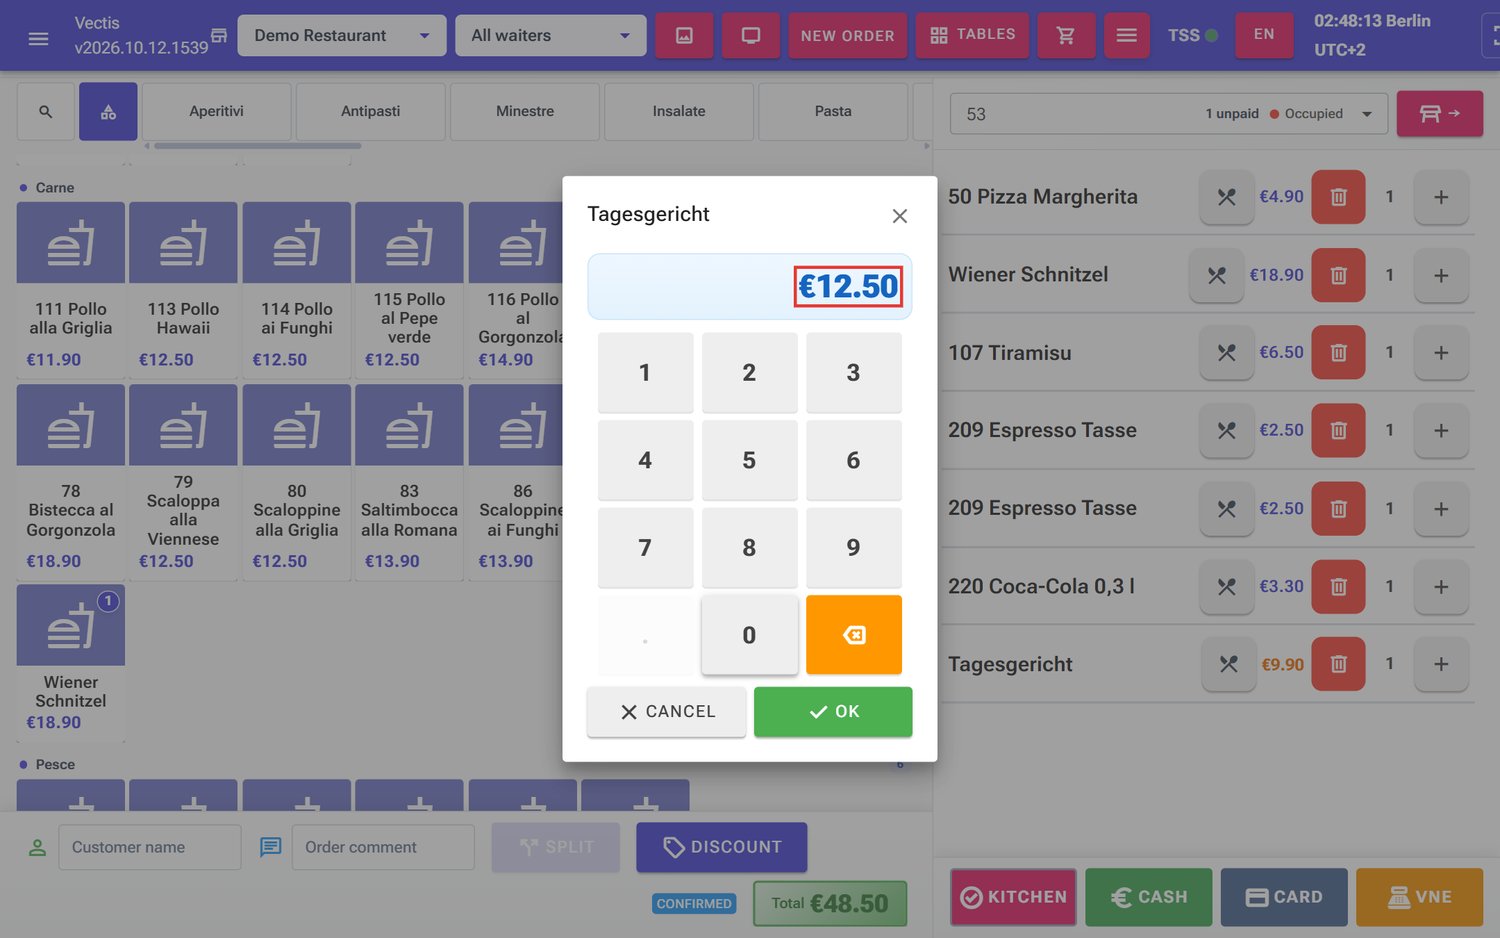 Number pad "Tagesgericht" with the entered price €12.50
Note: Open-price products have no variants and no extras at sale. Once a payment has been recorded on the order, the price can no longer be changed.
Caution: Check the amount in the display before you tap OK – a forgotten decimal key quickly gives a price a hundred times too high.
Deactivate a product (instead of deleting it)
Goal: Take a product off sale, e.g. a seasonal dish.
Who can do this: Admin, Manager.
- Open Menu › Catalog Management › Products.
- Click the orange icon (circle with a bar, Deactivate) in the product row.
- Confirm Are you sure you want to deactivate this product? with Yes. No leaves everything as it is.
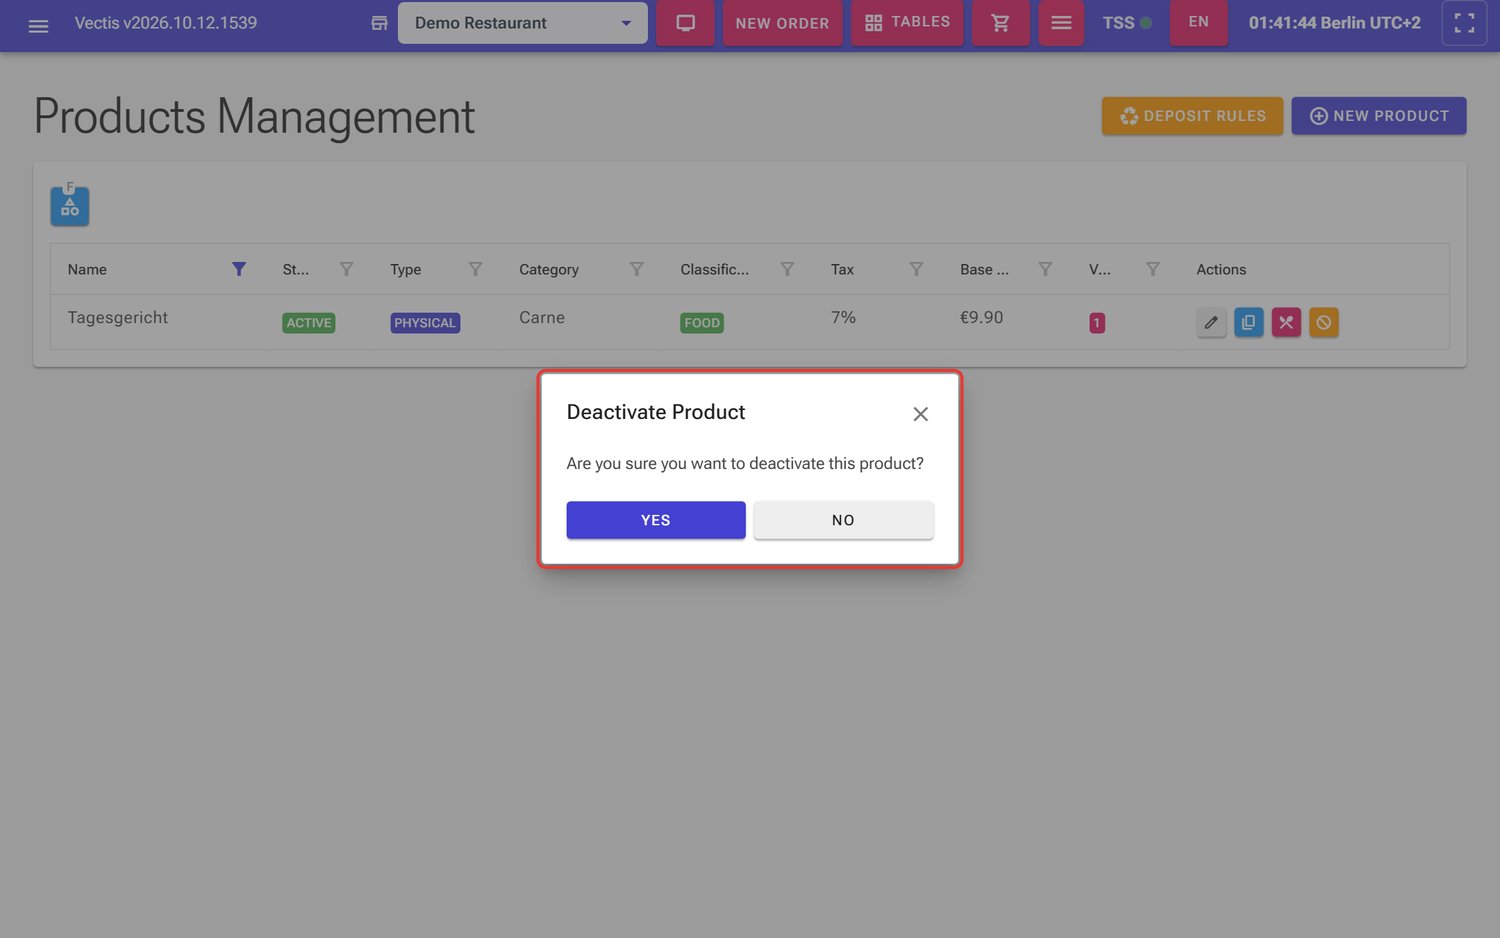 Deactivate Product confirmation for the Tagesgericht with Yes and No
 - The product now shows the status Inactive and can no longer be sold.
- To offer it again, click the green tick icon (Activate).
Caution: Products deliberately cannot be deleted at the till. A product that has ever appeared on a receipt must stay traceable for later checks (e.g. a tax inspection or the DSFinV-K export). Deactivate it instead of deleting it.
Tags
Goal: Create attributes such as "vegan" or "spicy" in the catalog.
Who can do this: Admin, Manager.
- Open Menu › Catalog Management › Tags and click New Tag.
- Enter Name, Type (e.g. Dietary, Allergen, Feature), Color and optionally Icon Name, then click Save.
Note: The product window at the till has no field for tags. If you need tags on products, contact your Vectis service partner.
Import a catalog bundle
Goal: Know what the Catalog Bundle Import page is for.
Who can do this: Admin and Manager can see the page. Your Vectis service partner does the import and any reset.
Under Menu › Catalog Management › Bundle Import a ready-made catalog (bundle file) is loaded onto the till, e.g. during first setup. Your Vectis service partner picks the bundle file in the Or upload file field.
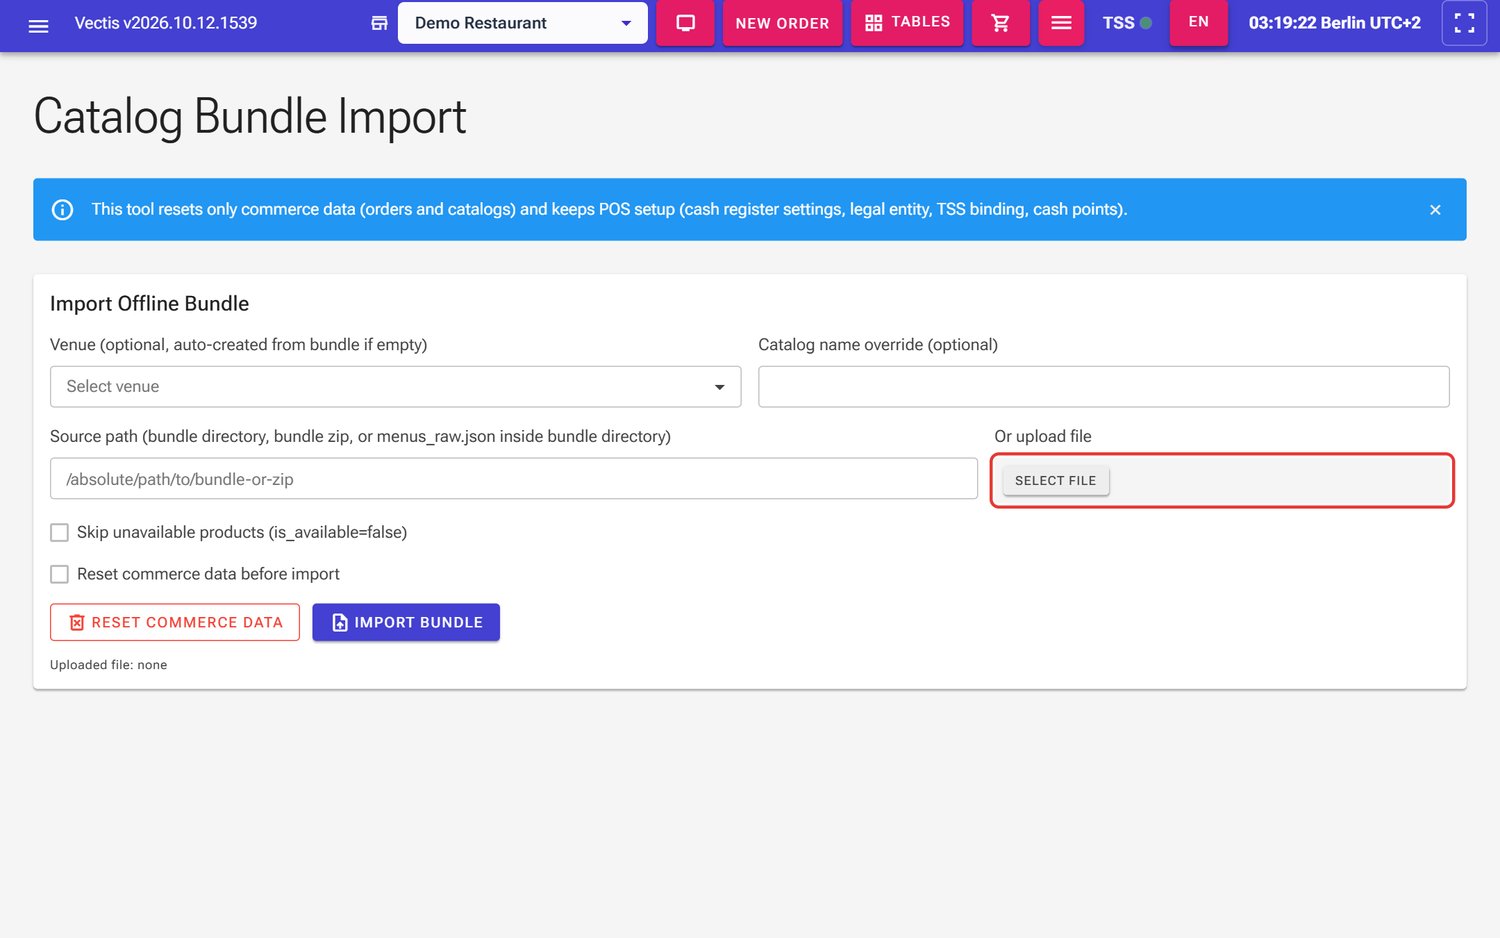 Catalog Bundle Import page; the "Or upload file" field for the bundle file is outlined in red
During the import, products with the same name are overwritten with the data from the bundle (e.g. price, category, tax group). Products that are not in the bundle stay unchanged.
Caution: The Reset Commerce Data button and the Reset commerce data before import tick permanently delete all orders and all catalogs/products. Orders are part of the till records you must keep. Never tap this button or this tick yourself. Your Vectis service partner does the import and any reset.
Frequently asked questions
Q: Why can't I delete a product? Products that have appeared on receipts must stay traceable for the tax authorities. Deactivate the product instead; it will no longer be sold.
Q: Where do I change the price? The "Default Price" field is grey. Via Manage Variants › pencil icon of the variant › Price incl. VAT (EUR).
Q: I can't see Catalog Management in the menu. It is only visible for the Admin and Manager roles. Log in with a suitable user.
Q: The new product window says "No tax groups configured". First create at least one tax group under Menu › Catalog Management › Tax Groups.
Q: The category cannot be deleted. It still contains products or subcategories. Move them first.
Q: Are there different VAT rates for eat-in and takeaway? No. The product's tax group always applies. Check the correct rates with your tax adviser.
Q: Why are the tax groups called "Reduced VAT" and "Standard VAT"? That is how they were named at setup. What matters is the rate and the tax key (7 % = 2, 19 % = 1). You can rename them with the pencil icon.
Q: What is the "Classification" (Food / Alcohol / Non-alcoholic) for? It decides on which kitchen or bar ticket the product is printed.
Q: How do I sell a drink in two sizes? Add a second variant with its own name and price (see "Add variants (sizes)") – or, as in the demo catalog, use two separate products.
Q: Why is there no image field when I create a product? You can upload an image only after the product has been saved. Open it again with the pencil icon.
Q: Can staff choose extras or a size for an open-price product? No. Open-price products have no variants and no extras at sale.
Q: I typed an open price and got €1250.00 instead of €12.50. The decimal key was missed. Tap the price again and enter 1, 2, decimal key, 5, 0.
Q: How do I enter "no pineapple"? Use the Item note on the order line. It is printed on the kitchen ticket.
Q: May I use "Reset Commerce Data" to rebuild the catalog? No – it also deletes all orders. Your Vectis service partner does the import and any reset.
Q: My catalog changes were overwritten. If your catalog is maintained centrally by your Vectis service partner or re-imported from a bundle, changes made at the till can be overwritten. Agree with your Vectis service partner where changes are made.