05 Orders
This chapter shows how to take an order at the till, send it to the kitchen, change it, move it to another table and split the bill. You also get to know the order list and its filters, plus a short overview of the kitchen display, the pickup display and the customer display. How to pay an order is described in chapter 06.
The example is an order at table 43: «Wiener Schnitzel», «242 Radeberger Pils vom Fass 0,4 l», «54 Pizza Hawaii» with an extra and the wish «no pineapple», and «230 Apple Spritzer 0,3 l».
The order list
Goal: See all orders of a period and continue working from there.
Who can do this: Admin, Manager, Cashier, Waiter
- Open Menu › Order Management › Orders, or click the cart icon (Orders) in the header bar.
- For each order the table shows the daily number (#), Origin (for example Cashier), Status, Total, an icon for the payment method (banknote = cash, card = card payment), Returned amount, Created, Items (sold / returned, for example «5/1») and Returned (No or Partially). The newest orders are at the top.
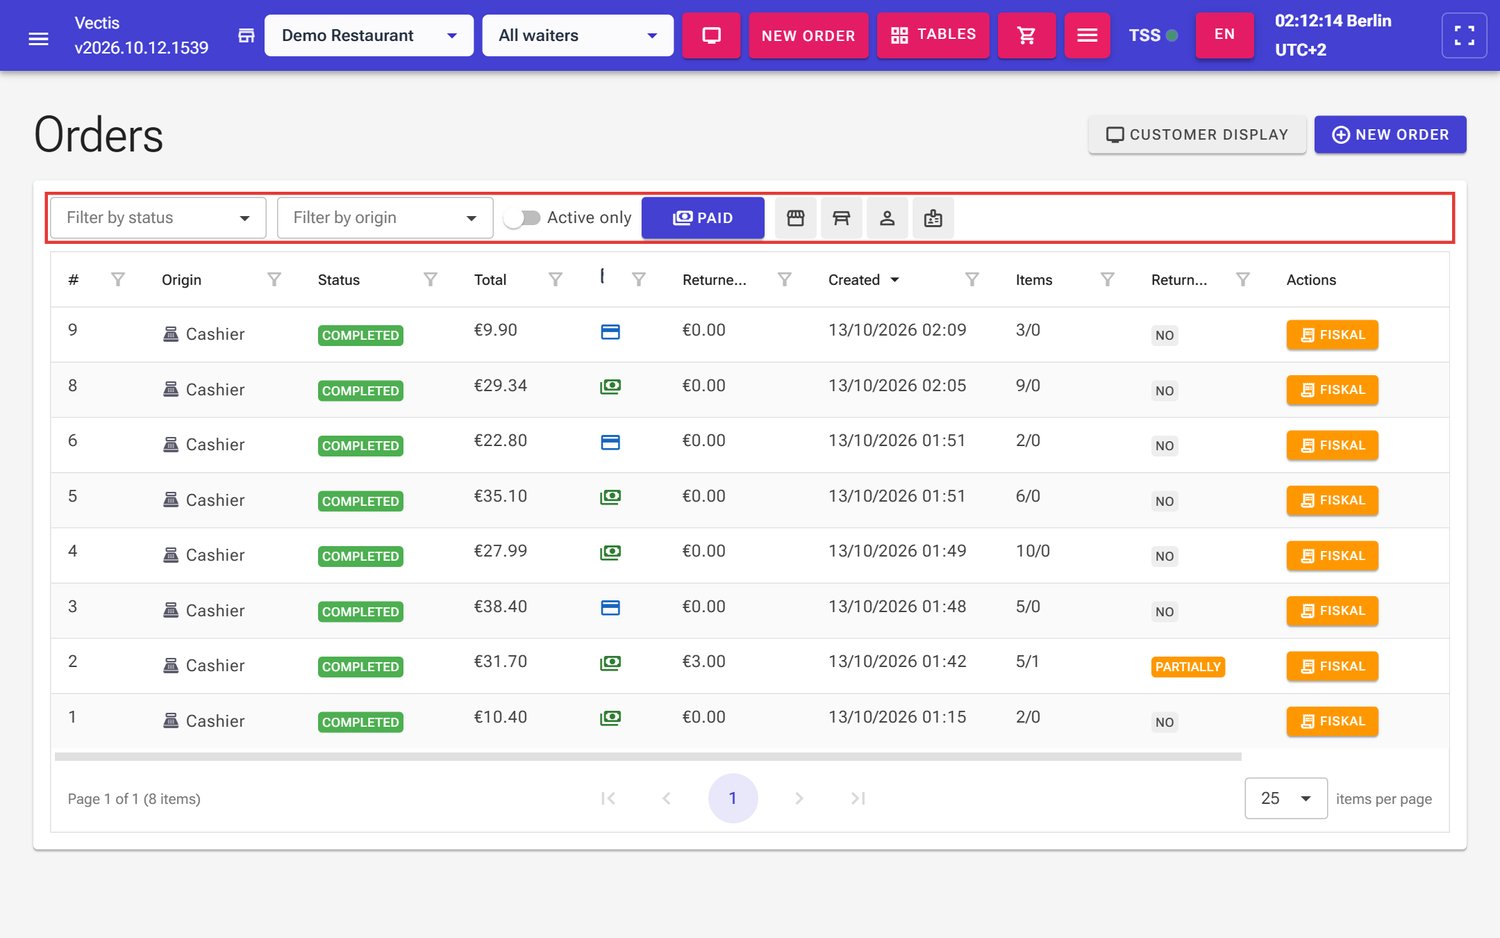 Order list with the filter bar (outlined in red)
 - Filter if needed:
- Filter by status and Filter by origin (for example Cashier or Self-checkout).
- Active only hides completed and cancelled orders.
- The payment filter switches on each click between Paid, Unpaid and All. When you first open the page it is set to Paid.
- The four icons next to it (venue, table, person, badge) show or hide the columns venue, place, customer and employee. They are hidden at first.
- The Actions column shows, depending on the state:
- Edit: opens the order screen (unpaid orders only).
- Confirm: sends an order that has not been sent yet (draft) to the kitchen.
- Pay: opens the payment (chapter 06).
- Fiskal: opens the receipt of a paid order (chapter 06).
- Complete: marks a paid order as handed over / done.
- Red cross icon: cancels an unpaid order.
- Split: splits the bill (see below).
Note: At the top right of the page you also find Customer Display and New Order.
Choose a period (Admin and Manager only)
Goal: View orders from earlier days.
Who can do this: Admin, Manager
- At the top choose one of the periods Today, 7d, 30d, This month or All time.
- Or set your own period with the two date fields next to them (from – to).
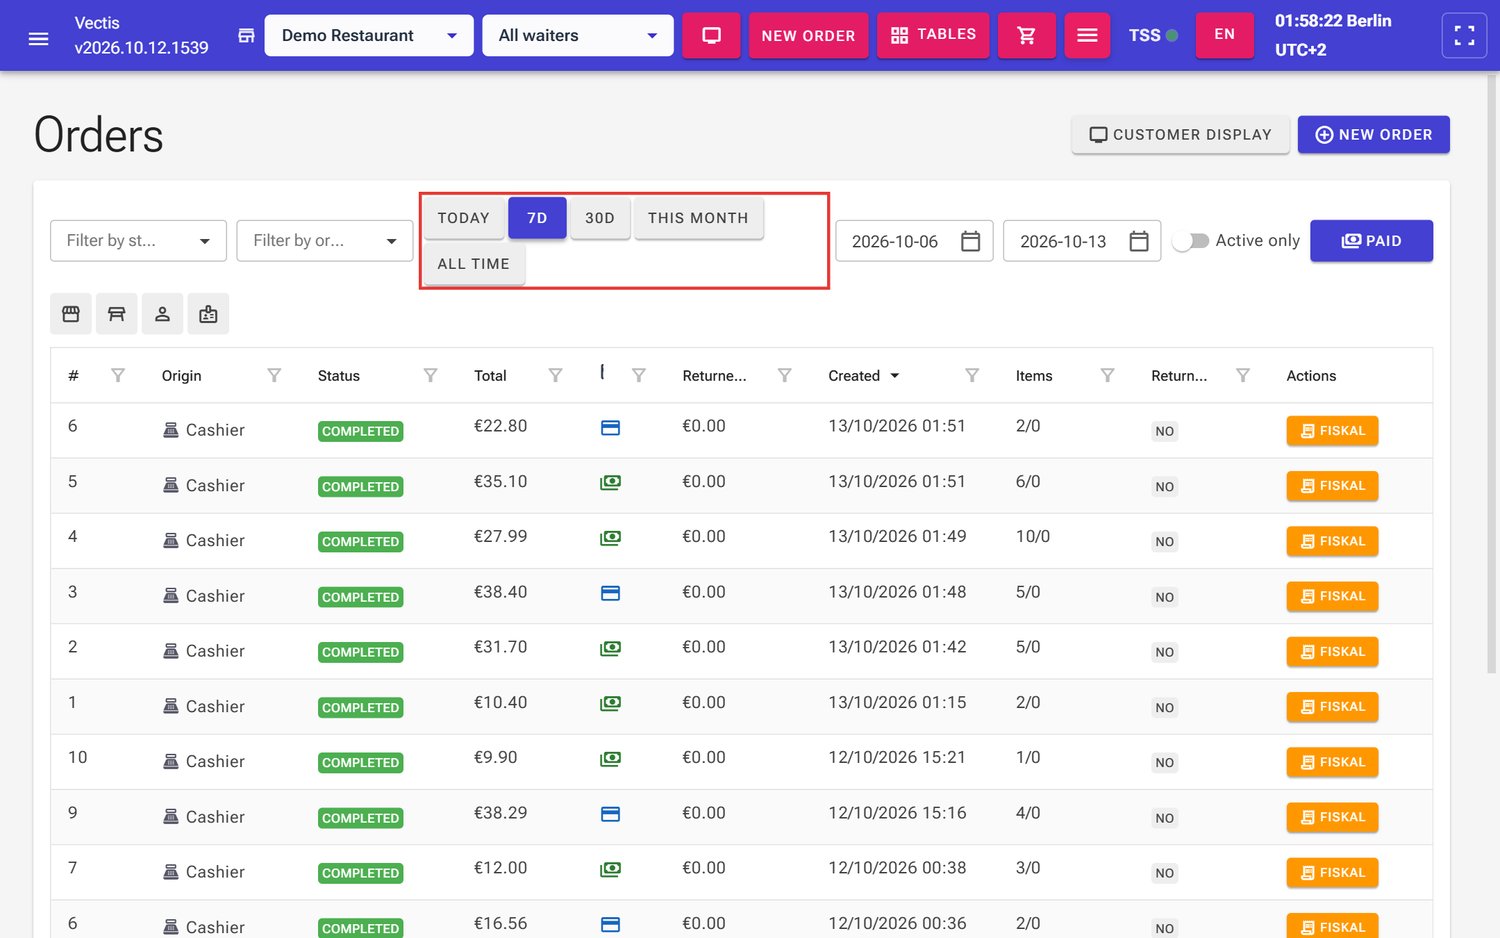 Period buttons for Admin and Manager (outlined in red)
Note: Cashiers and waiters do not see the period buttons. They always see only the current business day, that is everything since the last Z closing. Tables that stayed open across the Z closing remain visible.
Only my orders (waiters)
Goal: As a waiter, see only your own orders.
Who can do this: Waiter
- Tap Me in the order list. The list shows only orders assigned to you.
- All waiters shows all orders of the business day again.
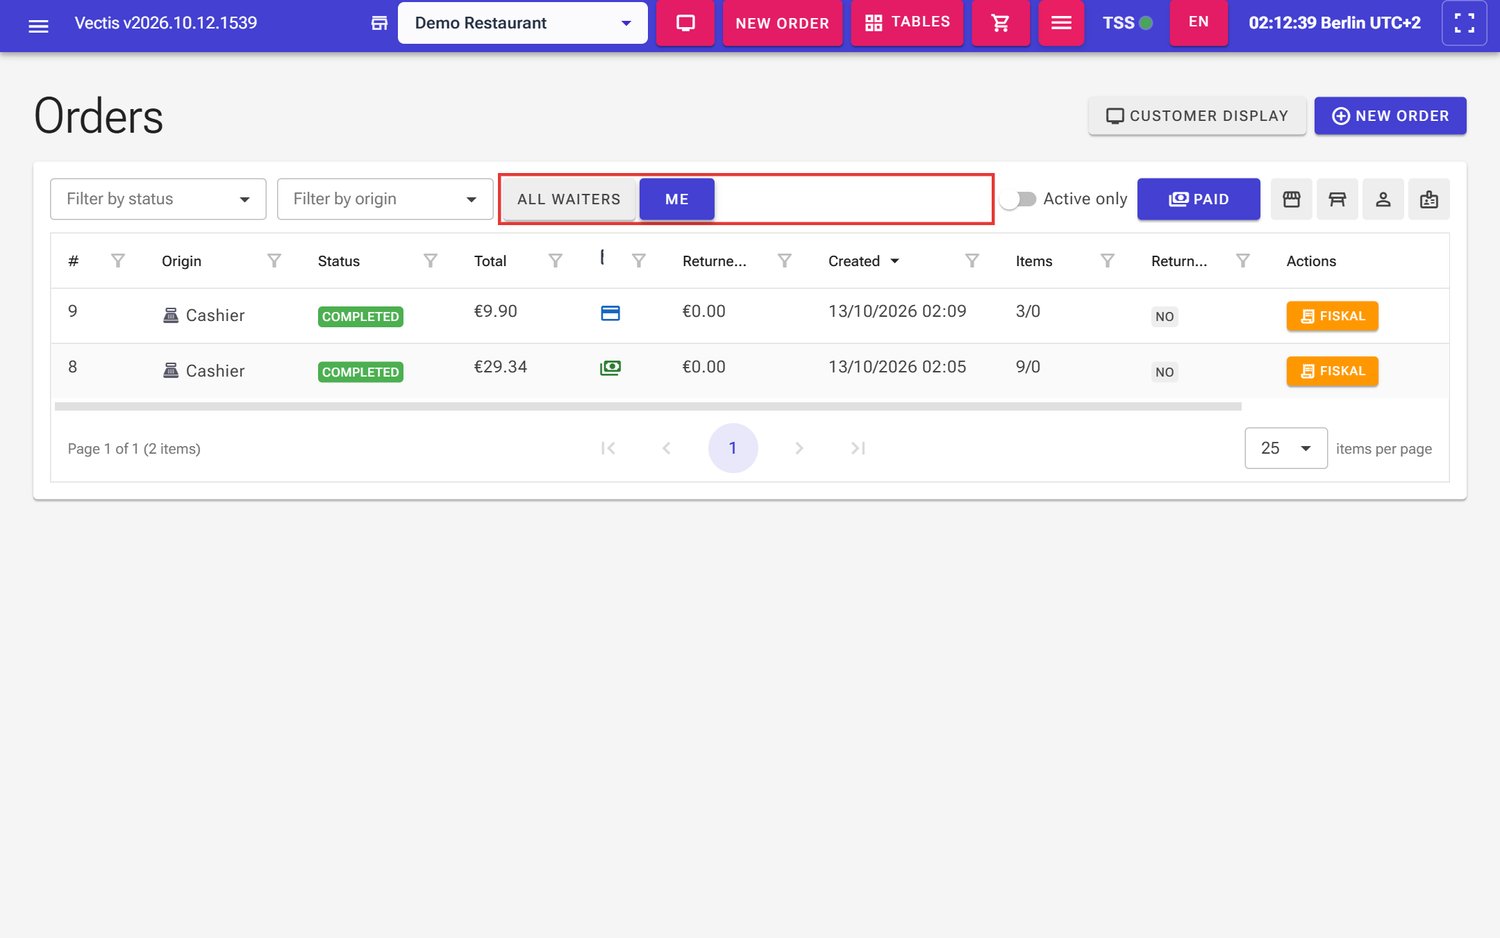 Waiter filter «All waiters» / «Me» (outlined in red)
Start a new order
Goal: Create an order for a table or for takeaway.
Who can do this: Admin, Manager, Cashier, Waiter
There are three ways:
- From the floor plan (recommended): tap the table, then New order (chapter 04). The table is already filled in.
- From the header bar: New Order (on narrow screens New). If there is already an empty order that has not been sent, Vectis opens it instead of creating a second one.
- From the order list: New Order. If you have several venues and none is selected, the New Order dialog first asks for the Venue; confirm with Create order.
- The order screen opens: the product catalog on the left, the cart on the right («Your cart is empty»), and at the bottom the fields Customer name and Order comment and the Total.
- Check the place at the top of the cart. If none is selected, the field has a red border and shows Select table/counter *. Click it and choose a table or a takeout counter. Each place shows its status (for example Free or «1 unpaid · Occupied»).
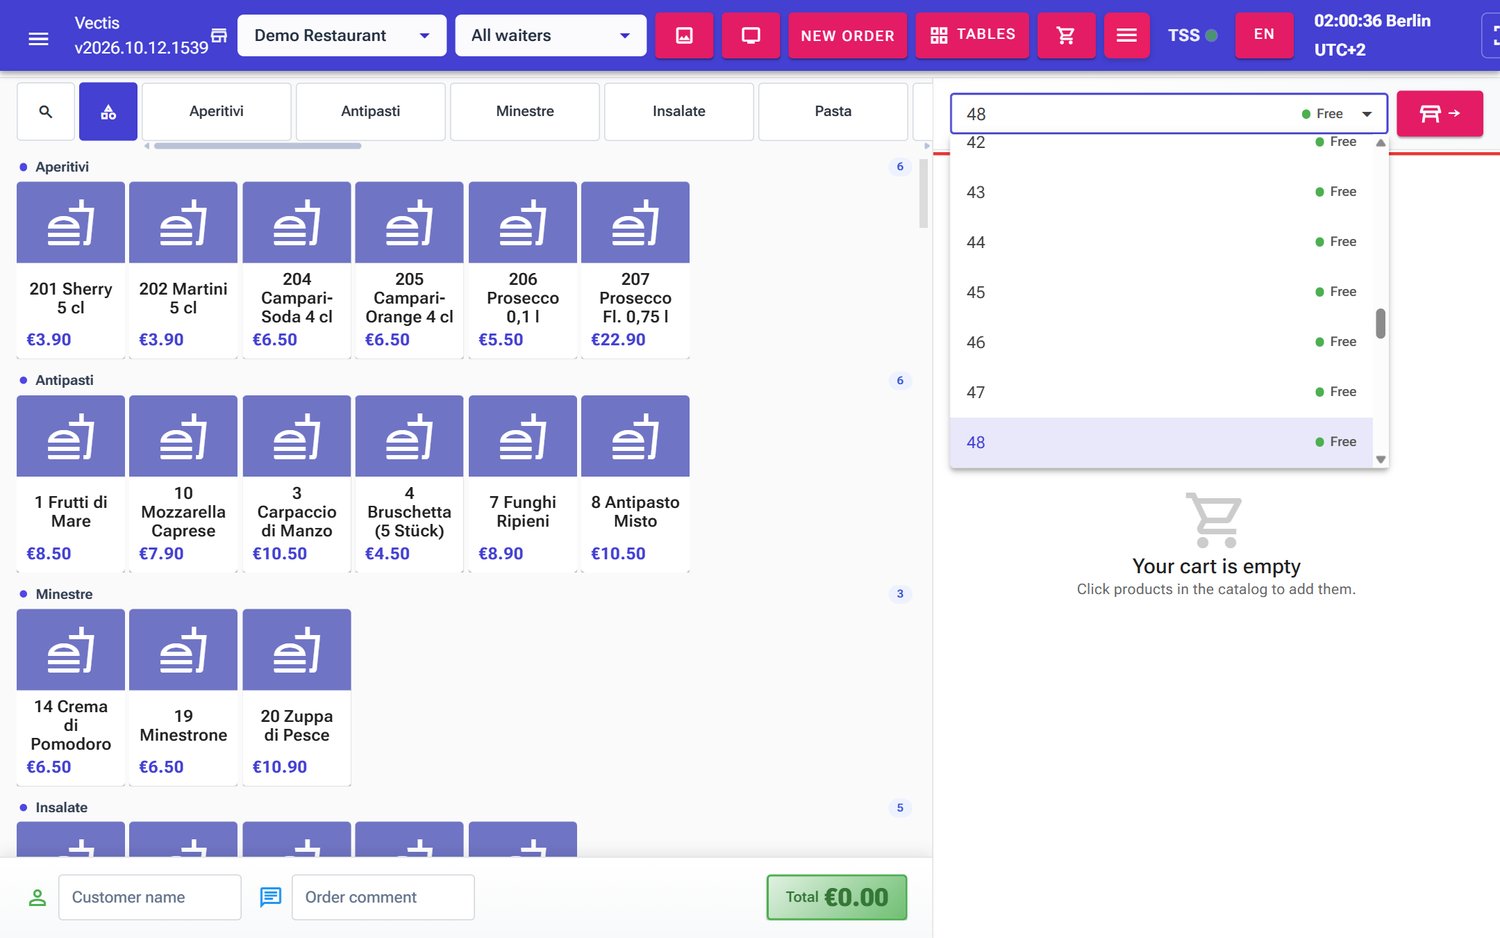 Order screen with the place list open, table 47 selected
Note: Without a place you can neither send the order to the kitchen nor pay it. For takeaway orders choose a takeout counter (place type «TakeoutCounter», see chapter 04).
Note: Above the catalog, the orders of this venue that have not been sent yet are shown as tabs (number and time). Click a tab to switch to that order.
Add products
Goal: Put dishes and drinks into the cart.
Who can do this: Admin, Manager, Cashier, Waiter
- Choose a category at the top of the catalog (for example «Aperitivi», «Antipasti», «Pasta»), or tap the icon to the left of them for all categories. With the magnifier (Search) you search by name: type the term on the on-screen keyboard, for example «Schnitzel», and confirm with OK.
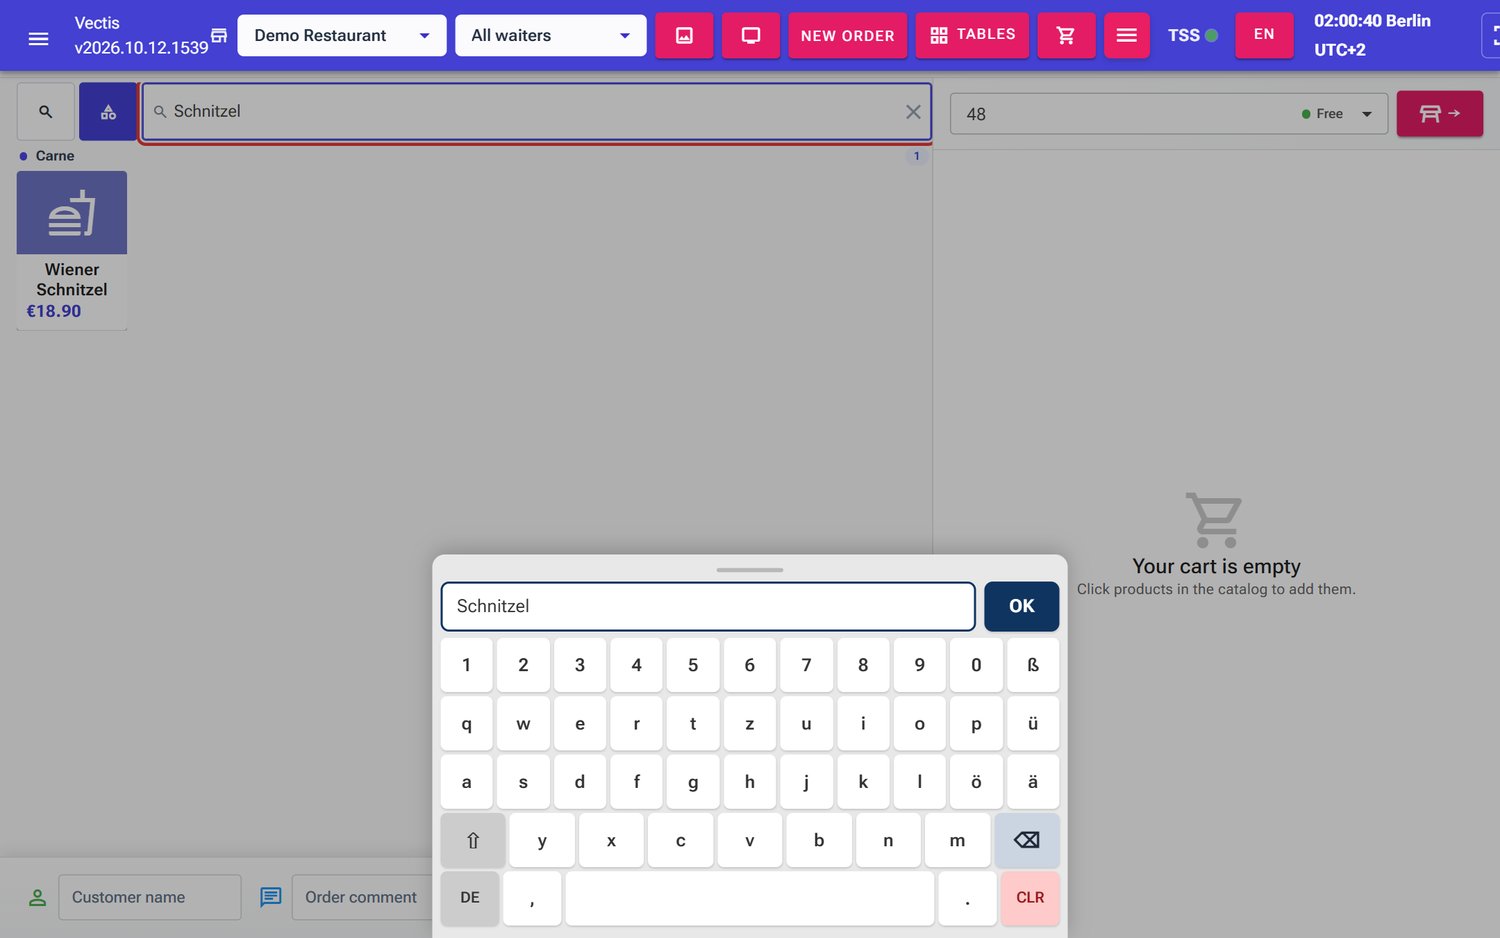 Search for «Schnitzel» with the on-screen keyboard; result «Wiener Schnitzel» in «Carne»
 - Tap a product, for example «Wiener Schnitzel». It appears in the cart. The number on the product card shows how often the product is already in the cart.
- Each further tap on the same product card adds another separate line with quantity 1 (in the example two lines «242 Radeberger Pils vom Fass 0,4 l»). If you prefer one line with quantity 2, raise the quantity in the cart with +.
- Each cart line has: the cutlery icon (extras and note), the price, the red bin (Remove from cart), the quantity and +. From quantity 2 on, − appears instead of the bin.
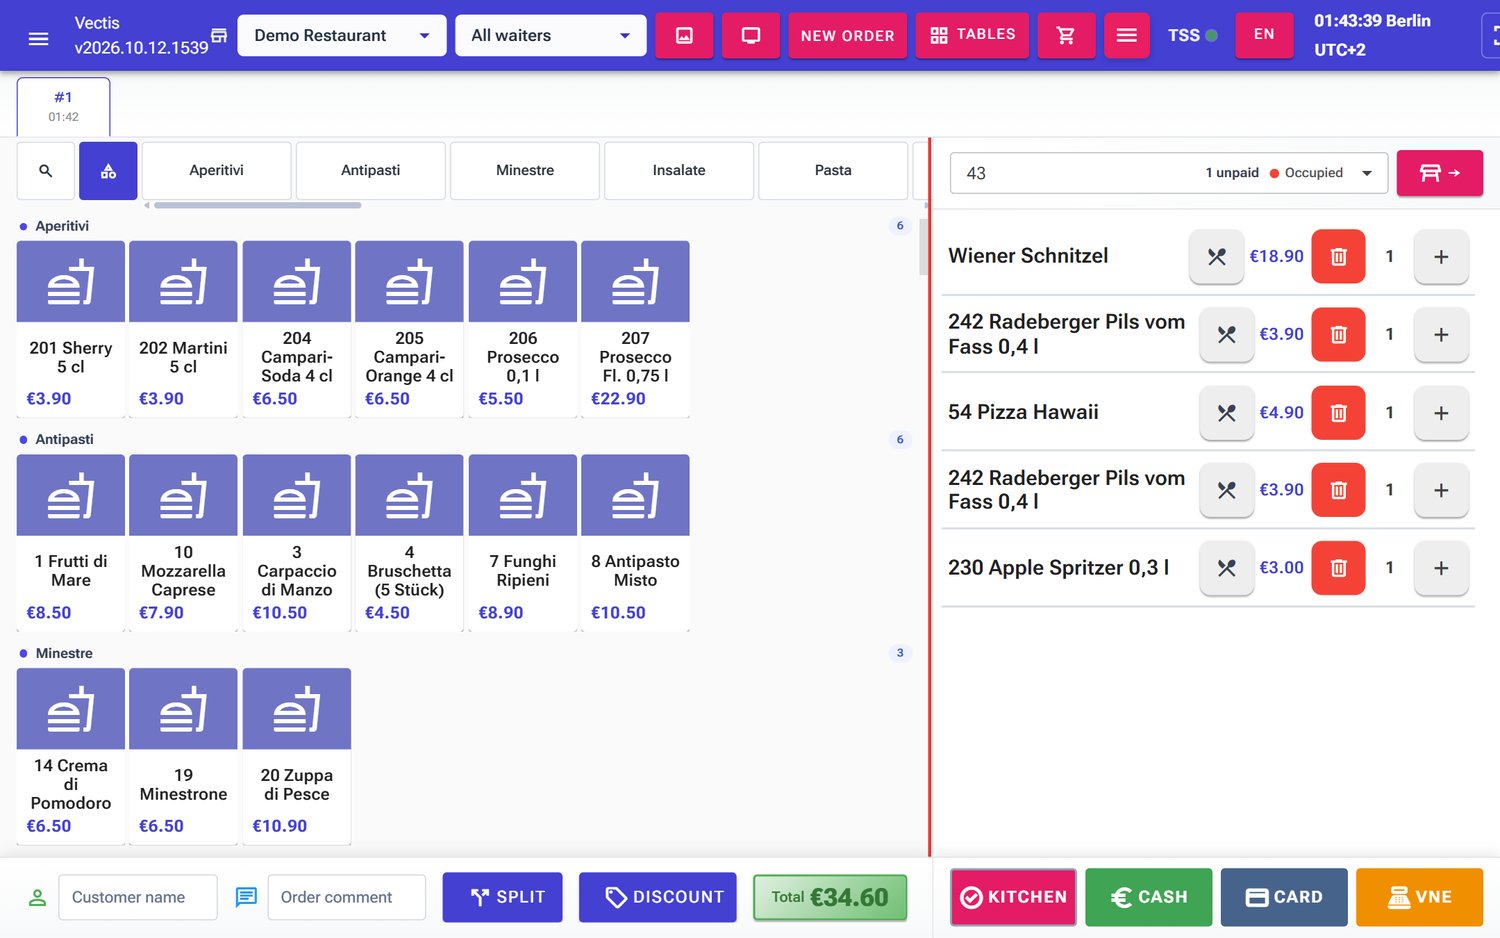 Cart at table 43 with five lines, total €34.60
 - If a product has variants (for example sizes), the default variant is selected. Tap another variant in the cart if needed.
- Open-price products (for example a «Tagesgericht», dish of the day) are added at their base price first. Tap the price on the line and enter the amount on the keypad. Careful: digits count as whole euros until you tap the comma – for €12.50 tap 1, 2, «,», 5, 0 and then OK.
Note: There is no save button. Every change is saved automatically. From the first item on, the table shows as Occupied on the floor plan.
Combos (set menus)
If your menu has combos set up, their product cards carry the COMBO badge. Tap one, make your choice in every group (required groups are marked required, surcharges with «+») and tap Add to cart - …. The combo appears in the cart as one block. The pencil icon on the block changes the choice (Edit selections), the bin removes the combo (Remove combo).
Extras, notes and courses
Goal: Record the guest's special wishes so the kitchen sees them.
Who can do this: Admin, Manager, Cashier, Waiter
- Tap the cutlery icon on the line (Show extra ingredients). The field Note for the kitchen… and the list of available extras with their surcharge «… per portion» open below.
- Increase an extra with +, for example «Extra 1,00» on the «54 Pizza Hawaii». The surcharge is added to the line (in the example €4.90 + €1.00 = €5.90).
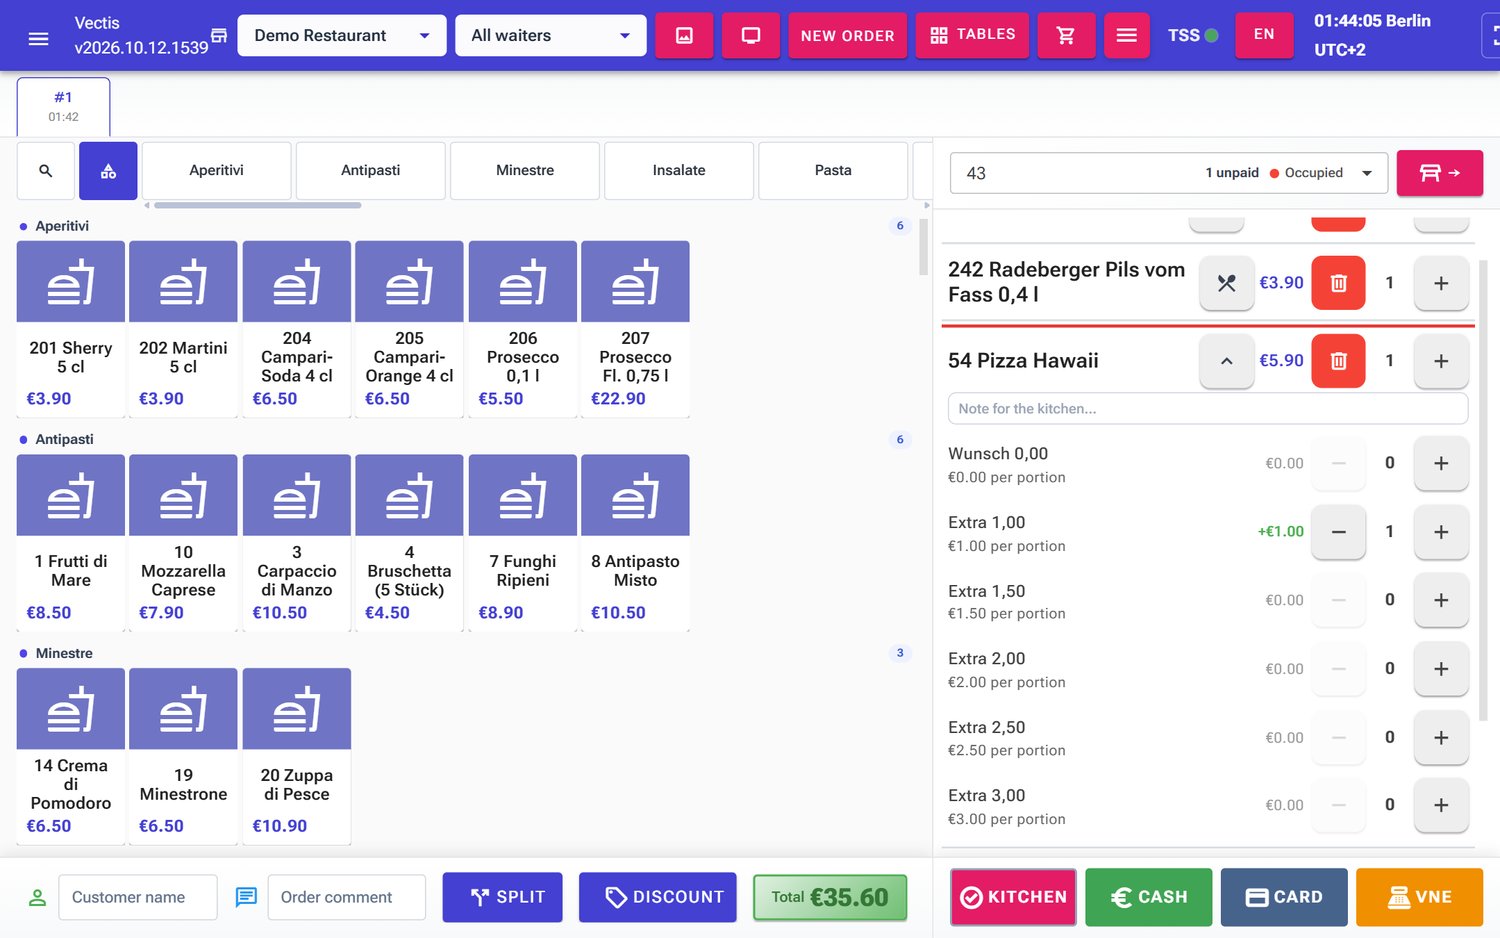 Extras open on the «54 Pizza Hawaii»: «Extra 1,00» chosen once
 - Tap the field Note for the kitchen… and type the wish on the on-screen keyboard, for example «no pineapple». Tap OK. CLR clears the input, the DE key switches the keyboard layout.
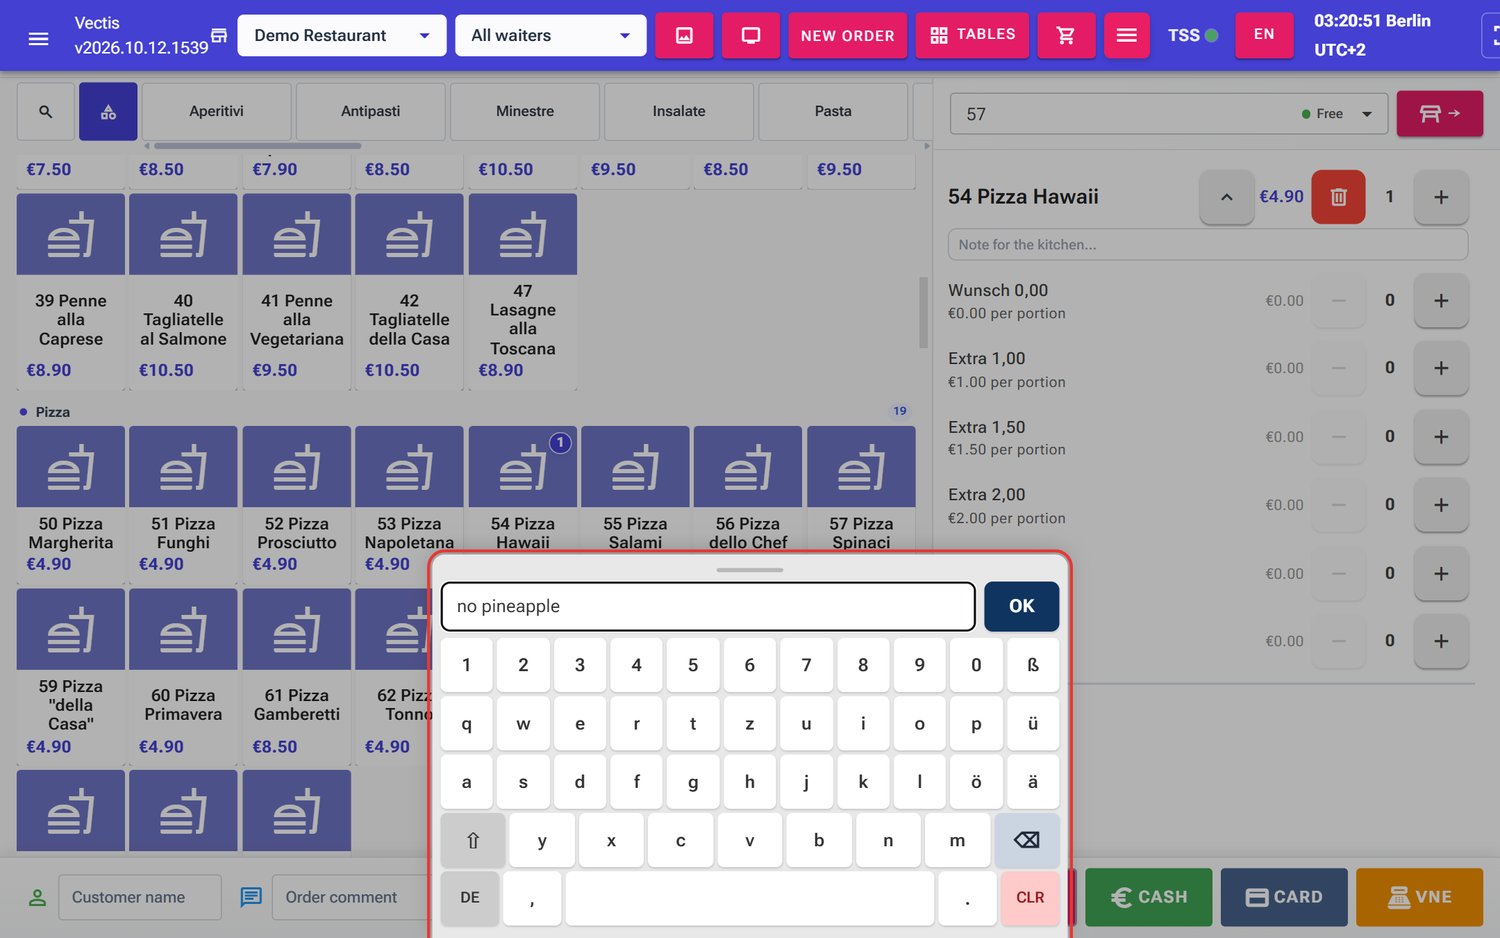 On-screen keyboard with the note «no pineapple»
 - Tap the icon again (Hide extra ingredients). The note stays visible as a yellow line under the item, followed by the chosen extras (for example «Extra 1,00 x1 (+€1.00)»).
- For the whole order there are the fields Customer name and Order comment at the bottom left. Tap them and type on the on-screen keyboard.
Note: The item note is printed on the kitchen ticket directly under the item. Courses: if course serving is switched on for the table (chapter 04), each item starts with a course button. Each tap counts on: 0 → 1 → 2 → 3 → 4 → 0 (0 = no course). The kitchen sees the items sorted by course.
Send to the kitchen
Goal: Send the order to the kitchen and bar.
Who can do this: Admin, Manager, Cashier, Waiter
- Check the place and the items.
- Tap Kitchen at the bottom right.
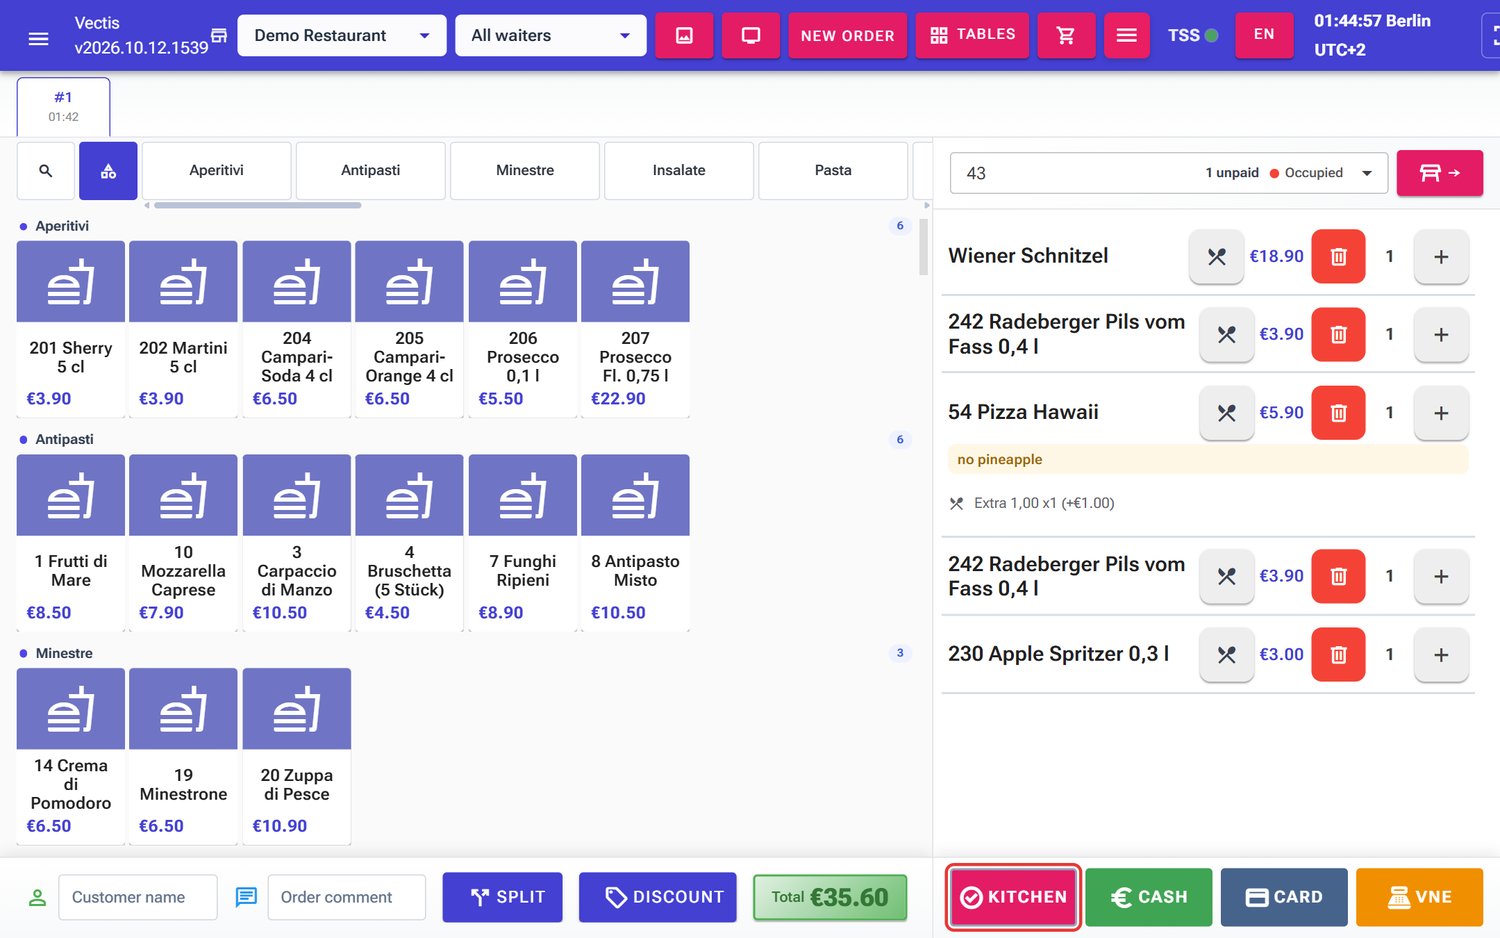 The «Kitchen» button (outlined in red); pizza with note and extra
 - On the first send the order becomes Confirmed (badge next to the Total) and gets its daily number. The kitchen sees it immediately on the kitchen display; depending on the printer setup a kitchen ticket is printed. The ticket shows the table and number in large print at the top, for example «Tisch 43 #2».
- If you add more items later, Kitchen becomes active again. Another tap sends only the new or changed items.
Note: Which items go to which printer is set per printer in the receipt options (for example only Food, not Alcohol and Non-alcoholic). That is why drinks normally do not go to the kitchen printer. The same place decides whether kitchen tickets print On confirmation, After payment or not at all.
Note: Kitchen is greyed out when no place is selected or there is nothing new to send. You can also tap Kitchen directly on the order in the floor plan.
Change an order
Goal: Add to or correct an open order.
Who can do this: Admin, Manager, Cashier, Waiter
- Open the order: tap the table on the floor plan, then Edit – or Edit in the order list.
- Add products, change quantities, extras or notes as described above.
- Tap Kitchen so the kitchen receives the changes.
Note: On an item that has already been sent to the kitchen you can no longer change extras, note, course or price. Vectis refuses with the message «Kitchen-visible details cannot be changed after send…». Remove the item (see below) and add it again with the right wish. You can still change the quantity.
Caution: As soon as a payment is recorded for an order, its items are locked. The cart then shows «Items can no longer be changed once a payment has been recorded.» A fully paid order cannot be edited at all («Paid orders cannot be edited.»). Mistakes on a paid, fiscalized receipt can only be corrected with a return (chapter 06); this keeps the till records complete for the tax office.
Remove or cancel items
Goal: Take an item off the order again.
Who can do this: Admin, Manager, Cashier, Waiter
Not yet sent to the kitchen:
- Reduce the quantity with −, or at quantity 1 tap the red bin.
- The item is simply removed; it does not appear on the kitchen ticket.
Already sent to the kitchen:
- Reduce the quantity or remove the item in the same way. There is no confirmation question.
- The Kitchen button becomes active again; Split is greyed out until the change has been sent.
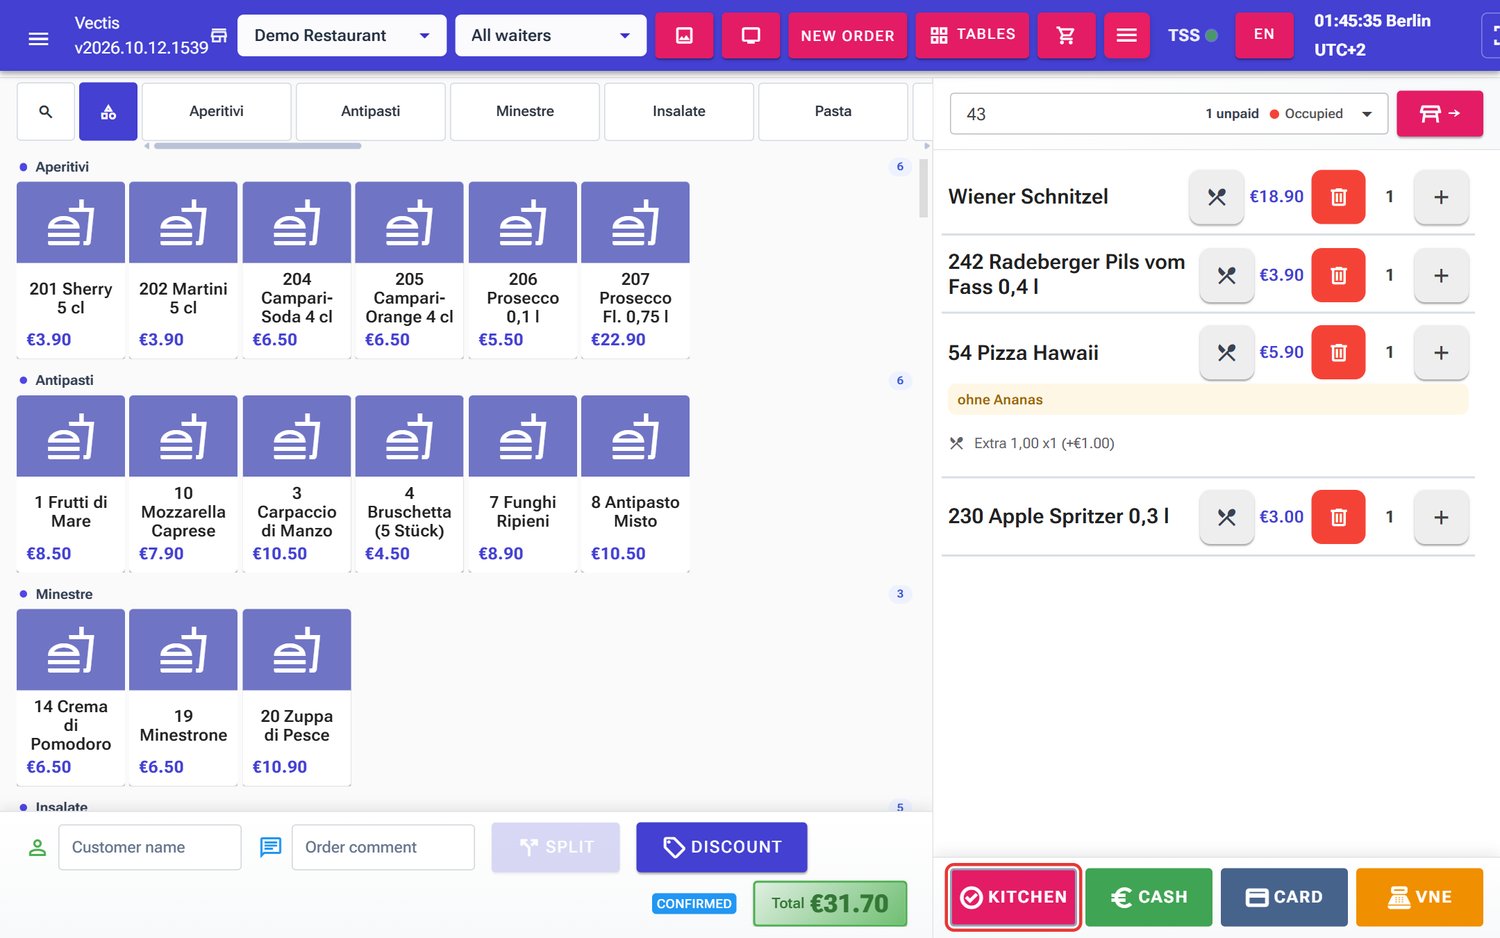 Second Pils removed: «Kitchen» active again (outlined in red), total €31.70
 - Tap Kitchen. The kitchen receives the cancellation: the kitchen display shows a STORNO · #… notice at the top.
Caution: As long as a cancellation or change has not been sent to the kitchen, the order cannot be paid («Send all pending kitchen changes before starting payment»). Tap Kitchen first.
Note: Removing items before payment does not need the storno right. The storno right only concerns paid, fiscalized receipts (chapter 06).
Cancel a whole order
- Tap Cancel on the order in the floor plan, or the red cross icon in the order list.
- The Cancel order dialog asks «Cancel order …?». Answer Yes (No aborts).
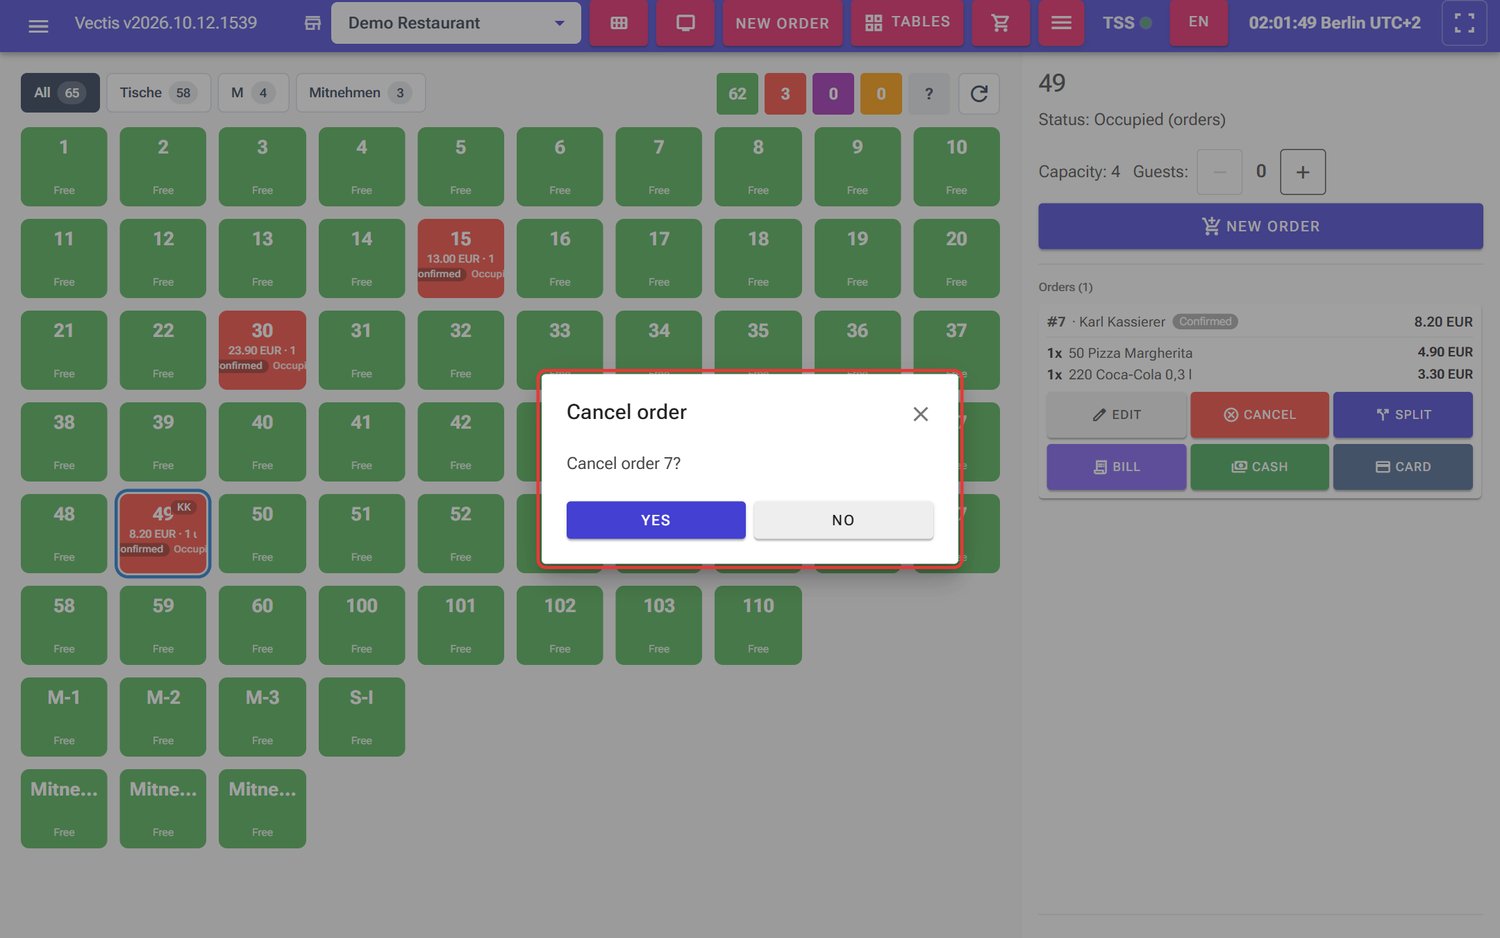 Question «Cancel order 7?» with «Yes» and «No»
 - If something has already been sent to the kitchen, the cancellation goes to the kitchen. Only then is the order Cancelled.
Note: Cancelling is only possible while no payment has been recorded for the order.
Move an order to another table
Goal: The guests change tables – the order should move with them.
Who can do this: Admin, Manager, Cashier, Waiter
- Open the order (Edit on the floor plan or in the list).
- Click the place field at the top of the cart (for example «47 · 1 unpaid · Occupied») and choose the new table, for example «49».
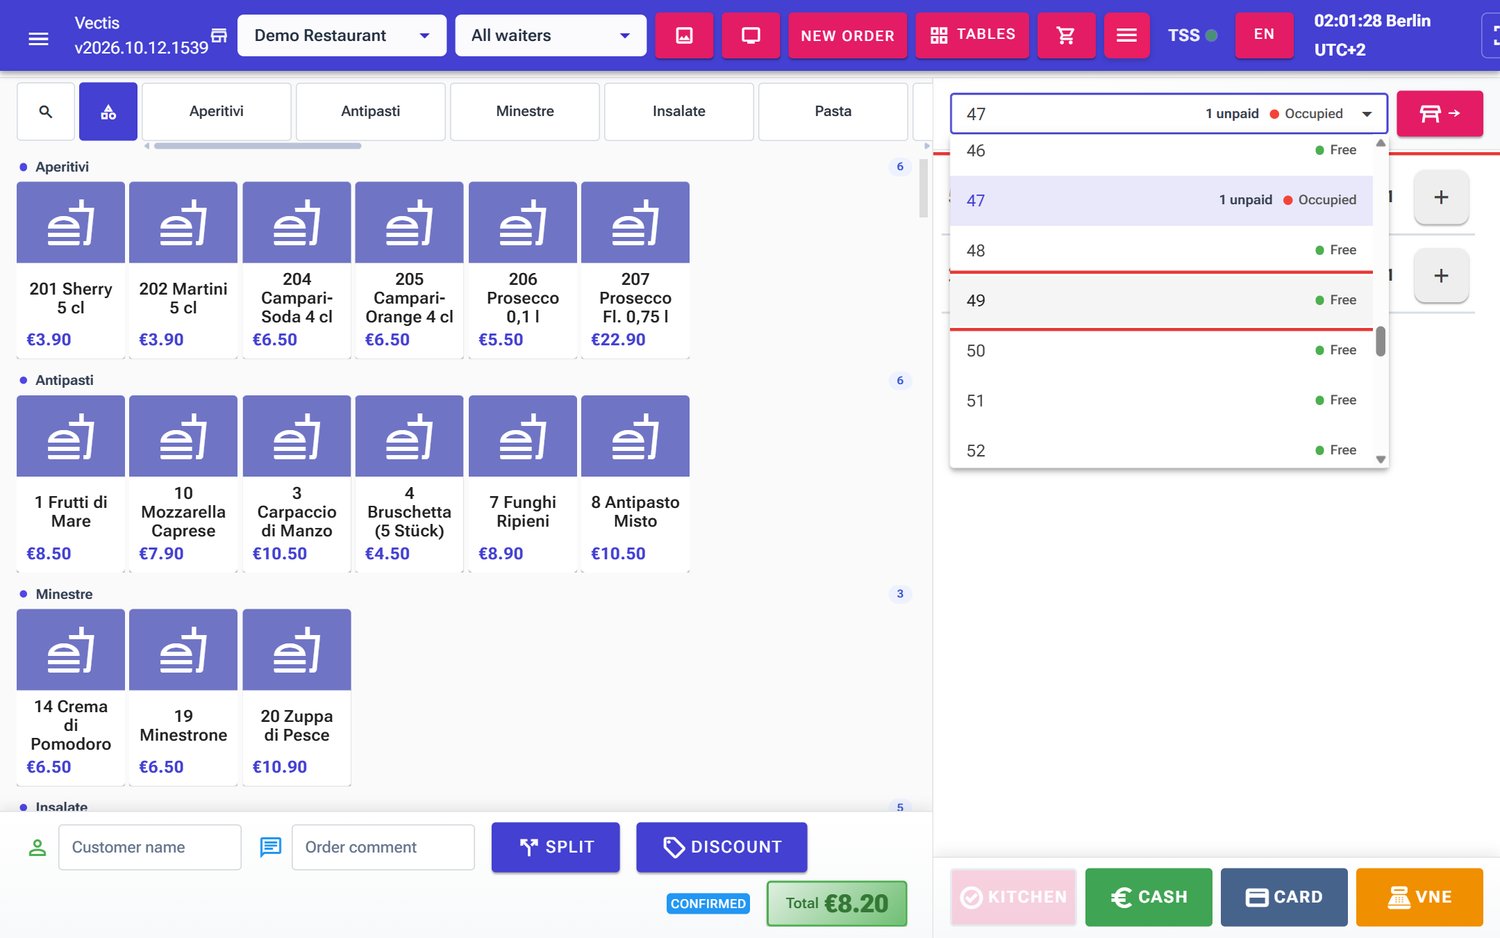 Place list open, new table 49 outlined in red
 - The order is attached to the new table straight away. On the floor plan the old table becomes free (if nothing else is open there) and the new one occupied.
- The button next to the place field (table icon →) takes you to the floor plan with the new table selected.
Note: Moving is no longer possible once a payment has started. You cannot choose a table marked dirty as the target. If moving fails, the reason is shown in a red box under the place field.
Split the bill
Goal: Put some of the items on a bill of their own, for example when two guests pay separately.
Who can do this: Admin, Manager, Cashier, Waiter
- Tap Split at the bottom of the order screen (or Split on the order in the floor plan).
- The Split bill dialog lists all items. Use + and − to choose how many pieces of each item go to the new bill. «1 / 1» means: 1 of 1 piece goes to the new bill.
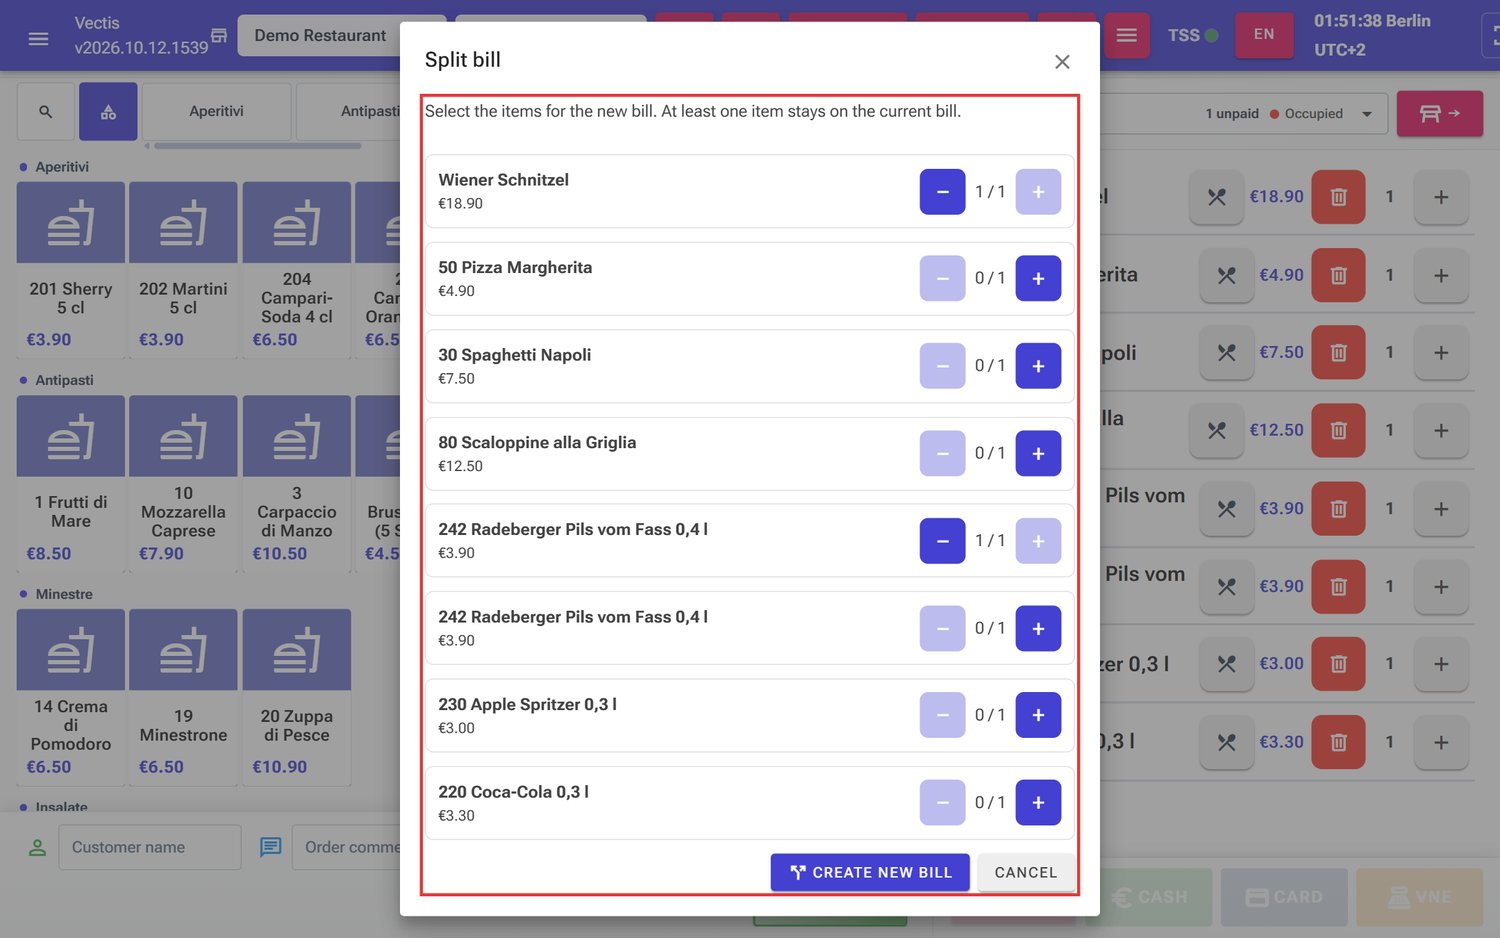 «Split bill» dialog: «Wiener Schnitzel» and one Pils go to the new bill
 - Tap Create new bill (Cancel closes the dialog).
- A second order is created at the same table with the chosen items; the order screen switches to it. You pay each order separately (chapter 06). In the example, table 46 then has orders #5 (€35.10) and #6 (€22.80).
Note: At least one item always stays on the original bill. These cannot be split: items with a catalog promotion (chapter 07), parts of a combo and custom items (message «This item cannot be split.»). A bill discount does not prevent splitting; the new bill gets the same discount. Splitting is only possible before the first kitchen send or when all changes have been sent – tap Kitchen first if needed.
Note: «Split» creates separate bills. Paying one bill partly in cash and partly by card is not possible.
Print an interim bill
Goal: Give the guest an overview of the order before paying.
Who can do this: Admin, Manager, Cashier, Waiter
- Open the floor plan and tap the table.
- Tap Bill on the order. The interim bill is printed on the receipt printer.
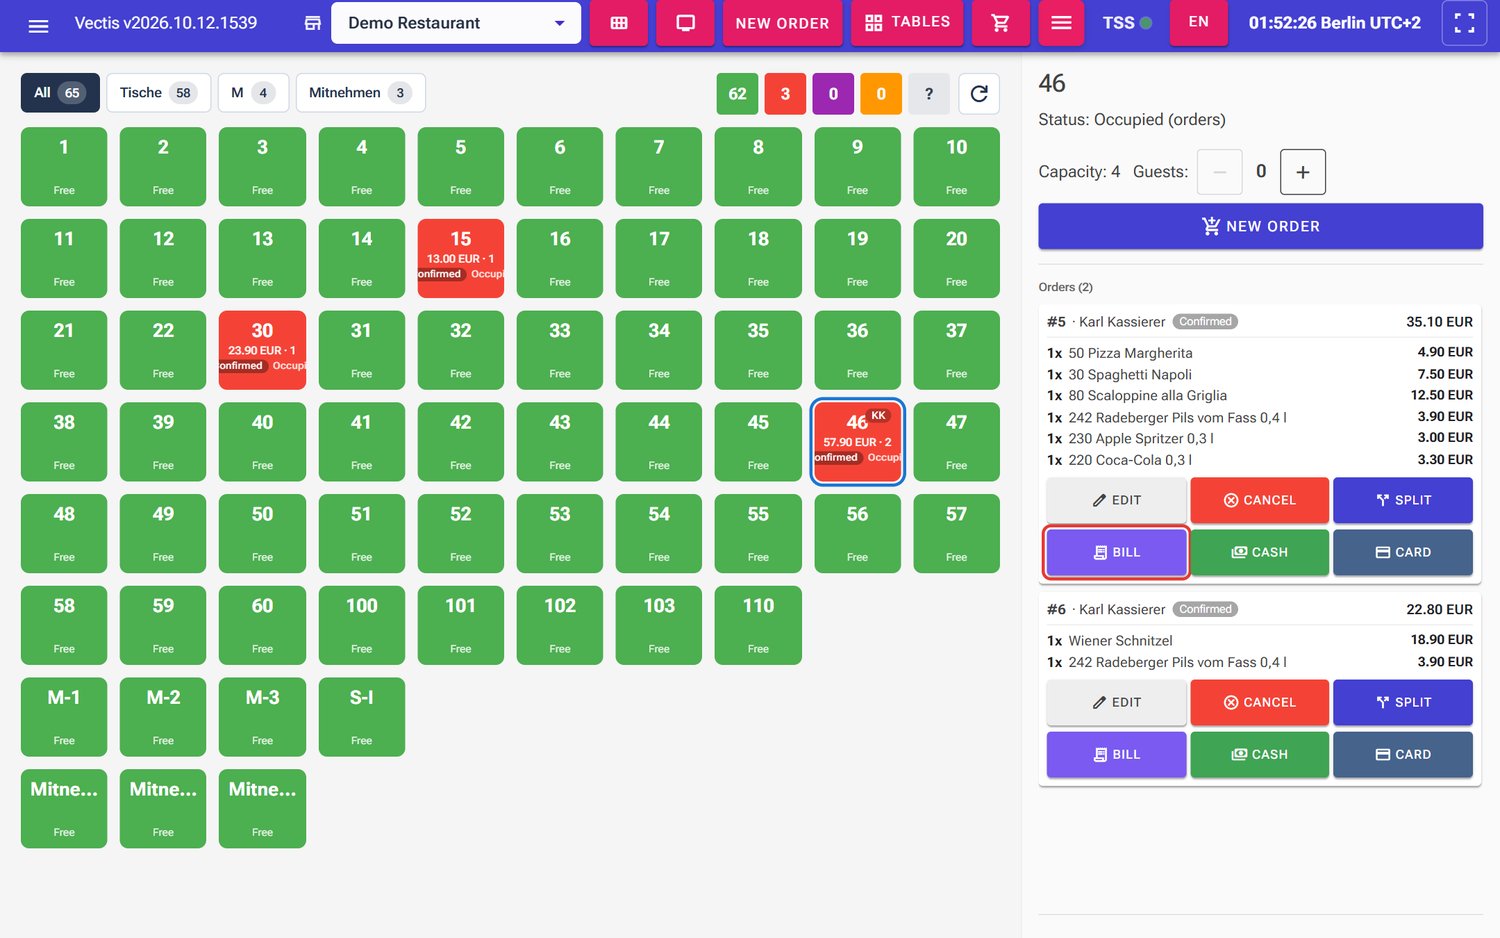 The «Bill» button on order #5 in the floor plan (outlined in red)
Note: Bill is only offered for unpaid orders with an amount above 0. The interim bill is not a fiscal receipt; the guest gets the receipt with TSE data after paying. If printing fails, «Failed to print bill.» appears.
Discount and payment
At the bottom of the order screen you also find Discount (a discount on the whole bill) and the payment buttons Cash, Card and, if present, VNE (cash recycler). Chapter 06 explains how to use them.
Kitchen display
Goal: Work through the orders on a screen in the kitchen.
Who can do this: kitchen device (role Kitchen), Admin, Manager
- Log in on the kitchen device; the kitchen view opens automatically. Tap Tap to start kitchen display once (so that sounds may play).
- The Kitchen Display has three columns: New («Paid first, oldest on top»), In Progress and Ready. Each card shows the number (for example «#10»), the origin (for example Cashier), table and age («53 · Created 1:34»), the items with extras, notes and, if used, Course 1 etc.
- Tap Start when you begin an order, Ready when it is done and Clear when it has been handed out.
- Cancellations from the service appear at the top as STORNO · #…. Log out at the top right logs the device out.
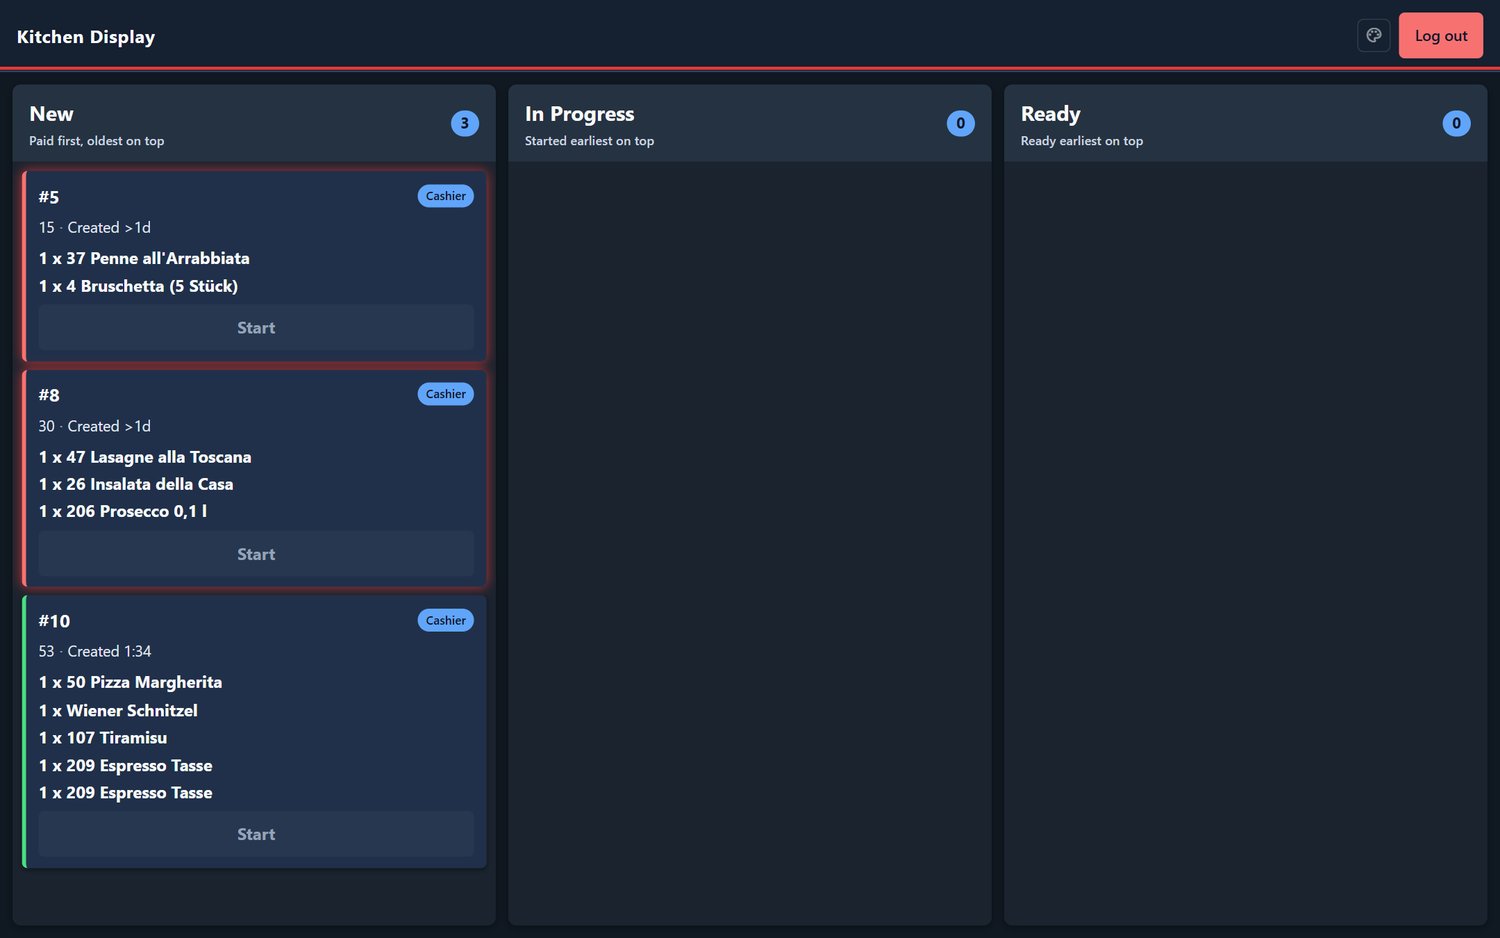 Kitchen display with three orders in the «New» column (two older orders from the previous day, one current #10 at table 53)
Note: If Start is greyed out (hint «Waiting for payment»), the order must be paid first. This is the case when Allow kitchen to start before payment is switched off for the venue (chapter 04), as in the example.
Note: The kitchen display shows all items of the order, drinks included. Which items go to the kitchen printer is set separately in the receipt options.
Pickup display (order display)
Goal: Show guests at the counter which orders are being prepared and which are ready.
Who can do this: display device (role OrderDisplay), kitchen device, Admin, Manager
- Log in on the display device; the order display opens automatically.
- The Order Display shows the columns Queue, In Progress and Ready for Pickup with large order numbers.
- At the top right choose with # / NAME whether only numbers or also customer names are shown, and with 3 / 2 whether three or two columns are used.
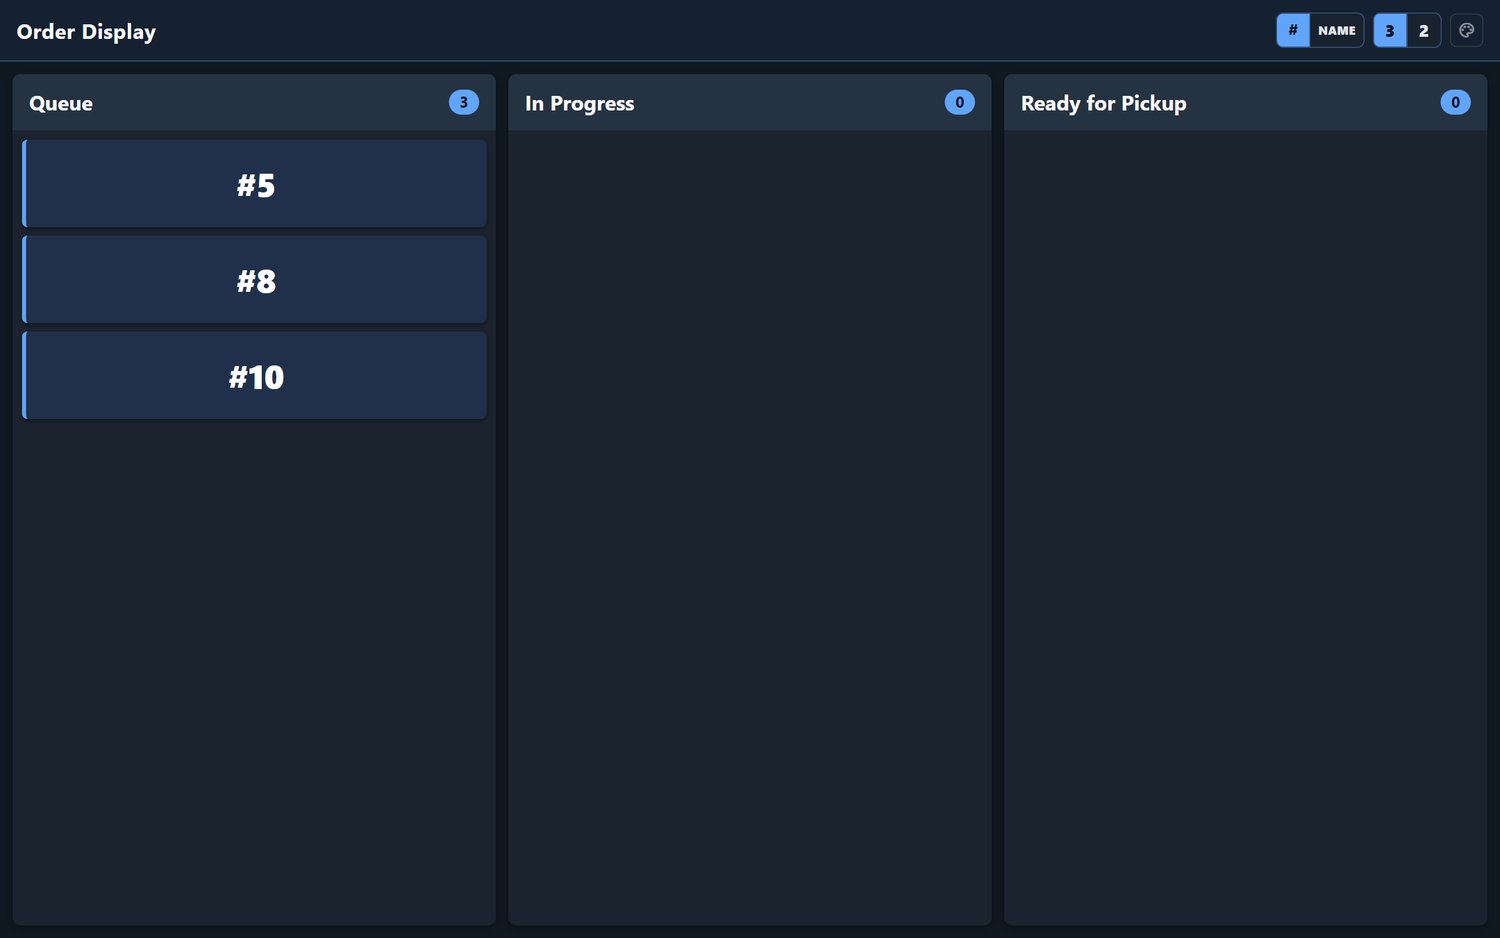 Order display with numbers #5, #8 and #10 in the queue
Note: A ready order stays on screen as long as set for the venue under Ready Display Seconds (default 120 seconds).
Customer display
Goal: Show the guest the current order and amount on a second screen.
Who can do this: Admin, Manager, Cashier, Waiter
- Click Customer Display in the order list, or ☰ › Customer Display in the header bar. A new window of the same browser opens.
- Drag the window to the customer screen and switch it to full screen.
- While an order is being edited at the till, the customer display shows «Welcome – Please wait for your order». As soon as the order is on the payment page, the guest sees the items, the table, Payment, the number of items, Paid and the remaining amount. After payment Thank You appears.
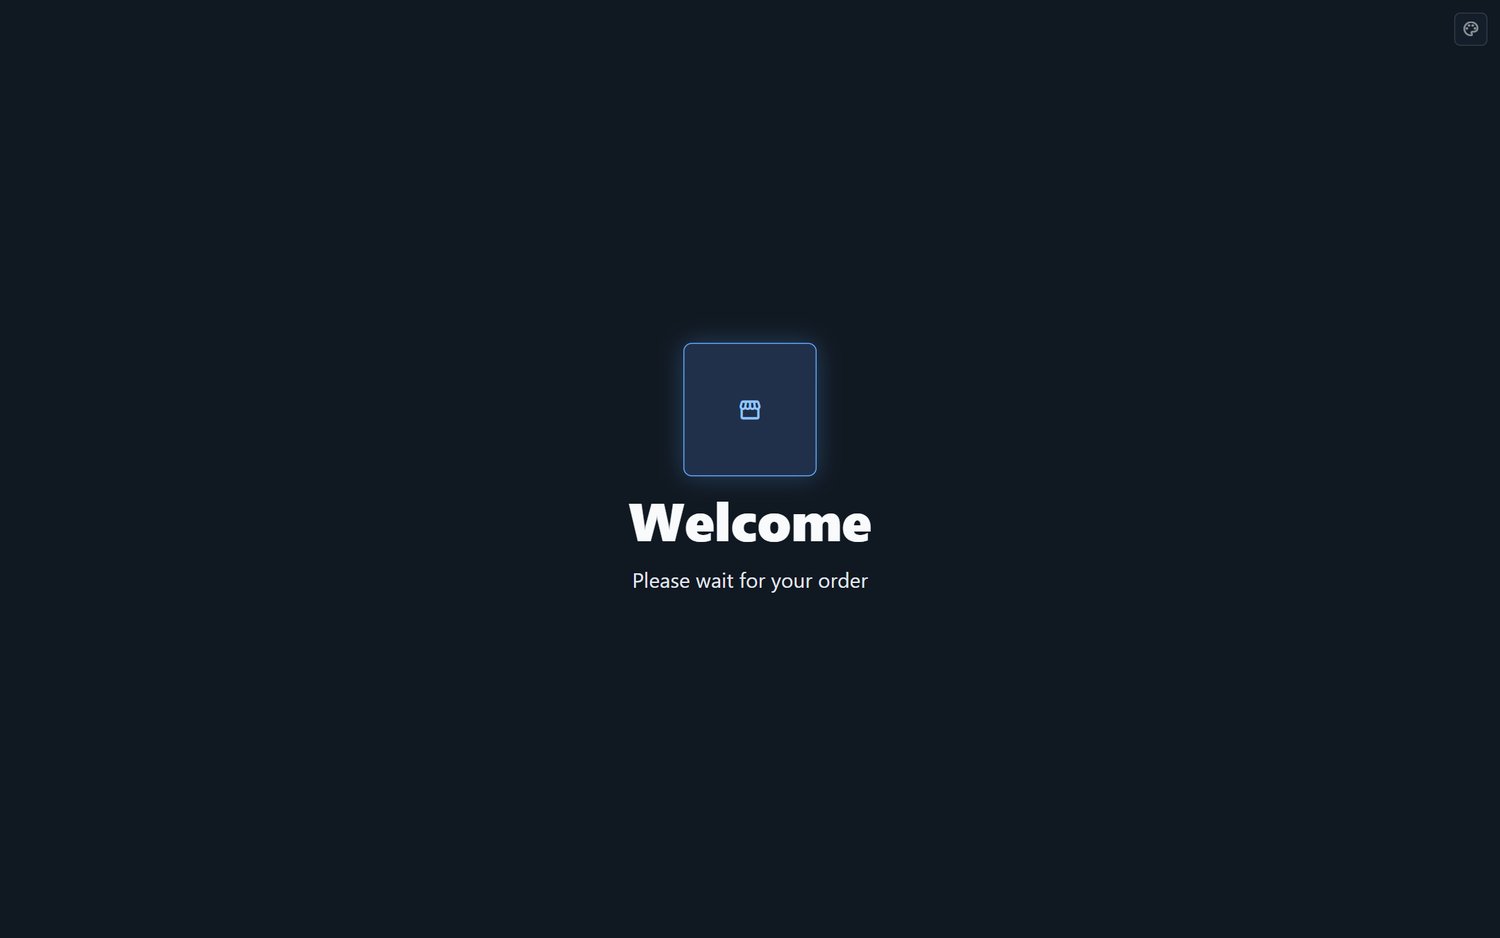 Customer display waiting: «Welcome»
Frequently asked questions
Q: I cannot find a save button. The order is saved automatically as soon as you change something.
Q: «Kitchen» is grey. No place is selected yet, or there is nothing new to send.
Q: Why does the kitchen not print my drinks? Drinks normally do not go to the kitchen printer. This is set per printer in the receipt options.
Q: How do I write «no pineapple» for the kitchen? Cutlery icon on the line, then tap Note for the kitchen…, type and confirm with OK.
Q: I tapped a product twice and now have two lines. That is normal: each tap adds a line of its own. You can remove the second line with the bin and raise the quantity of the first line with + instead.
Q: I ordered one item too many and it is already in the kitchen. Reduce the quantity or remove the item, then tap Kitchen. The kitchen receives a cancellation.
Q: Why can I no longer change an item? A payment has already been recorded for the order. After that the items are locked.
Q: The guests changed tables. Open the order and choose the new table at the top of the cart.
Q: Two guests want to pay separately. Choose Split, put the second guest's items on the new bill and pay both bills separately.
Q: «Split» is greyed out. The order has only one item, none of the items can be split, or there are kitchen changes that have not been sent yet.
Q: As a cashier I cannot see yesterday's orders. Cashiers and waiters see only the current business day since the last Z closing. An Admin or Manager can see older orders.
Q: Is there an interim bill? Yes: Bill on the order in the floor plan.
Q: The kitchen cannot start an order – «Waiting for payment». The venue does not allow the kitchen to start before payment. An Admin or Manager can switch on Allow kitchen to start before payment.
Q: What is the difference between «Cancel» on the floor plan and the storno right? Cancel on the floor plan cancels an order that has not been paid yet. The storno right is needed to correct paid, fiscalized receipts.