08 Mobile waiter (phone)
With a phone, waiters take orders right at the table, send them to the kitchen and take payment at the table – cash or card. The phone needs no app: it opens the till in the browser and automatically shows its own, simple phone view. This chapter covers the setup and every step from logging in to freeing the table.
Connect the phone to the till
Goal: Reach the till from the phone.
Who can do this: setup by an Admin or your Vectis service partner; after that every waiter
- The phone must be on the same Wi-Fi as the till PC.
- Find out the till PC's IP address on the network. Ask your Vectis service partner if unsure.
- Open the browser on the phone (Safari or Chrome) and enter
http://<till-IP-address>:10110. - Tip: save the page as a bookmark or add it to the home screen.
Caution: The Windows firewall on the till PC must allow incoming connections on TCP port 10110. The Vectis installer does not create this firewall rule itself. If the page does not load on the phone while it works on the till PC at http://localhost:10110, this rule is usually missing. Ask your Vectis service partner or IT support to add it.
Note: The connection is a plain http connection inside your own network. The phone works only while it is on the restaurant's Wi-Fi and the till PC is running.
Log in on the phone
Goal: Log in as a waiter and land directly in the phone view.
Who can do this: Waiter (for Admin, Manager and Cashier see the note)
- Open the till address (see above). The Log in page appears. At the top right choose the language if needed (DE / EN).
- Enter your user name under Login, for example «kellner», and your Password.
- Tap Log in.
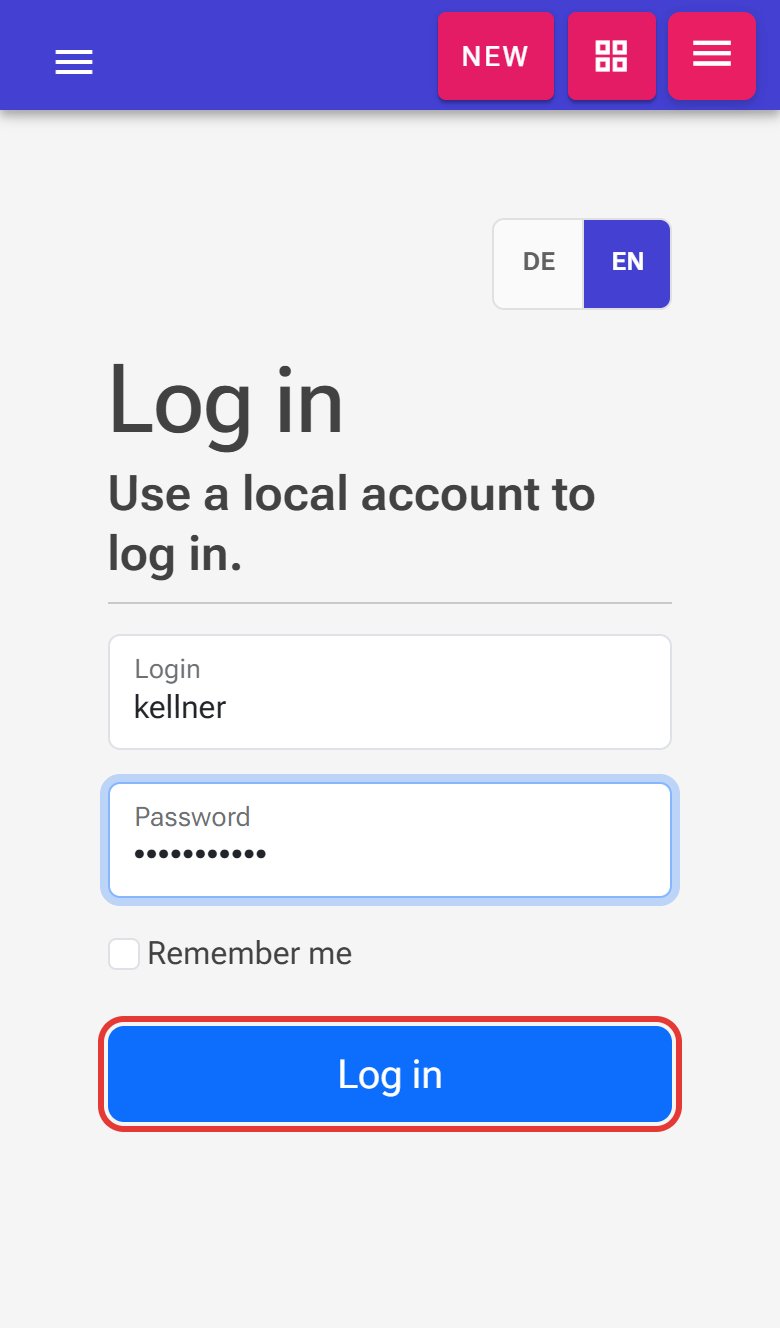 Logging in on the phone as «kellner», Log in button (outlined in red)
 - Vectis recognises the phone and opens the phone view with the table list.
Note: The automatic switch applies only to users with the Waiter role and only on touch-screen devices (phone, tablet). Admin, Manager and Cashier see the normal till view on a phone too. They can still open the phone view directly: http://<till-IP-address>:10110/mobile/waiter/tables.
Note: If you chose Desktop view in the profile, the phone remembers this – even after logging out. To get back to the phone view, open the address …/mobile/waiter/tables.
The phone view at a glance
The navigation bar with five tabs is always at the bottom of the screen:
| Tab | What it shows |
|---|---|
| Tables | all tables |
| Busy | only occupied tables |
| New | only free tables, to start a new order |
| Orders | your own orders of today |
| Profile | your daily statistics, language, log out |
The table list
Goal: See which tables are free or occupied and choose a table.
Who can do this: Waiter, Admin, Manager, Cashier
- Tap Tables at the bottom.
- Each row is a table: on the left the table number, in the middle the status and the waiter's initials, on the right – for open orders – the amount and two numbers «Total | unpaid».
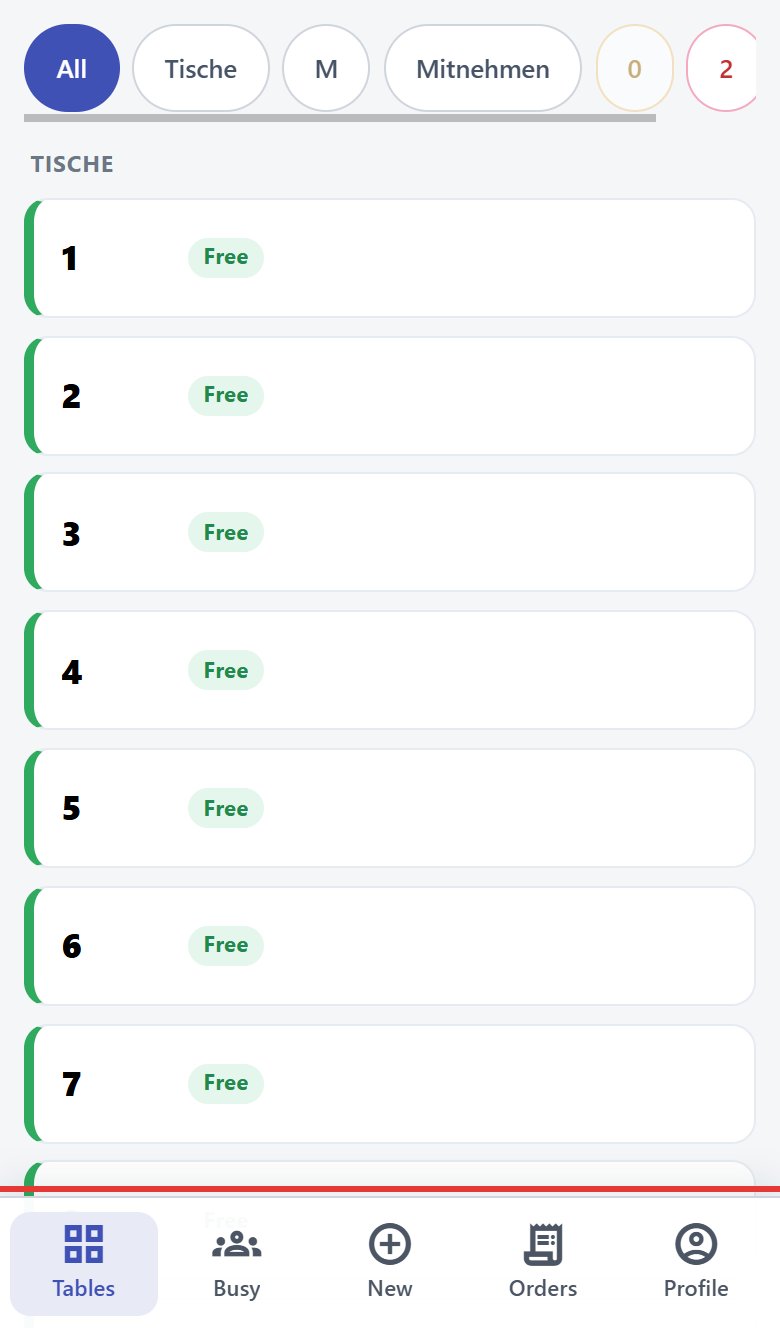 Table list on the phone with area filters at the top and the navigation bar at the bottom
 - The coloured edge on the left shows the status:
- Free – green (or the area colour),
- Busy – red,
- Settled – blue (everything paid, table not freed yet; on the till the same state is shown in purple),
- Reserved – orange,
- Dirty – grey.
- Filters at the top:
- All and one button per area (for example «Tische», «M», «Mitnehmen») when there are several areas.
- An orange number: tables with your open orders (My busy).
- A red number: all occupied tables (All busy).
- A green number: all free tables.
- Tap a table to open it.
Note: The list updates itself when orders are taken at the till or on another phone.
Take an order
Goal: Order dishes and drinks for a table.
Who can do this: Waiter, Admin, Manager, Cashier
- Tap New at the bottom (shows only free tables) or Tables, and choose the table, for example «51».
- A free table shows «No visible orders.» and the big Menu button. Tap Menu.
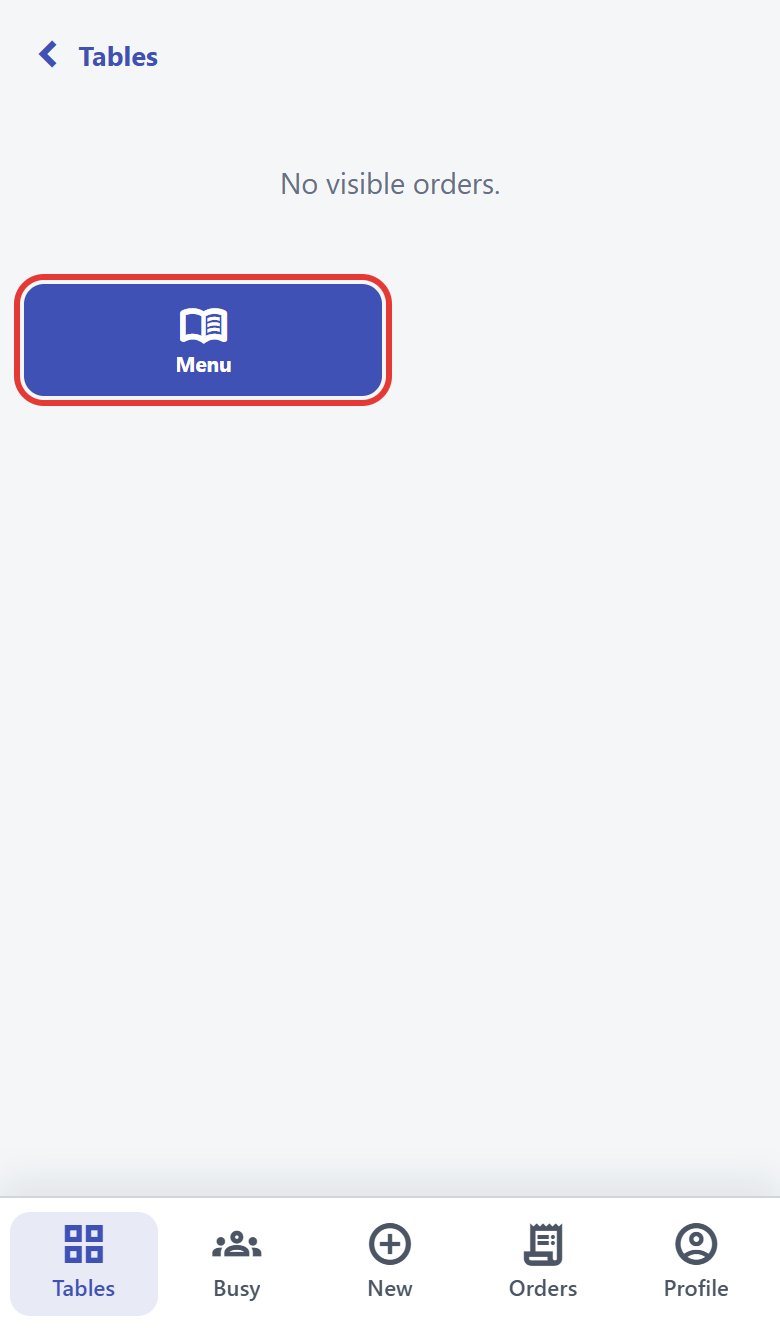 Free table with the Menu button (outlined in red)
 - The categories appear (for example «Aperitivi», «Antipasti», «Pasta», «Pizza»), each with its number of products on the right. Tap a category, for example «Carne». The Search products… field searches the whole menu. At the bottom a bar shows the table («51»), the order number («#—» until the order has gone to the kitchen), the number of items and the total, with the buttons Edit, Table and View cart below it.
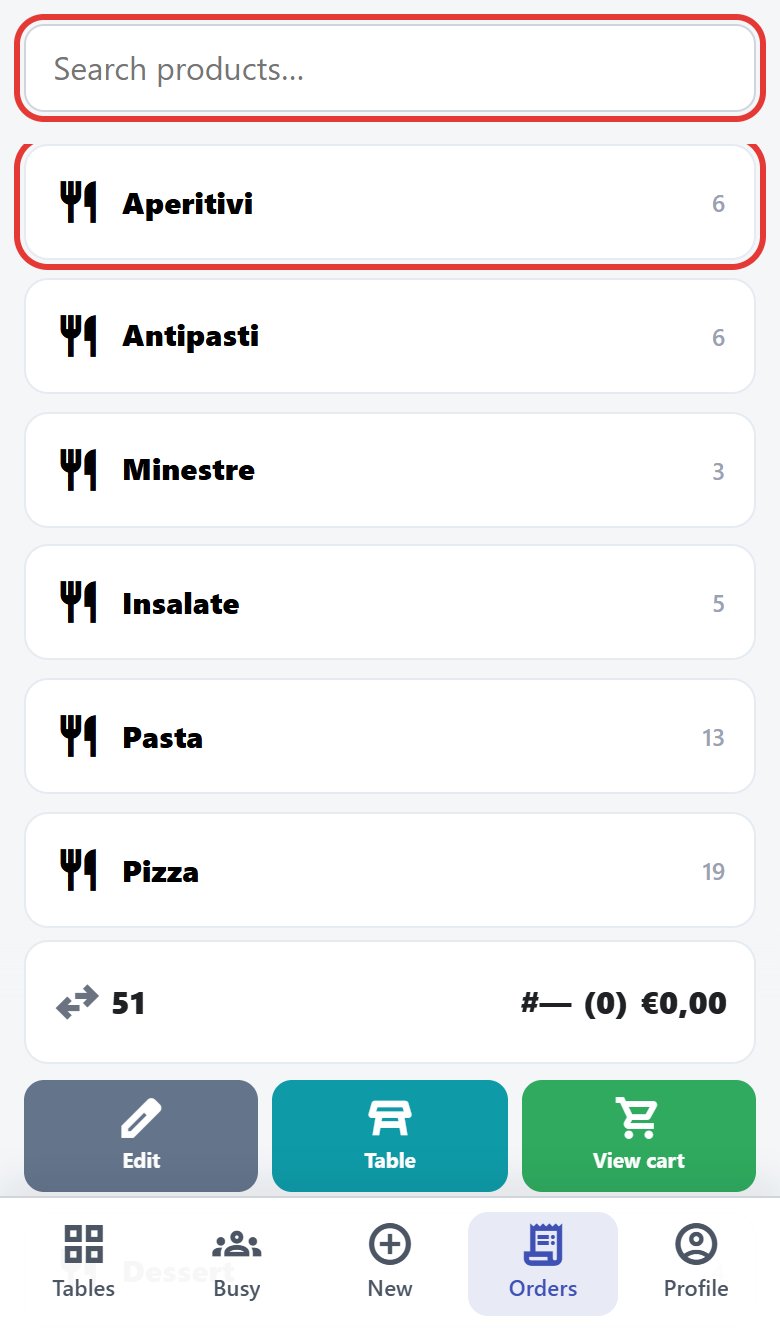 Categories with the search field and the category «Aperitivi» (outlined in red)
 - Tap a product or +, for example «Wiener Schnitzel». It is added once; «×1» shows the number in the order. Each further tap adds another portion.
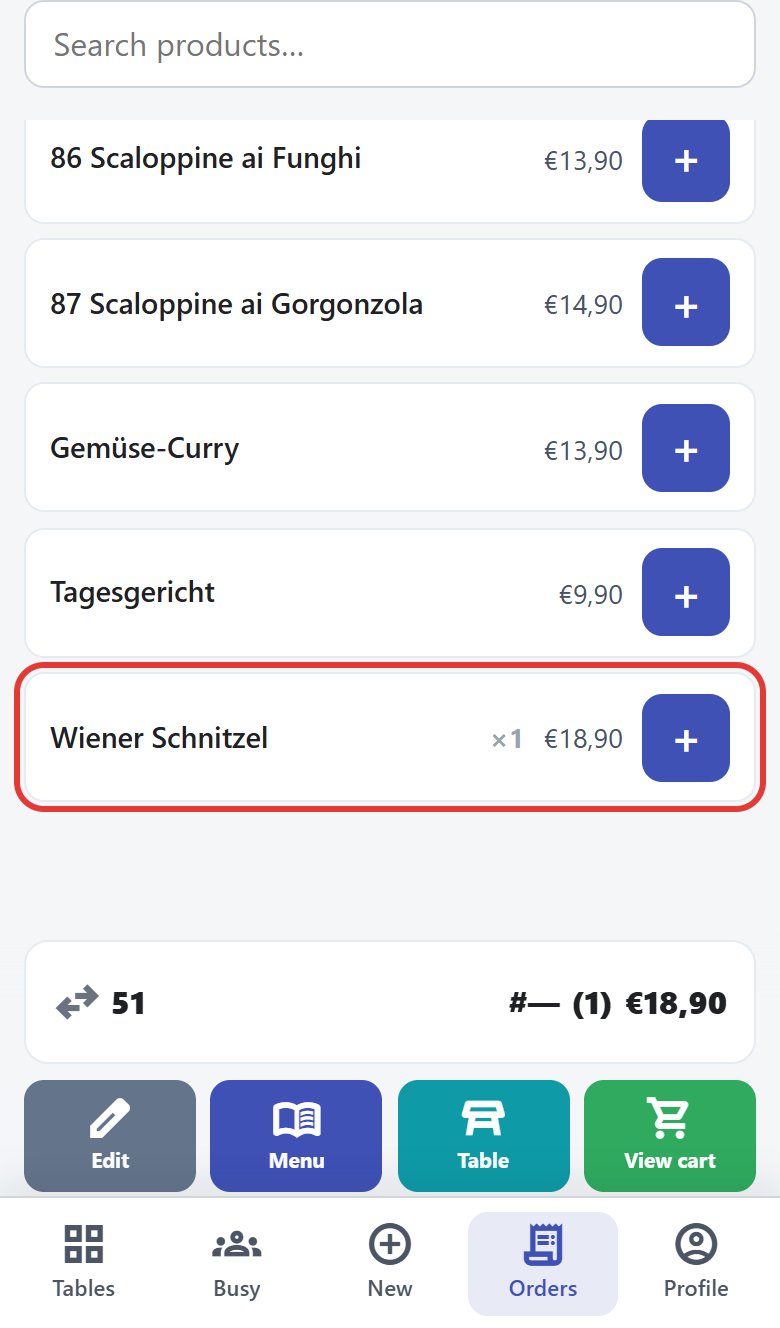 Product list: Wiener Schnitzel ×1 added, total €18.90
 - Menu at the bottom takes you back to the categories, for example for «Pizza» («54 Pizza Hawaii») and «Birre» («242 Radeberger Pils vom Fass 0,4 l»).
- Tap View cart to check the order.
Note: Products with several variants or required options show a slider icon instead of +. They cannot be ordered on the phone: the message «This product has variants/options — please edit on desktop/tablet.» appears. Take such products at the till.
Note: There is no save button. Everything is saved immediately. As soon as the first item is ordered, the table is Busy.
Cart: quantity, extras, note
Goal: Check the order and record special wishes.
Who can do this: Waiter, Admin, Manager, Cashier
- The cart lists each item with quantity and price.
- Change the quantity with + and −. At quantity 1, − turns into a bin: tapping it removes the item.
- Tap the item's name. The item expands and shows the field Note for the kitchen…. Type the wish, for example «ohne Ananas» (no pineapple). The note is saved as soon as you leave the field and then shows on the card with a yellow background.
- If the product has extras, tap the cutlery icon (Extras) and increase an extra with +, for example «Extra 1,00». A chosen extra is highlighted and shows its count; the item's price goes up (in the example «54 Pizza Hawaii» from €4.90 to €5.90).
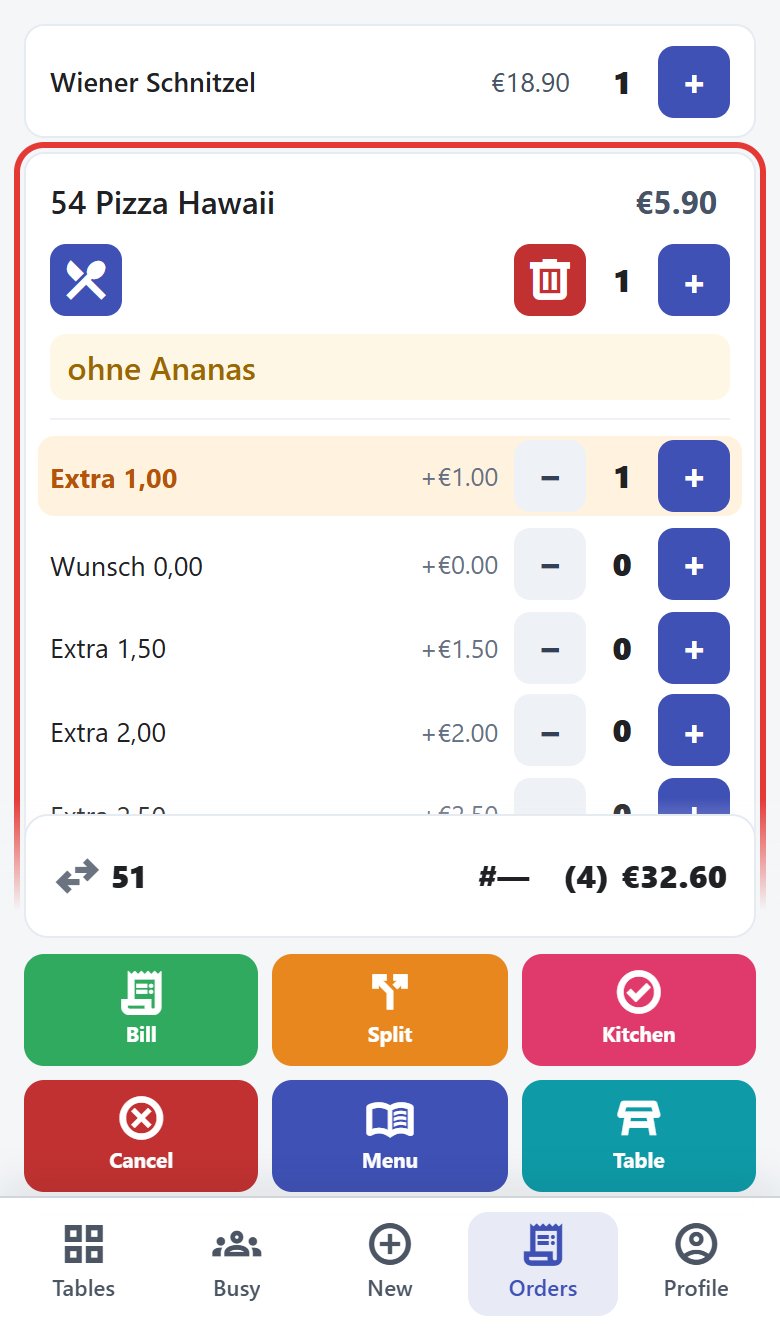 Cart: 54 Pizza Hawaii with the note «ohne Ananas» and Extra 1,00
 - If course serving is switched on for the table, each item starts with a course button. Each tap counts on: 0 → 1 → 2 → 3 → 4 → 0. Shortly afterwards the list re-sorts by course.
Note: On the phone you can only add extras. Write «without …» into the note. There is no note for the whole order on the phone.
Note: If an order contains custom items or combos, it can only be viewed on the phone. The message «This order contains custom items — please edit on desktop/tablet.» appears.
Send to the kitchen
Goal: Send the order to the kitchen and bar.
Who can do this: Waiter, Admin, Manager, Cashier
- Tap Kitchen in the cart (or on the order card at the table).
- The order becomes Confirmed and gets its number, for example «#8». The kitchen sees it immediately; depending on the printer setup a kitchen ticket is printed. Drinks normally do not go to the kitchen printer.
- If you add more later, tap Kitchen again. Only the new or changed items are sent.
Note: After sending, you can no longer change extras, note, course or price of an item (message «Kitchen-visible details cannot be changed after send…»). Remove the item and order it again. You can still change the quantity.
View the table
Goal: See all open orders of a table and continue working.
Who can do this: Waiter, Admin, Manager, Cashier
- Tap the table in the table list. Each order has a card with table, number, status (for example Confirmed, In progress, Ready), number of items, total, Waiter and the items.
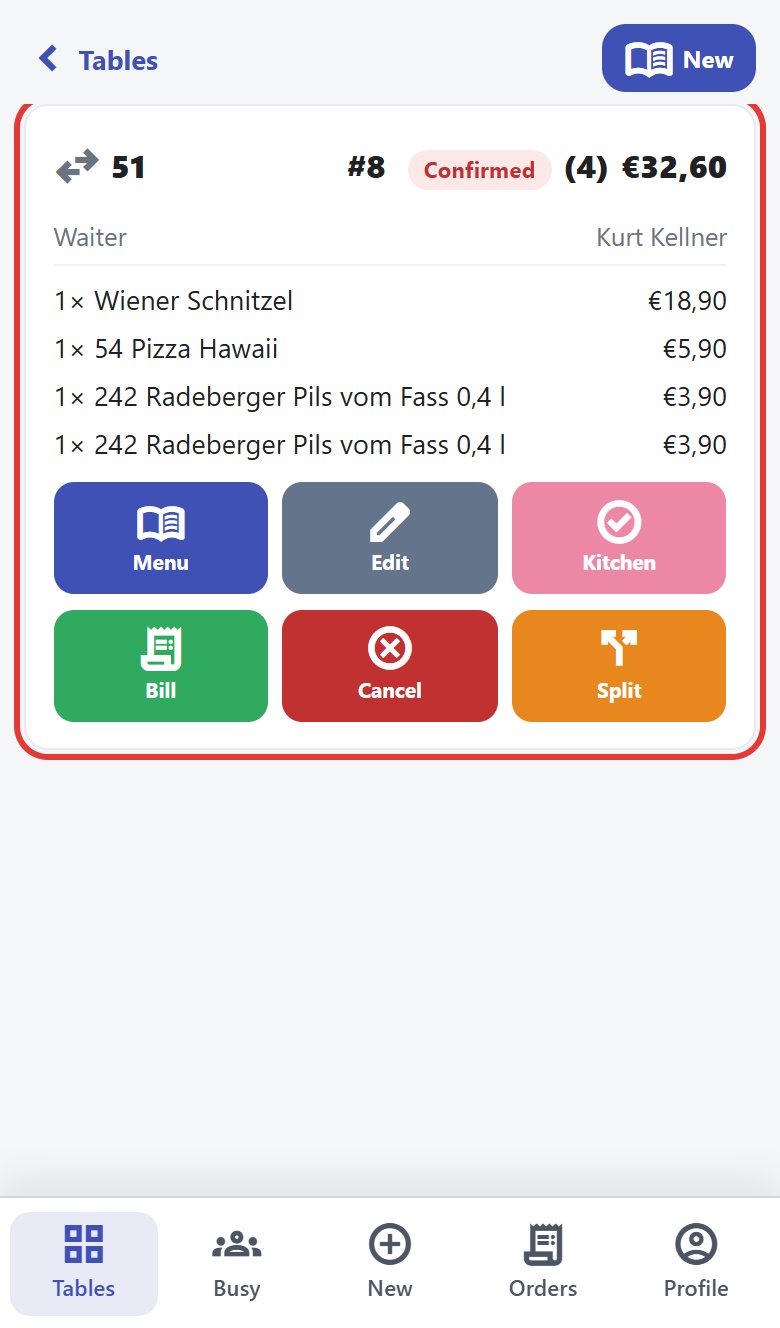 Table 51 with order #8: Confirmed, 4 items, €32.60
 - The card has these buttons:
- Menu: order more items.
- Edit: open the cart.
- Kitchen: send new or changed items to the kitchen.
- Bill: open the bill (interim bill and payment).
- Cancel: cancel the whole unpaid order (question «Really cancel this order?»).
- Split: split the bill.
- Free: appears instead of Kitchen when the order is paid; frees the table.
- Dirty / Clean: only when table cleaning is switched on for the venue.
- At the top there is ‹ Tables (back) and, if the table already has an order, New for a second, separate order at the same table.
Note: If you cancelled something that was already in the kitchen, the cancellation only takes effect when you tap Kitchen.
Move an order to another table
Goal: The guests change tables and the order should move with them.
Who can do this: Waiter, Admin, Manager, Cashier
- On the order card (or at the top of the cart or the bill), tap the table name with the arrow icon.
- The Select target table dialog lists all tables by area. The current table is marked Current.
- Tap the new table. «Order moved to ….» appears.
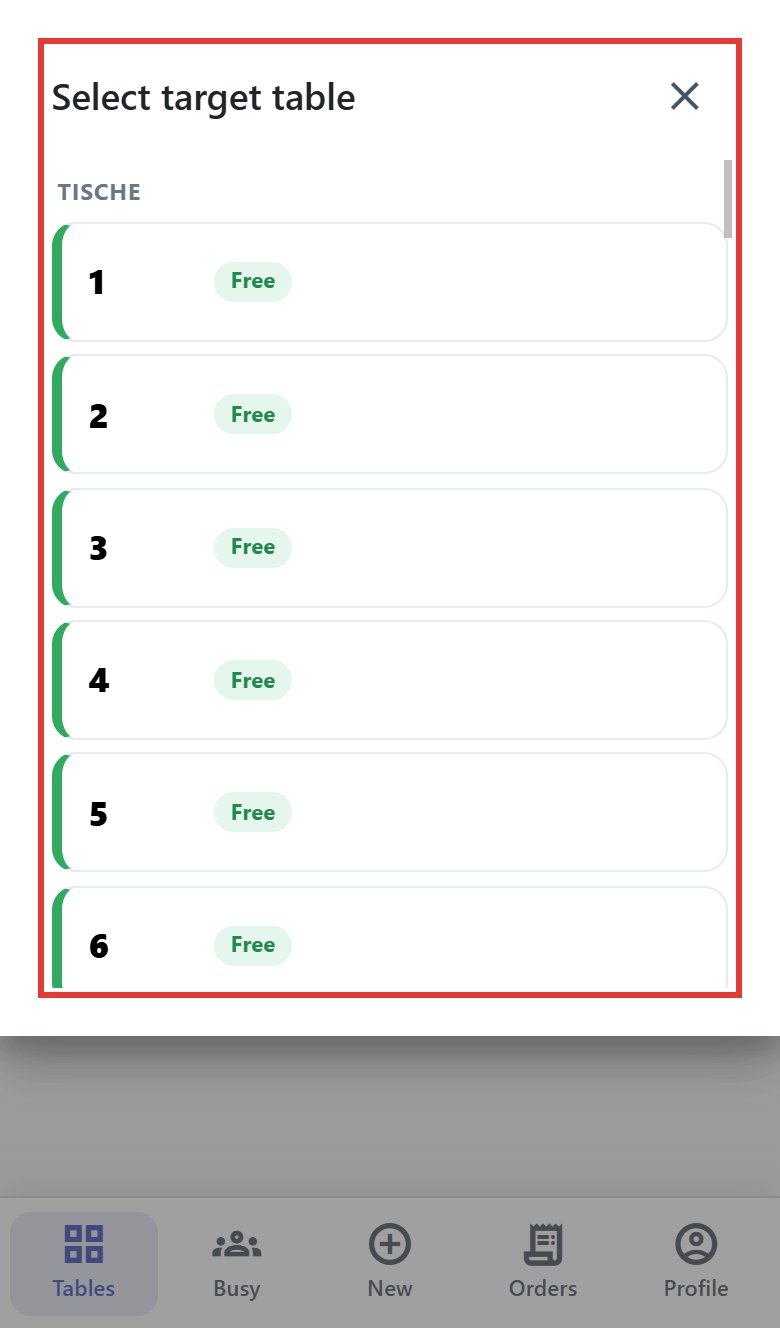 Select target table dialog with the tables of the «Tische» area
Note: Once a payment has started, the order can no longer be moved («This order can no longer be moved.»).
Bill and interim bill
Goal: Show the guest the bill or print it.
Who can do this: Waiter, Admin, Manager, Cashier
- Tap Bill at the table. The bill opens. It looks like the printed receipt: date, table and number (for example «51 · #8»), items with extras, Total, included VAT and the VAT breakdown by tax rate. The bill text itself stays German even in the English view.
- Tap Print to print an interim bill on the till's receipt printer.
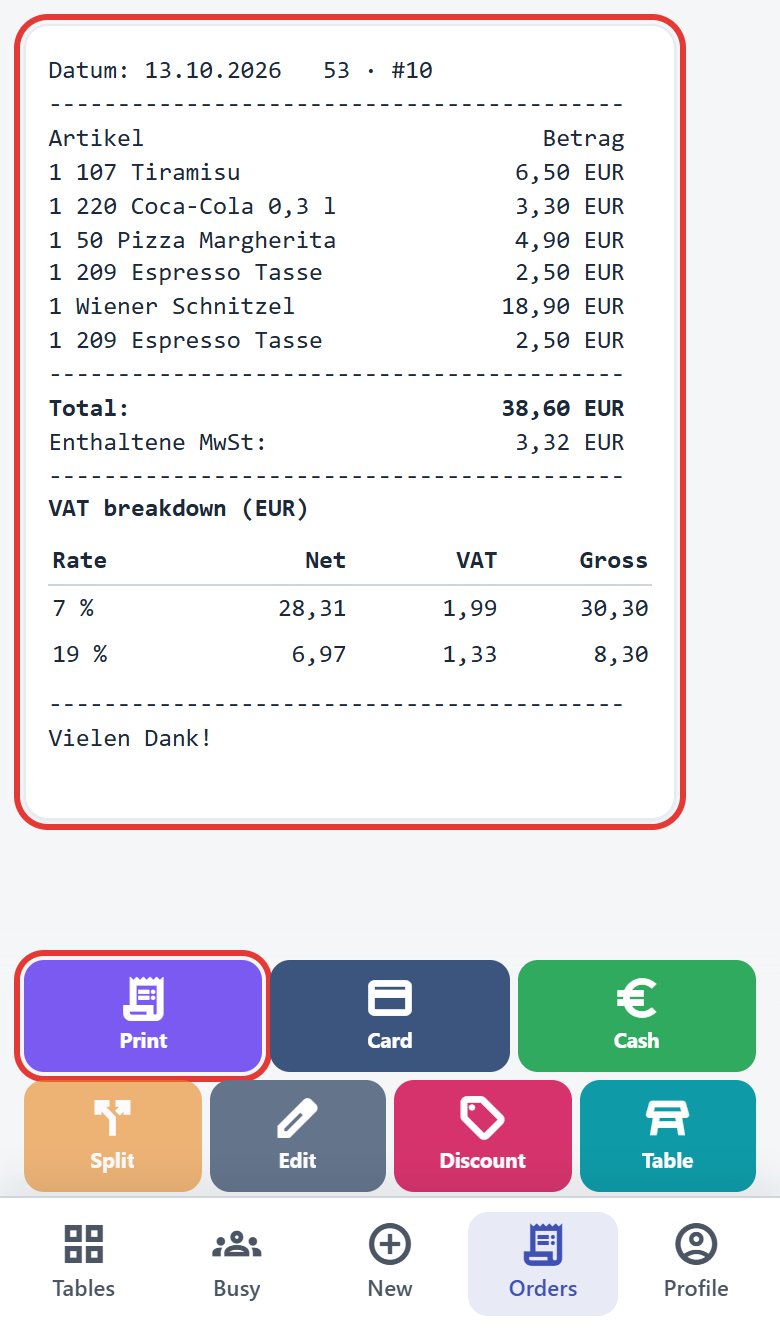 Bill for table 51, order #8 for €32.60, Print button (outlined in red)
 - Below the bill you find the buttons Print, Card, Cash, Split, Edit, Discount and Table.
Note: The interim bill is not a fiscal receipt. Vectis prints the receipt with TSE data after payment.
Give a discount
Goal: Give a discount on the whole bill.
Who can do this: Waiter, Admin, Manager, Cashier
- Tap Discount in the bill. The Discount window opens.
- Tap 5 %, 10 % or 15 %. The discount applies at once and the window closes.
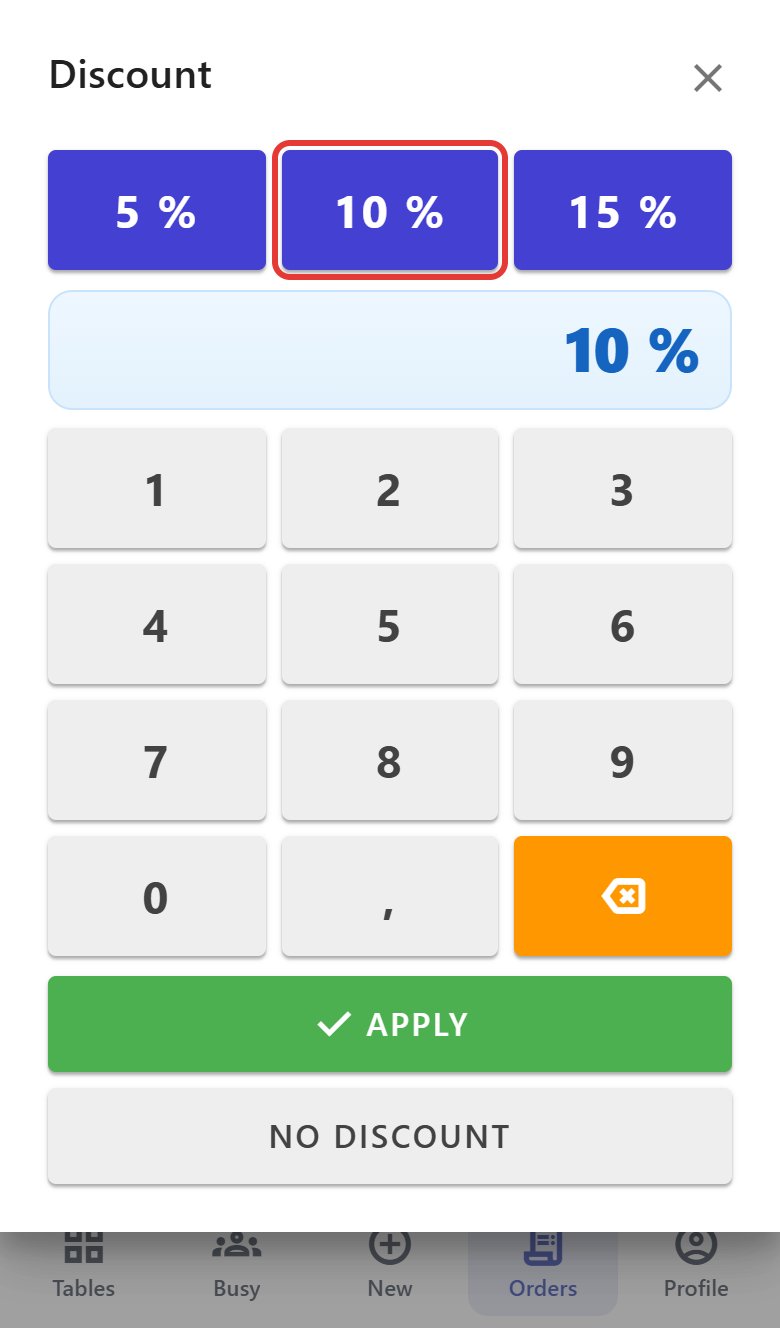 Discount window with the quick buttons 5 %, 10 % (outlined in red) and 15 %
 - For another value, type it on the keypad (1 to 99 %, also with a decimal, for example 7,5) and then tap Apply. No discount removes a discount again.
- The bill now shows the total discount and the new Total (in the example 10 % of €32.60 = −€3.26, total €29.34). The Discount button shows the chosen rate, for example «10 %».
Note: A discount is only possible before any payment has started. There is no discount on single items on the phone.
Take cash at the table
Goal: Pay the bill in cash and let Vectis calculate the change.
Who can do this: Waiter, Admin, Manager, Cashier
- Tap Cash in the bill. The Cash dialog opens.
- Amount due shows the amount. The Given field is pre-filled with exactly this amount.
- If the guest hands over more, tap Given and enter the amount received, for example 50. Change shows the change immediately (in the example: due €29.34, given €50, change €20.66).
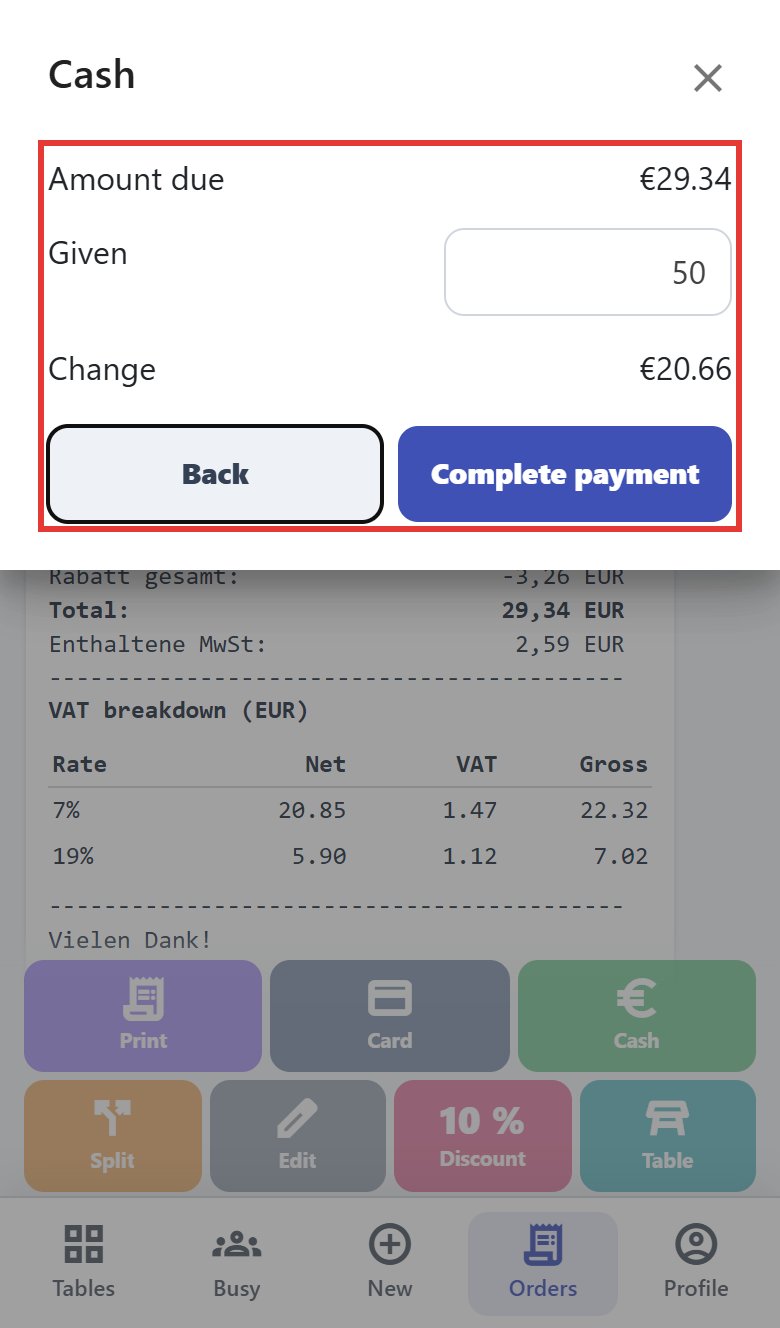 Cash window: due €29.34, given 50, change €20.66
 - Tap Complete payment. The button is disabled while Given is less than the amount due. Back closes the window without taking payment.
- Paid appears with a green tick and the summary: items (with a discount, at their discounted amounts), VAT breakdown, net, VAT, total and Paid. Table opens the table, Back to tables the table list.
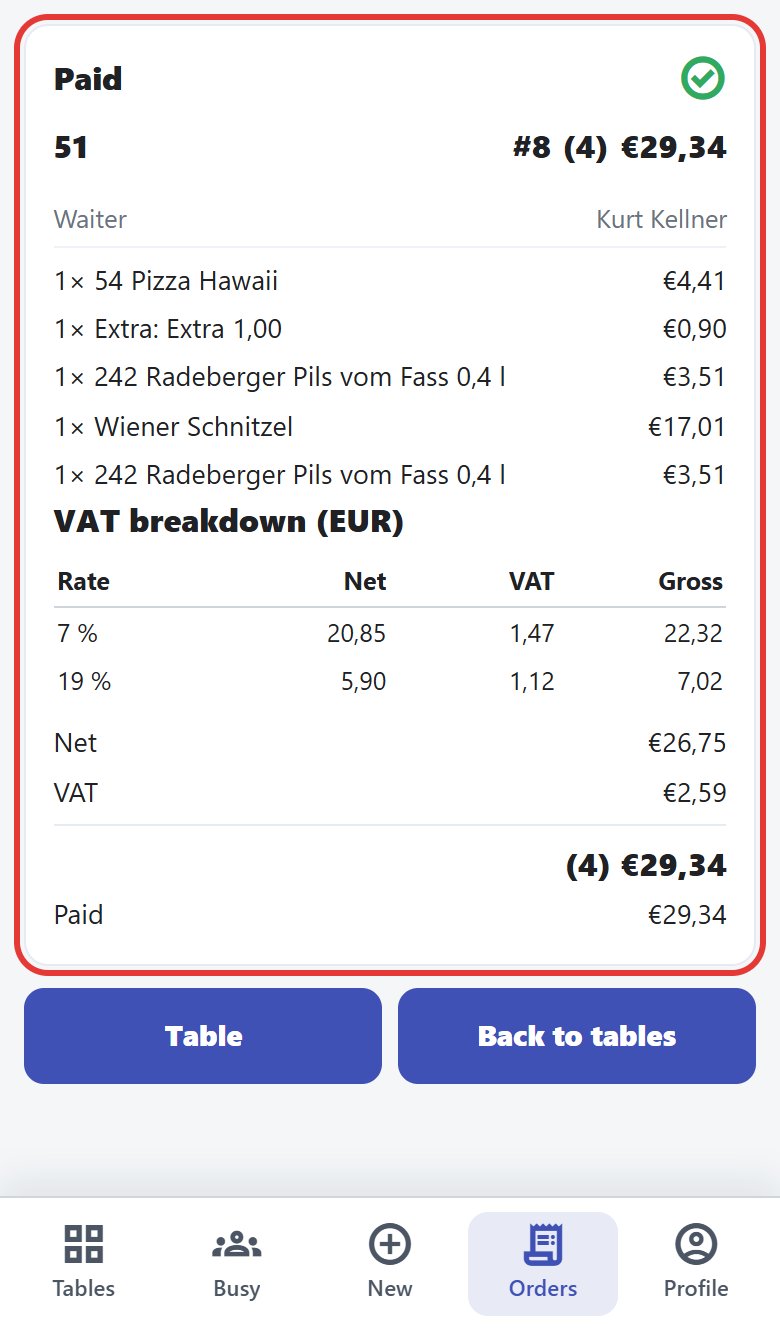 Paid: table 51, order #8, €29.34
Note: If a tip is already recorded on the order, cash is not possible: «Tips are only possible with a card payment – pay by card or remove the tip at the till.»
Take a card payment at the table (with tip)
Goal: Record a card payment that the guest has made on the card terminal.
Who can do this: Waiter, Admin, Manager, Cashier
Vectis is not connected to any card terminal. The guest pays on the external terminal, and afterwards you confirm the card payment on the phone by hand. Example: order #9 at table 52 for €9.90, 10 % tip.
- Tap Card in the bill. The Card dialog shows the Amount due (€9.90 in the example).
- Choose the tip:
- No tip,
- 5 %, 10 % or 15 % (in the example 10 %: of which tip 0.99, Amount on the terminal 10.89),
- Round up (to the next full euro),
- or enter the amount directly: Amount on the terminal (what the guest pays in total) or of which tip. The two fields convert into each other.
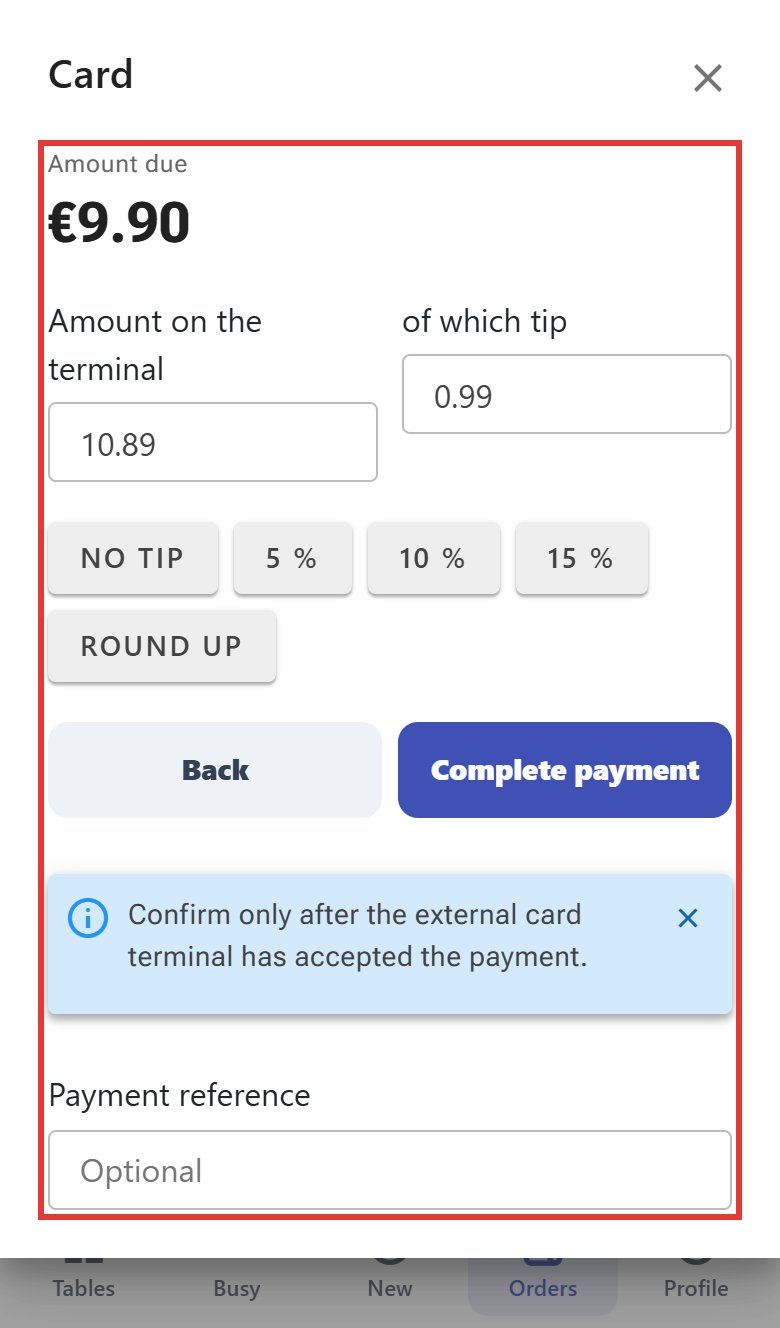 Card window: due €9.90, amount on the terminal 10.89, of which tip 0.99
- Enter the Amount on the terminal on the external card terminal and let the guest pay there.
- Optionally enter a Payment reference from the terminal slip.
- Tap Complete payment – only after the terminal has accepted the payment. The window says so too: «Confirm only after the external card terminal has accepted the payment.» Back closes the window without booking.
- Paid appears with a green tick and the summary (as for a cash payment, see above).
Caution: If «The card payment was not booked. Please press «Card» again – do NOT charge the terminal again.» appears, tap Card again, but do not charge the card a second time. If the tip is higher than the bill, Vectis asks (Check the tip: Yes, book it or Correct it).
Note: On the phone the whole amount is always paid with one method. Part cash, part card is not possible. If guests want to pay separately, tap Split first and take payment for each bill on its own. If a partial payment has already been started at the till, the phone shows «Partial payment active» – finish the payment at the till.
Note: After payment, the receipt is printed automatically on the till's receipt printer if the receipt settings say so. If «Fiscalization failed» appears, no receipt is printed – tell the cashier.
Free the table
Goal: Report the table as free again after payment.
Who can do this: Waiter, Admin, Manager, Cashier
- If Free table immediately after payment is switched on for the venue (the default), the table is Free automatically after payment. Tap Back to tables.
- If the setting is off, the table shows Settled (blue). Open the table and tap Free on the order card.
- With table cleaning: tap Dirty when the guests have left, and Clean when the table has been cleared. A dirty table cannot get a new order («Table must be cleaned first»).
My orders
Goal: See your own orders of today.
Who can do this: Waiter, Admin, Manager, Cashier
- Tap Orders at the bottom. The My Orders page shows your orders of today, newest first.
- Filter with Active (default), Paid, Cancelled or All.
- Each card shows table, number, status, number of items, total, the waiter and the items. Below are the buttons Edit, Bill, Kitchen, Menu, Cancel and Table. For paid orders most of them are pale (locked).
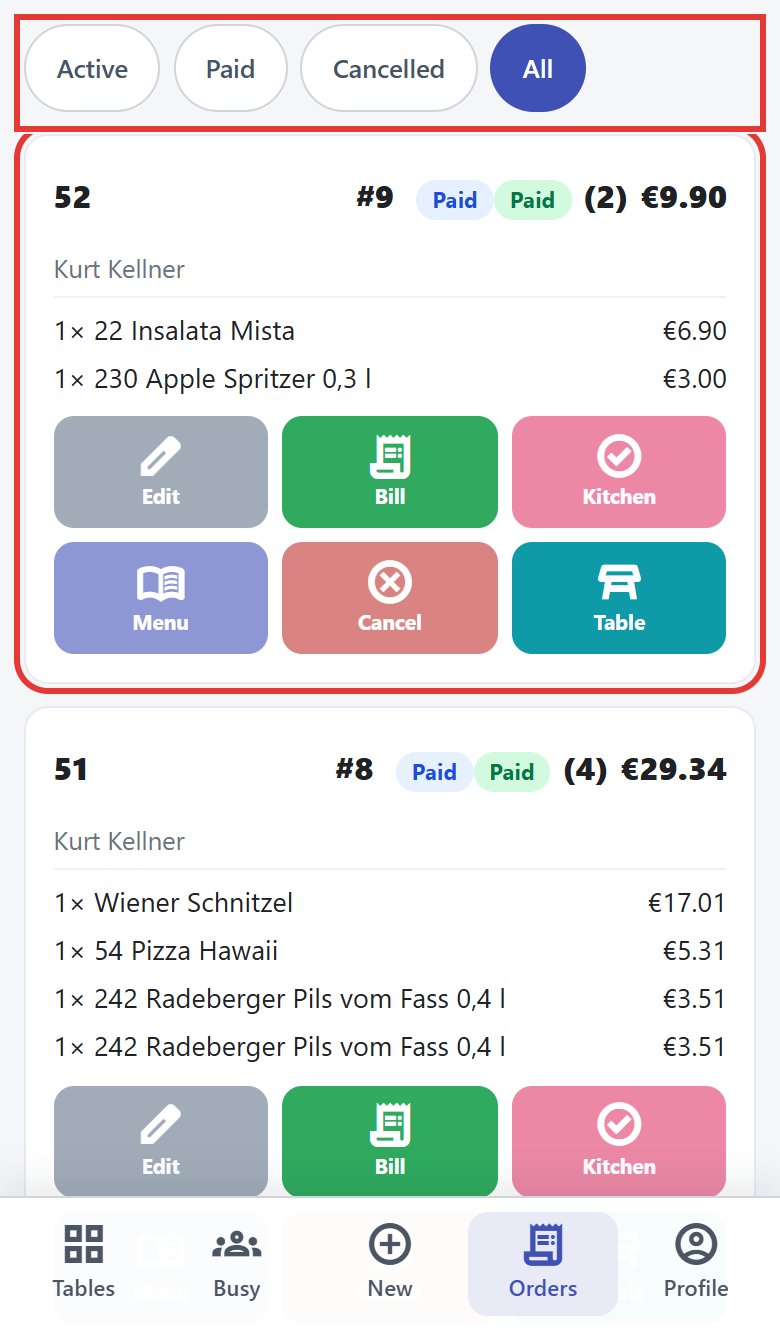 My orders, filter All: two paid orders #9 and #8
Note: Only orders assigned to you appear.
Profile, daily statistics and logging out
Goal: See your own sales of the day and log out.
Who can do this: Waiter, Admin, Manager, Cashier
- Tap Profile at the bottom.
- At the top you see your name (for example «Kurt Kellner») and Role.
- Under Today you see your Paid orders and the amounts Cash, Card and Total of the day (without tips). You see only your own figures. In the example: 2 paid orders, cash €29.34, card €9.90, total €39.24 – the €0.99 tip is not included.
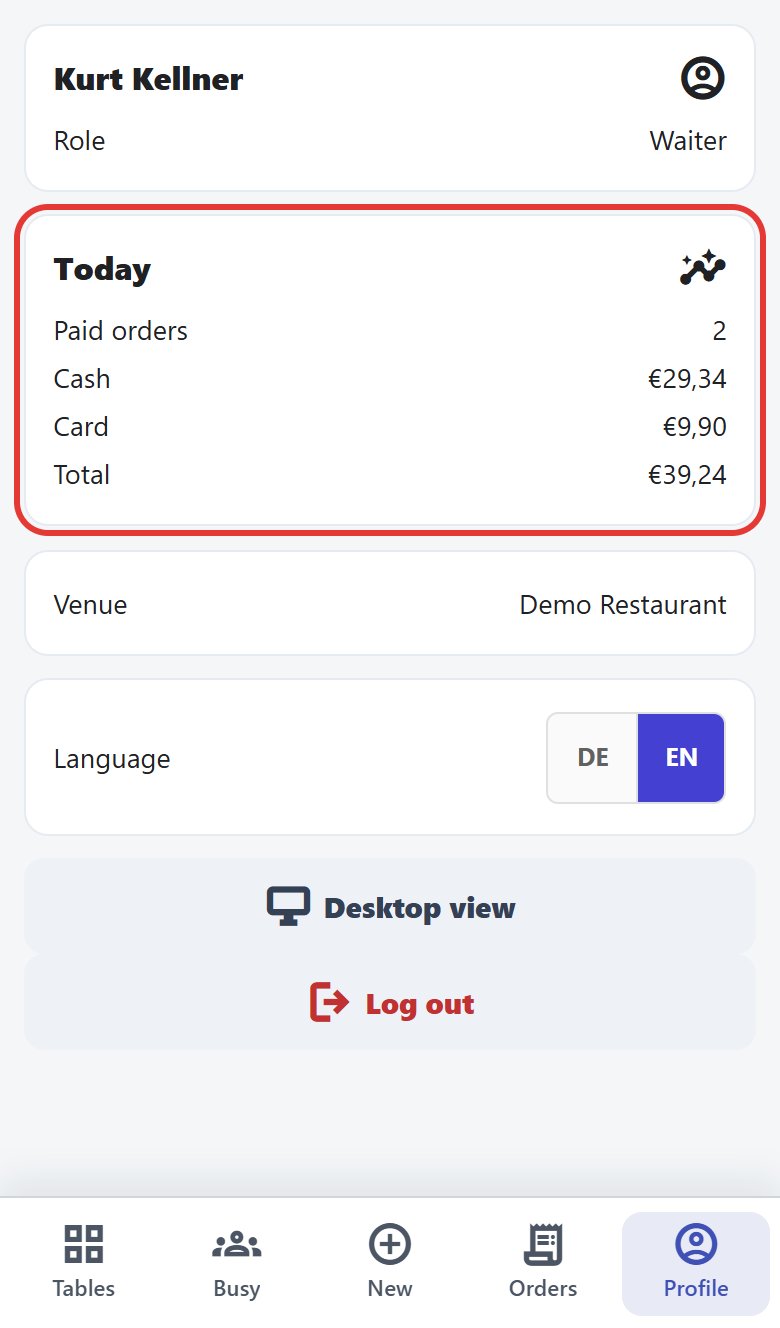 Profile with the Today statistics (outlined in red)
 - Venue shows your venue. Under Language switch between DE and EN. If there are several venues, switch under Switch venue.
- Tap Log out when your shift ends.
Note: Desktop view opens the normal till view and stays saved on this phone. The only way back is the address …/mobile/waiter/tables.
Frequently asked questions
Q: The page does not load on the phone.
Check that the phone is on the restaurant's Wi-Fi, that the IP address is right and that the till PC is running. If it works on the PC at http://localhost:10110 but not on the phone, have the firewall rule for port 10110 checked (see above).
Q: The phone shows the normal till instead of the phone view.
The phone view opens automatically only for waiters. Or Desktop view was chosen. Open …/mobile/waiter/tables.
Q: A product has no «+», only a slider icon. It has variants or required options and must be ordered at the till.
Q: How do I order «no pineapple»? Tap the item in the cart and write the wish in Note for the kitchen….
Q: I cannot change the note after sending. That is intended, the kitchen already has the item. Remove the item, order it again and tap Kitchen.
Q: Payment does not work – there is a message about kitchen changes. There are unsent changes or a cancellation. Tap Kitchen first.
Q: Can a guest pay partly in cash and partly by card? No. Split the bill with Split and take each bill with one payment method.
Q: Cash is refused – «Tips are only possible with a card payment». A tip is already recorded on the order. Pay by card or remove the tip at the till.
Q: The card payment was not booked. Does the guest have to pay again? No. Tap Card again, but do not charge the terminal again.
Q: The table stays blue («Settled») after payment. Automatic freeing is switched off for the venue. Open the table and tap Free.
Q: My orders and my statistics are empty although I took orders. Contact your Vectis service partner.
Q: Can I see my colleagues' sales? No. The profile shows only your own figures.
Q: I see «Access denied». Your account has no permission for this page (for example a kitchen or display device account). Log in with a waiter account.