04 Tables and places
In this chapter you set up your venue: areas (in the example «Tische», «M» and «Mitnehmen»), tables and takeout counters. Then you get to know the floor plan your service team works with during service: it shows at a glance which table is free, occupied, settled, reserved or dirty. The last part covers reservations.
Note: The dialogs for editing venues, places and reservations are in English in both interface languages (for example Edit Venue, Add Place, New reservation, Save). This chapter quotes the labels exactly as they appear on screen. Area names such as «Tische» or «Mitnehmen» are names from the example, not interface labels.
View and edit venues
Goal: Check or change the name, address and basic settings of your venue.
Who can do this: Admin, Manager (the menu item is shown only to Admin and Manager)
- Open Menu › Venue Management › Venues. You see the list of your venues with Name, Type, Address, Phone and Email. On the right are the actions: pencil icon (edit), Places and the orange ban icon (deactivate). A deactivated venue carries the red Inactive badge.
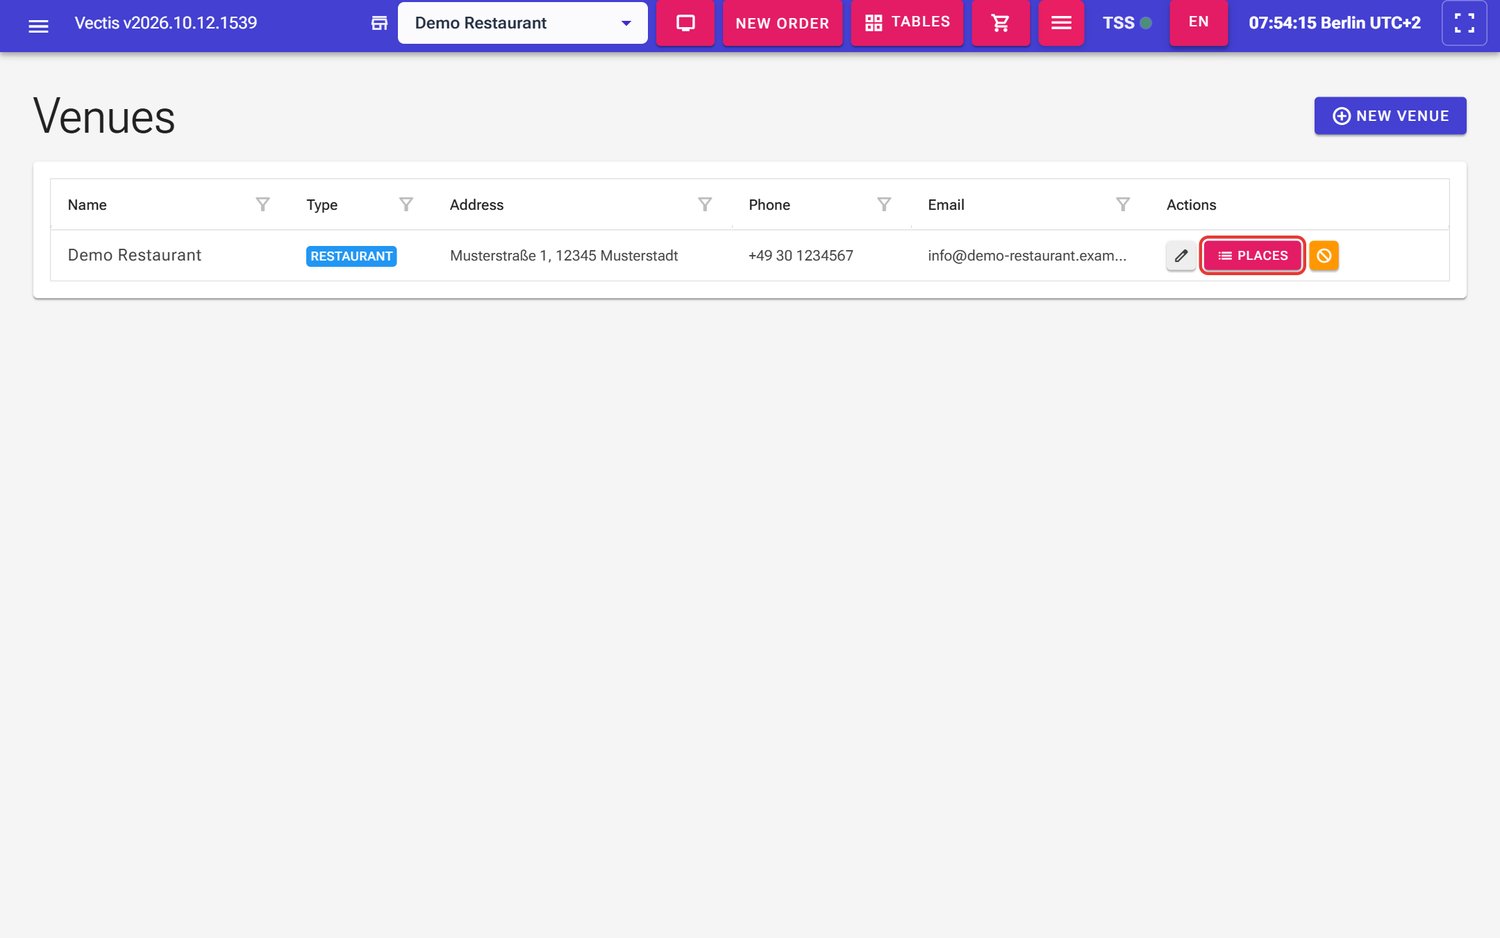 Venue list with the «Places» button (outlined in red)
 - Click the pencil icon in the venue's row. The Edit Venue dialog opens.
- Change Name, Type, Address, Phone or Email if needed. All of these fields are required. Leave Default Cash Recycler empty if you have no cash recycler.
- Set how tables and the kitchen work:
- Allow kitchen to start before payment: switch on for restaurants where guests pay at the end of the meal. When it is off, the kitchen can start an order only after it has been paid (for counters, snack bars, takeaway).
- Free table immediately after payment: paid orders close automatically and the table becomes free without another click. This is on for new venues.
- Use table cleaning (Dirty/Clean): shows the Mark dirty button on the floor plan. A dirty table cannot seat new guests until it has been cleaned.
- Ready Display Seconds: how long a ready order stays on the kitchen and pickup screens. Empty = 120 seconds.
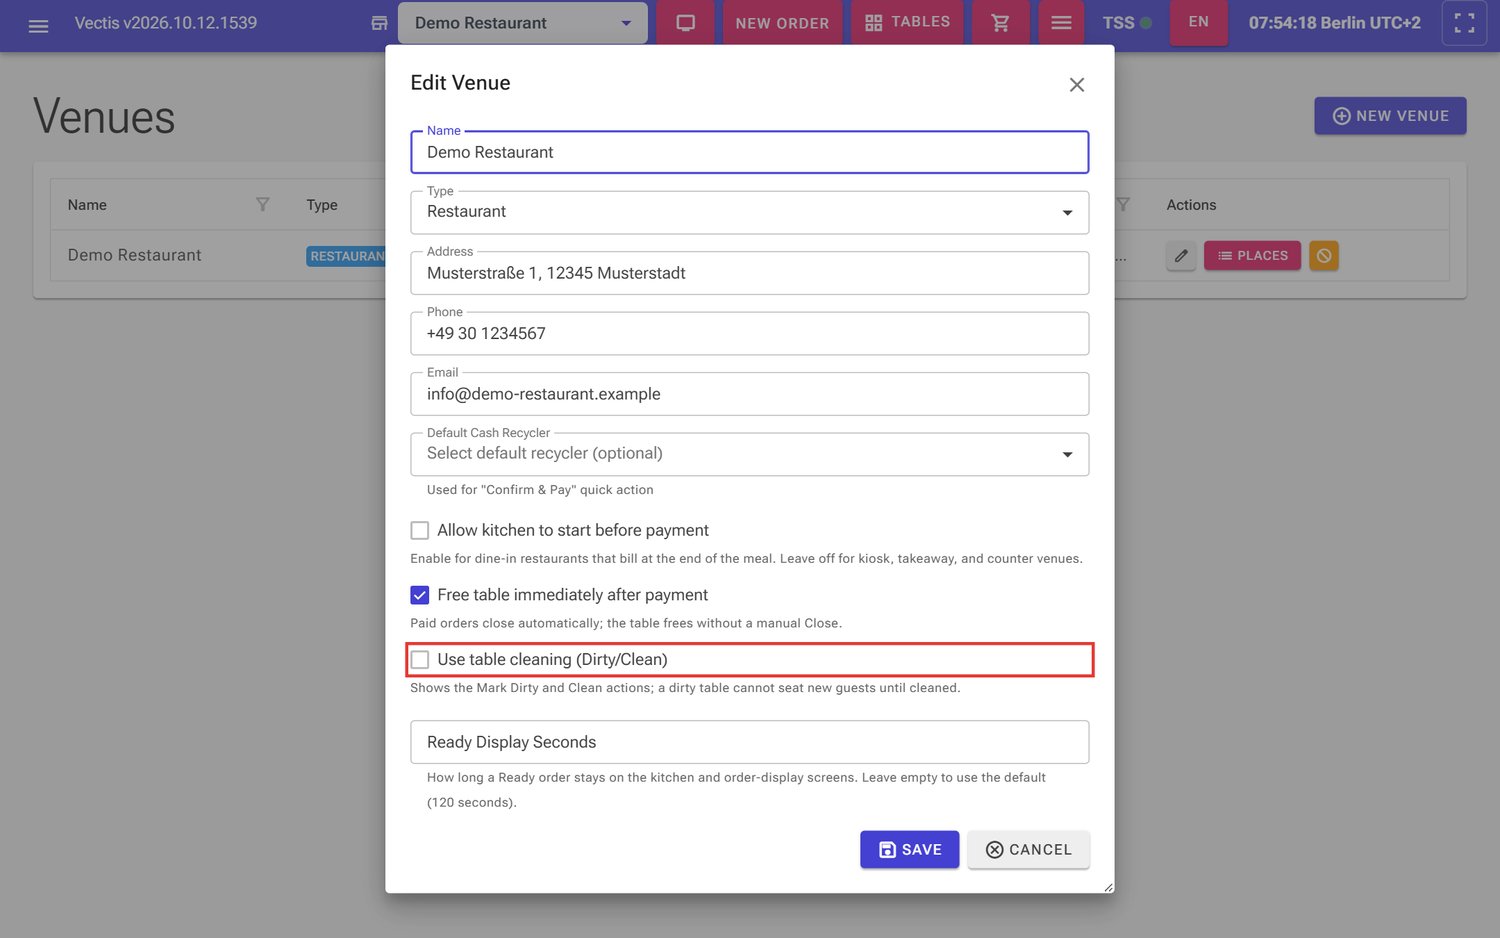 «Edit Venue» dialog, table-cleaning option outlined in red
- Click Save.
Note: The orange block icon in the list deactivates a venue (confirm with Yes); the green tick activates it again. No new orders can be created for a deactivated venue.
Create and rename areas
Goal: Group tables into areas, for example dining room, bar and takeaway. Each area becomes its own tab on the floor plan.
Who can do this: Admin, Manager (the menu item is shown only to Admin and Manager)
- Open Menu › Venue Management › Venues.
- Click Places in the venue's row. The dialog «Places - Demo Restaurant» opens. At the top, the Categories / tabs block lists the existing areas with Name, Free color, number of Places, Order and Actions. In the example these are «Tische» (58 places), «M» (4) and «Mitnehmen» (3).
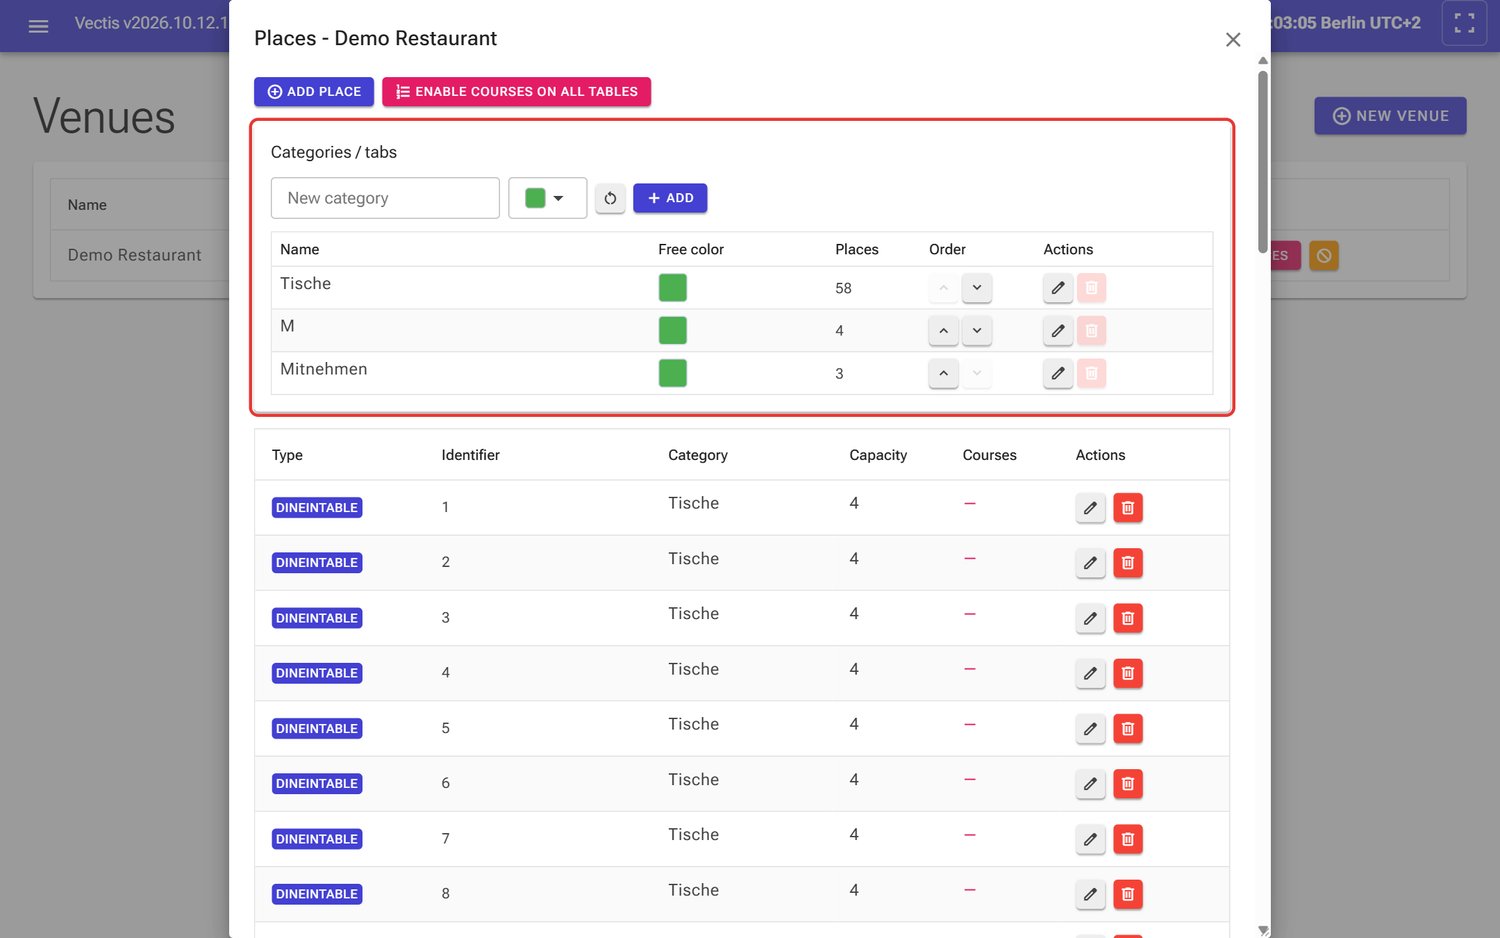 «Places - Demo Restaurant» dialog with the «Categories / tabs» block (outlined in red)
 - Type the name of the new area in the New category field, for example «Bar».
- Optional: pick a colour with the colour field next to it. Free tables of this area are shown in this colour on the floor plan. Without a colour of their own, free tables are green. The arrow icon resets the colour.
- Click Add.
- Rename: click the pencil icon in the area's row, change the name or colour and save with the disk icon. The cross icon cancels.
- Order: the up and down arrows in the Order column decide in which order the tabs appear on the floor plan.
Note: You can delete an area (red bin icon) only while no places are assigned to it. While it has places, the bin is pale and cannot be clicked. Move the tables to another area first.
Add tables and takeout counters
Goal: Add a new table or a takeout counter.
Who can do this: Admin, Manager (the menu item is shown only to Admin and Manager)
- Open the venue's Places dialog as described above.
- Click Add Place. A form appears below the areas.
- Under Type choose:
- DineInTable for a table,
- TakeoutCounter for a takeout counter or bar counter.
- Under Identifier (e.g., Table 1, Counter A) type the name, for example «61». This name appears on the floor plan and as the headline of the kitchen ticket.
- Under Category / tab choose the area, for example «Tische».
- Tables only: enter the number of seats under Capacity (1 to 20). This field is required.
- Optional:
- Unlimited (no status tracking; for takeout counters): the place has no status (it always stays «Free»). Useful for takeout counters with many orders at the same time.
- Course serving (waiter can assign courses 1-4 to items): tables only. The cart then shows a course button on each item (see chapter 05).
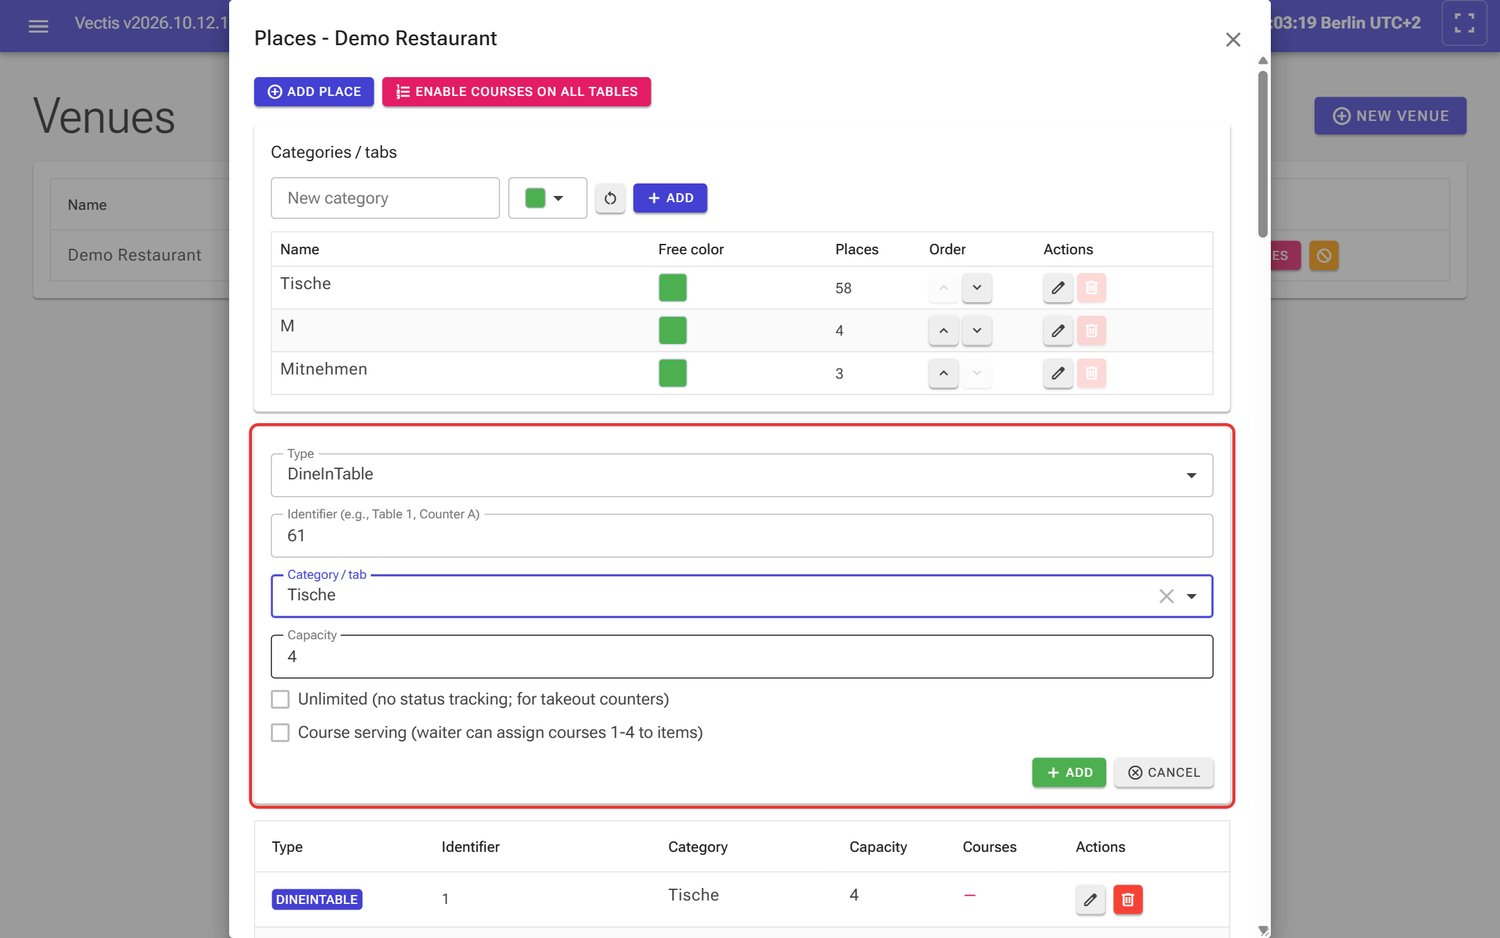 Form for a new table «61» in the area «Tische» (outlined in red)
- Click Add. The place appears in the list below (columns Type, Identifier, Category, Capacity, Courses, Actions). Cancel closes the form without saving.
Note: Enable courses on all tables switches courses on for every table of the venue at once. Takeout counters are not affected.
Rename, move or delete tables
Goal: Change the name, area or capacity of an existing place, or remove a place.
Who can do this: Admin, Manager (the menu item is shown only to Admin and Manager)
- Open the venue's Places dialog.
- Click the pencil icon in the place's row. The form shows the current values.
- Change Identifier (rename), Category / tab (other area), Capacity or the options.
- Click Save.
- To delete, click the red bin icon and confirm with Yes.
- Close the dialog with the cross at the top right.
Caution: Do not delete a table that still has an open order. Close or move the order first.
Understand the floor plan
Goal: See during service which tables are free, occupied or settled.
Who can do this: Admin, Manager, Cashier, Waiter
- Click Tables in the header bar, or open Menu › Venue Management › POS Floor Plan.
- At the top left are the table zone tabs: All and your areas (in the example «Tische», «M», «Mitnehmen»), and Without zone if needed. The number on the tab is the number of places in that area. Tap a tab to see only that area.
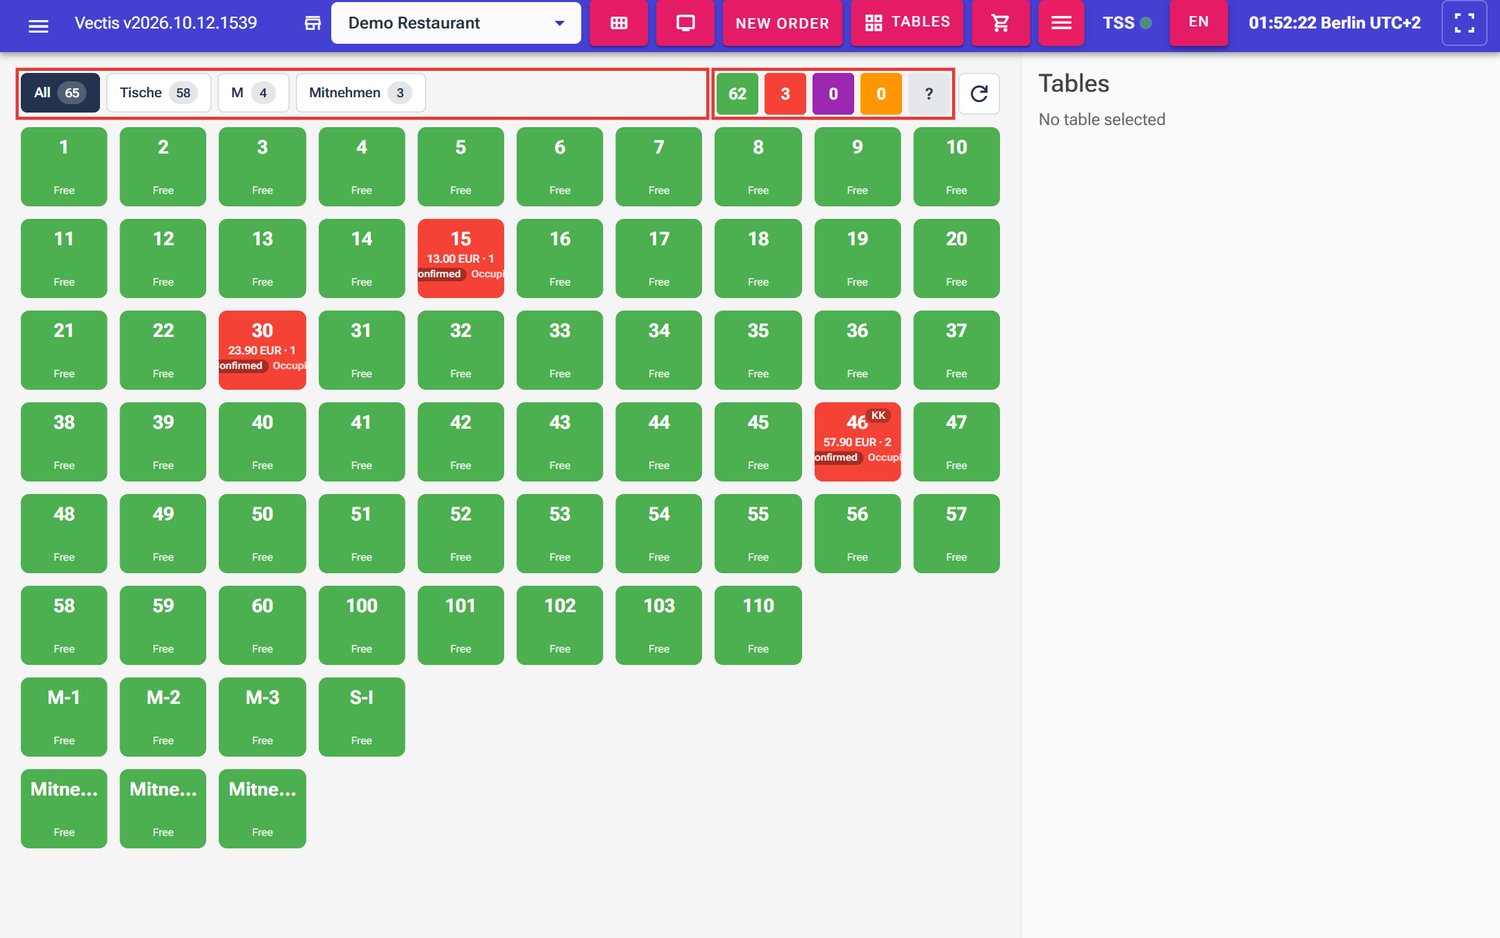 Floor plan: area tabs on the left and coloured status counters on the right (outlined in red)
 -
Each tile is a table. Its colour shows the status:
Colour Status Meaning Green (or the area colour) Free empty, ready for guests Red Occupied guests are seated or there are unpaid orders Purple Settled all orders are paid, the table is waiting to be cleared / freed Orange Reserved a reservation starts soon (15 minutes before) Grey Dirty marked dirty, needs cleaning (only when table cleaning is switched on) -
The tile also shows: for open orders the amount and the number of orders (for example «57.90 EUR · 2»), the order status (for example Confirmed) and the waiter's initials; for a reservation the time and name (for example «02:15 Fa…»).
- At the top right there is a coloured counter for each status (green, red, purple, orange; grey only when there are dirty tables). Clicking a counter filters the plan to that status; clicking it again removes the filter. Clear all filters shows everything again.
- Clicking ? shows an explanation of the colours.
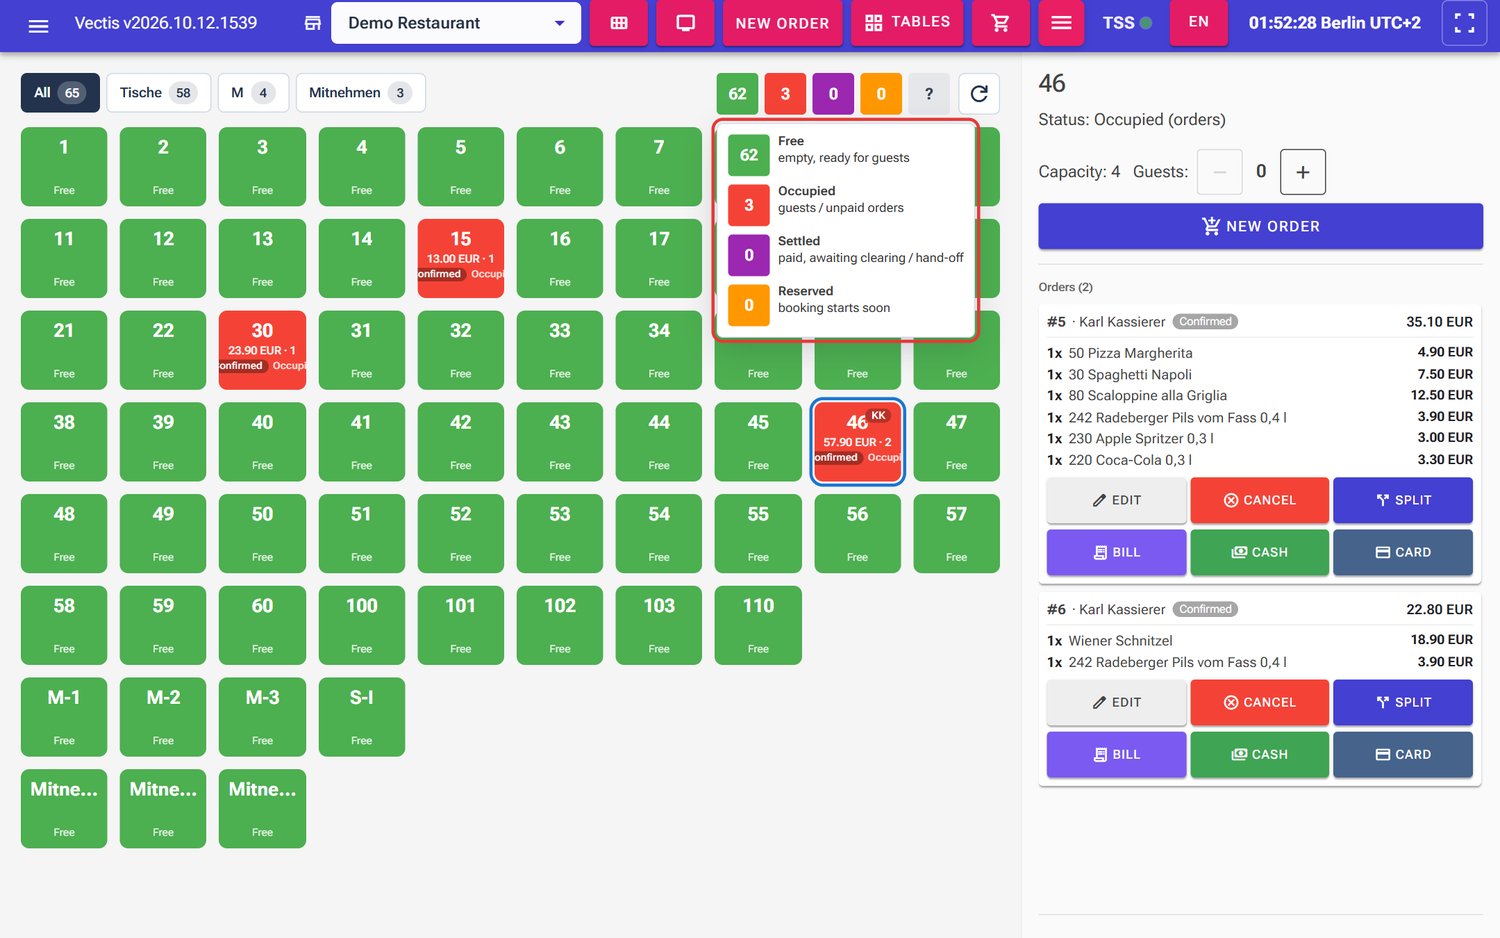 Colour explanation after clicking «?» (outlined in red)
Note: The status is calculated automatically from the orders. You never set a table to «Occupied» by hand: as soon as an order with at least one item is attached to the table, it is occupied. «(orders)» after the status in the details panel means it comes from the orders; «(booking)» means it comes from a reservation.
Note: The floor plan updates itself, also when orders are taken on another device (for example a phone). The refresh icon next to the counters reloads it immediately. The number of columns and the text size of the tiles are set under ☰ › Table display settings (Table columns, Table card text).
How a table changes status
This is the typical flow at a table:
- Free → you tap the table and choose New order. As soon as the first item is in the cart, the table becomes Occupied (red).
- Occupied → all orders of the table are paid: the table becomes Settled (purple).
- If the venue has Free table immediately after payment switched on (as in the example), the order closes automatically after payment and the table is Free again straight away.
- Otherwise tap Free on the paid order in the details panel. The order is completed and the table becomes Free.
- Optional, with table cleaning: when the guests have left, tap Mark dirty. The table is Dirty (grey). New orders and Seat now are blocked («Table must be cleaned first»). After cleaning, tap Clear status – the table is Free again.
- Reserved appears by itself shortly before a reservation, as long as the table is not occupied.
Note: There is no separate «Cleaning» status. There is only Dirty and, after Clear status, Free again. If the table still has an unpaid order, it keeps showing Occupied after Clear status.
Work with a table
Goal: Select a table and order, pay or free it from there.
Who can do this: Admin, Manager, Cashier, Waiter
- Tap the tile on the floor plan. It gets a blue outline and the details panel on the right shows the table name, Status (for example «Occupied (orders)»), Capacity and Guests.
- Use − and + next to Guests: to enter the number of guests.
- New order opens the order screen for this table (chapter 05).
- Under Orders (…) you see every open order of the table with its number (for example «#5»), waiter, status, amount and items including extras. Depending on the situation, these buttons appear:
- Kitchen: appears only when new or changed items have not been sent to the kitchen yet, and sends them.
- Edit: opens the order in the order screen.
- Cancel: cancels the whole unpaid order (question «Cancel order …?», answer Yes). Only possible while no payment has been recorded.
- Split: splits the bill (chapter 05).
- Bill: prints an interim bill for the guest (only before payment).
- Cash / Card: opens the payment with that method preselected (chapter 06).
- Free: appears on orders that are already paid and completes them; the table then becomes free.
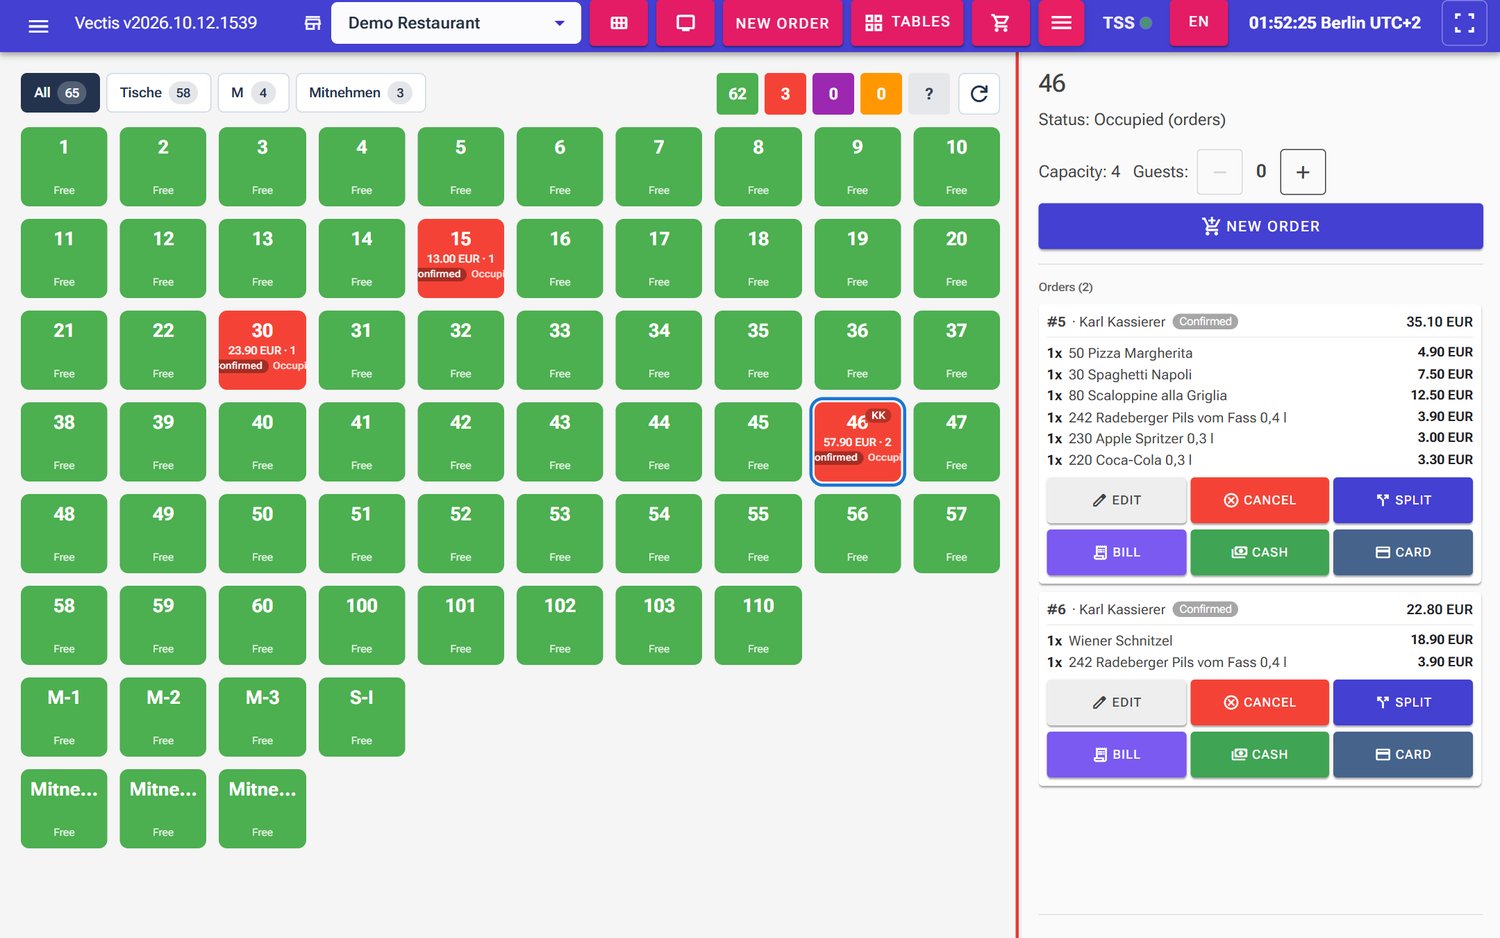 Table 46 selected: details panel with orders #5 and #6 and their buttons
- With table cleaning switched on, a free table also offers Mark dirty. On a dirty table New order is greyed out and only Clear status is offered.
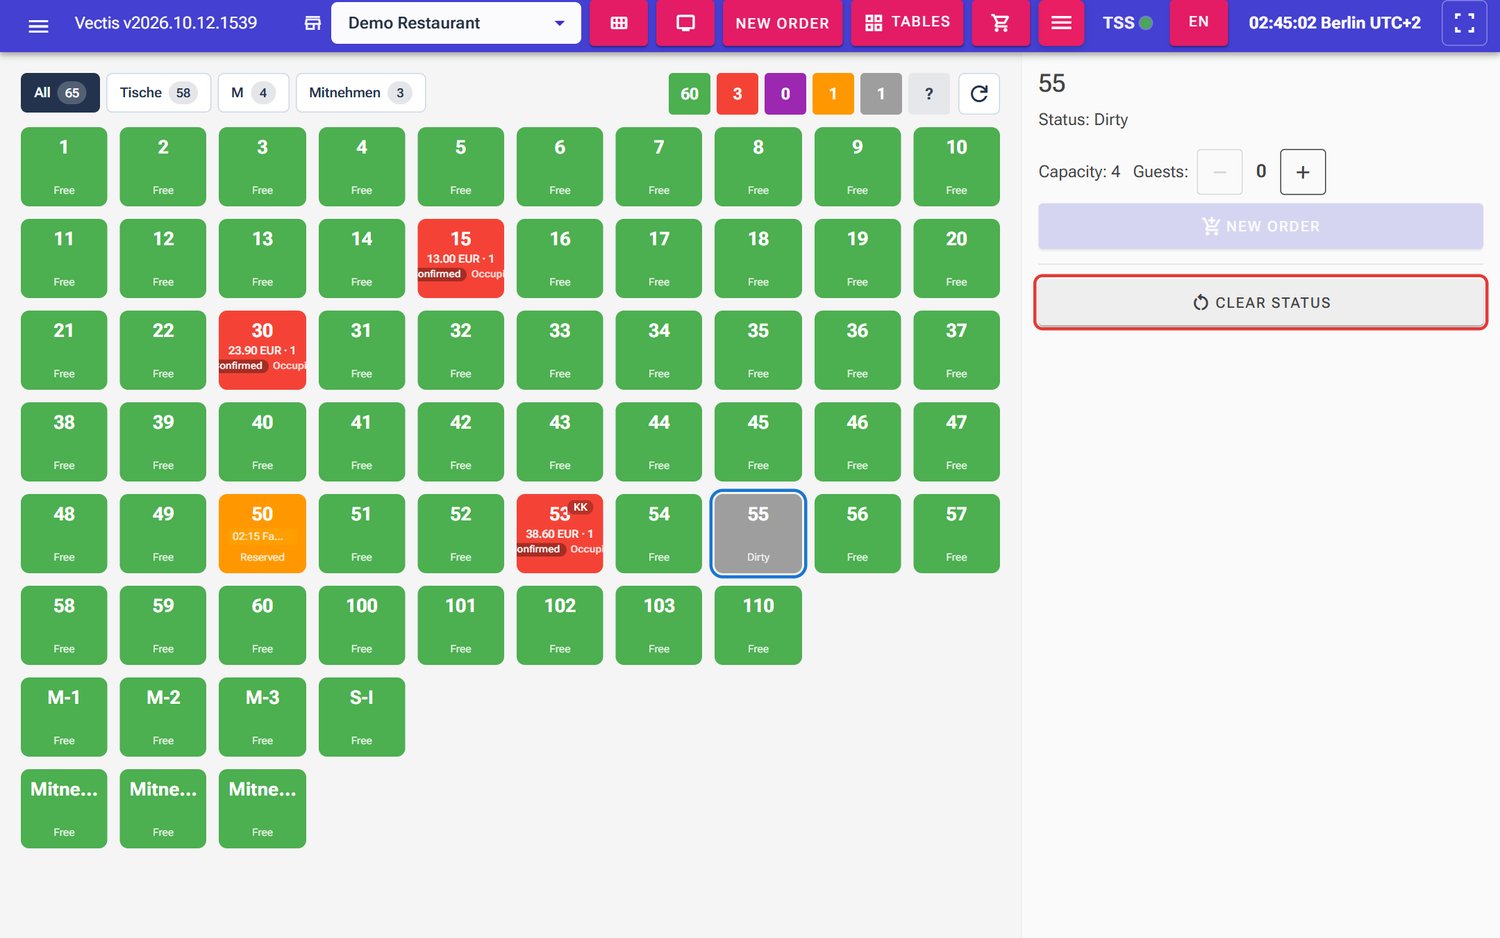 Dirty table 55 with «Clear status» (outlined in red)
Manage reservations
Goal: Create, change, reschedule or cancel a table reservation.
Who can do this: Admin, Manager, Cashier. Waiters see the menu entry but cannot view, create, change or cancel reservations.
- Open Menu › Venue Management › Reservations.
- At the top, filter by period (From, To) and table (Place). The default is today plus seven days. Refresh reloads the list. The tabs Upcoming, Seated, Cancelled and Expired separate reservations by state. The list shows Date, Time, Place, Guest, Phone, Party, Status and Actions.
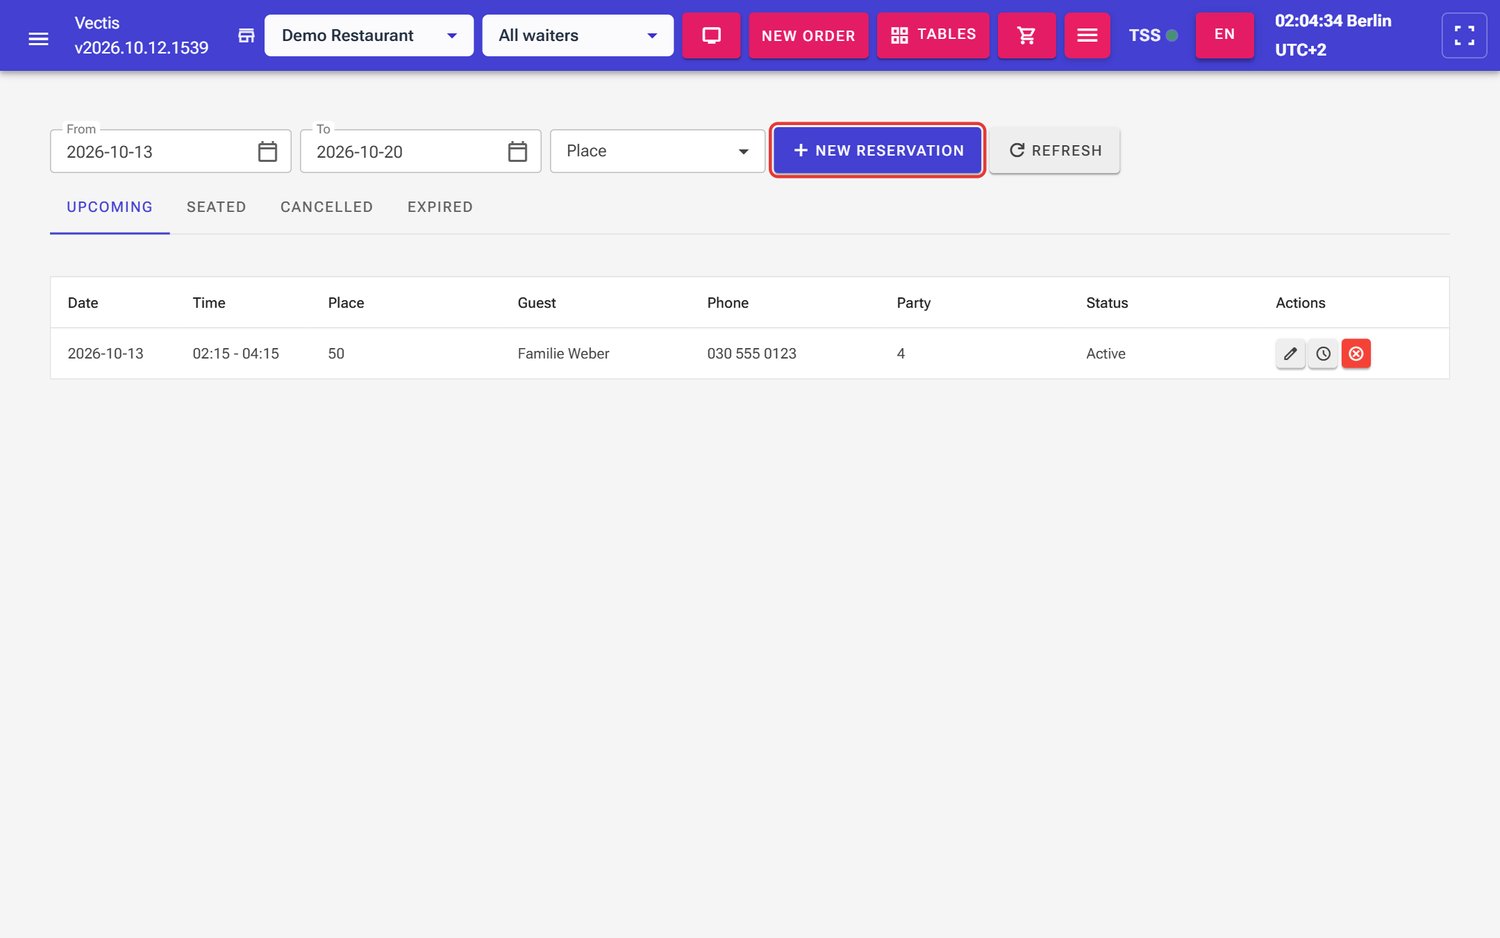 Reservation list with the reservation «Familie Weber» at table 50; «New reservation» outlined in red
 - Click New reservation.
- Fill in the New reservation dialog: Place (table), Guest name, optionally Phone (optional), Party size, Date, From and To (in 15-minute steps), optionally Notes (optional). Example: table 50, «Familie Weber», 4 guests, 02:15–04:15, note «Kinderstuhl» (high chair).
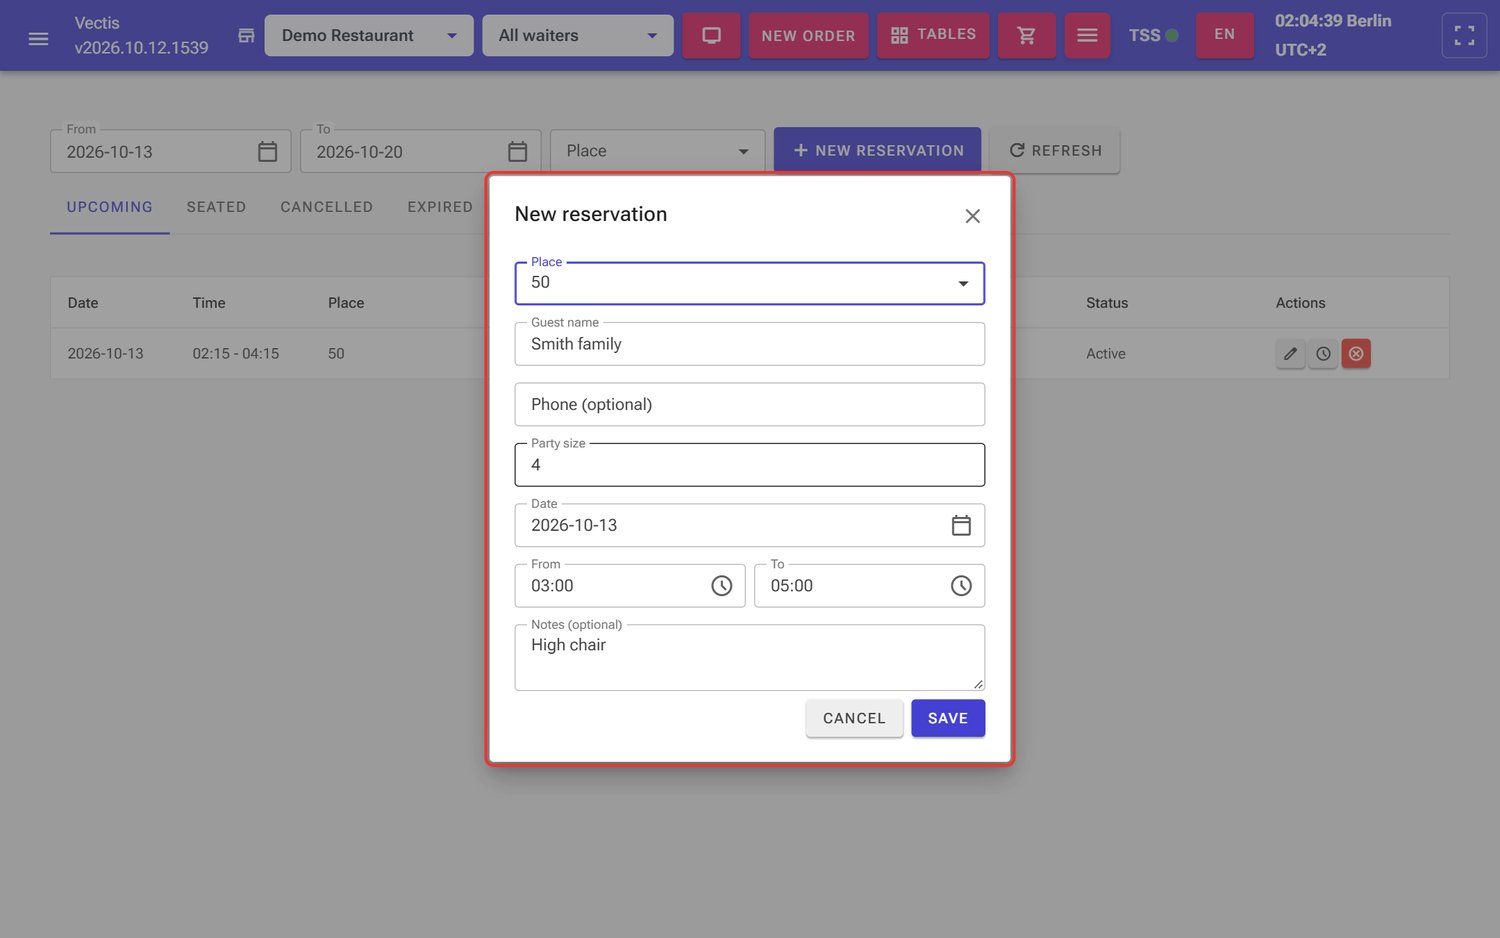 «New reservation» dialog filled in for Familie Weber
 - Click Save.
- If the time overlaps another reservation on the same table, the dialog shows in red «Conflicts with reservation by …». Choose another time or table.
- If there are more guests than seats, the orange hint «Party size exceeds the place capacity.» appears.
- In the list, change an upcoming reservation with the pencil icon (name, phone, party size, notes), reschedule it with the clock icon (date and time) or cancel it with the red icon (confirm the question).
Note: The Status column shows «Active» for a valid reservation (in English also in the German interface).
Seat guests with a reservation
Goal: Seat arriving guests who have a reservation.
Who can do this: Admin, Manager, Cashier. If a waiter taps Seat now, the till refuses; the waiter starts with New order instead.
- Open the floor plan. A table with an upcoming reservation turns orange shortly before and shows the time, name and Reserved on the tile.
- Tap the table. The details panel shows «Status: Reserved (booking)» and a light orange box with name, party size and time (in the example: Familie Weber, 4 guests, 02:15 - 04:15).
- Tap Seat now. The reservation counts as seated and the order screen for this table opens.
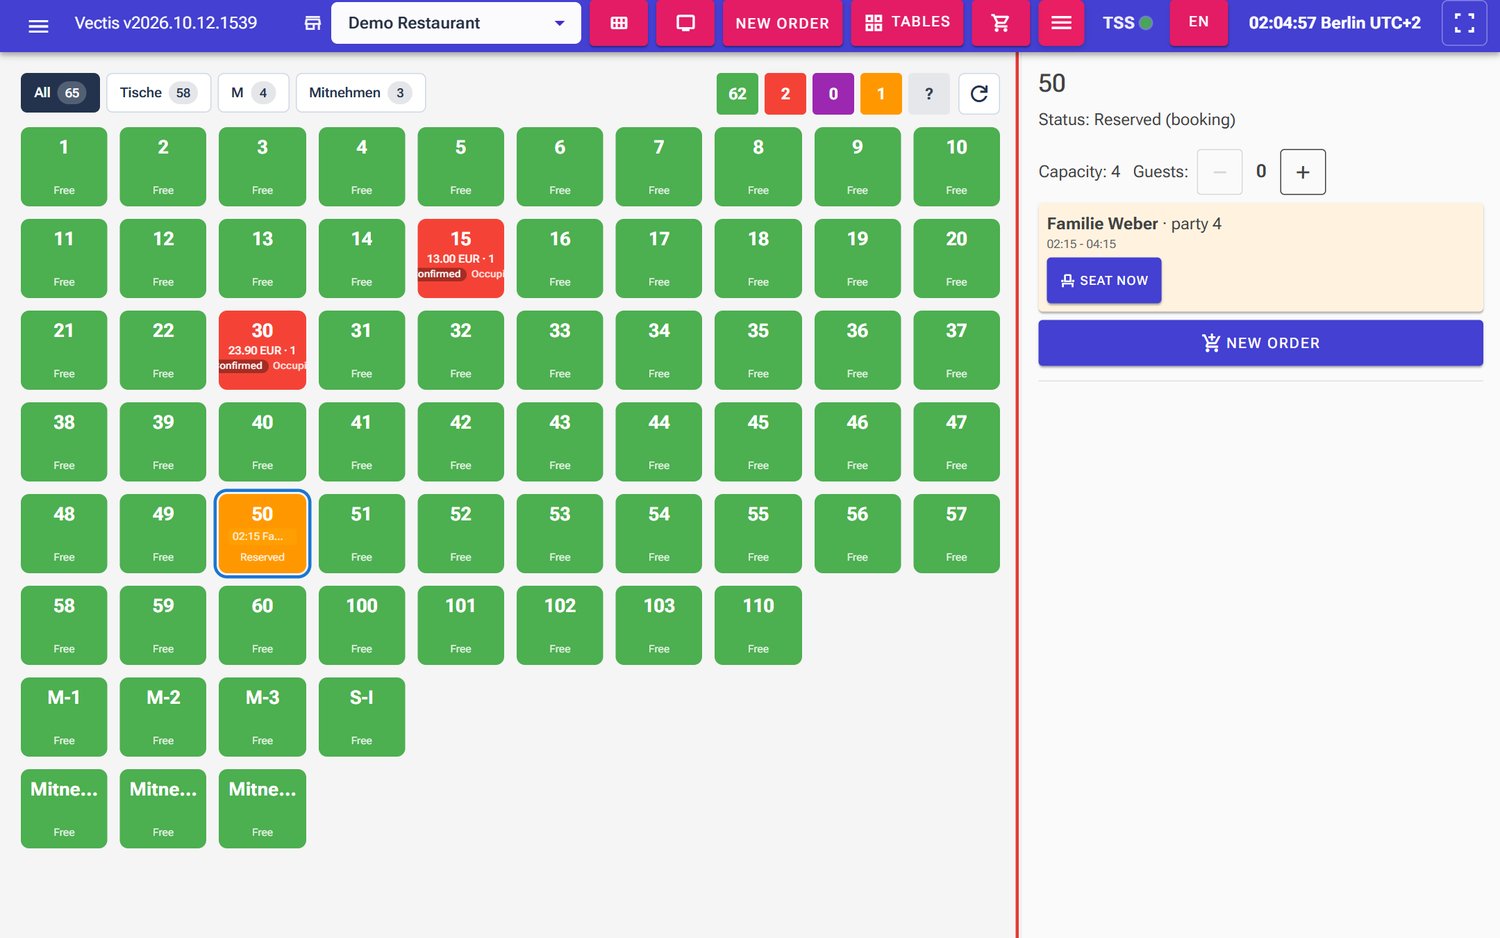 Reserved table 50 with the «Familie Weber» box and «Seat now»
Note: If the table is marked dirty, Seat now is blocked. Clean the table first (Clear status).
Frequently asked questions
Q: I cannot see the «Venues» menu item. Only Admin and Manager may set up venues, areas and tables. Cashiers see the floor plan and reservations, waiters can only use the floor plan.
Q: The floor plan says «No places configured for this venue». The selected venue has no tables yet. Add them under Venues › Places.
Q: Why is a table red although nobody is sitting there? The table still has an unpaid order with items. Open the table and pay, move or cancel the order.
Q: The table is purple. What do I do? All orders are paid. Tap Free on the order and the table is free again. To have this happen automatically, switch on Free table immediately after payment for the venue.
Q: I cannot create a new order for a table – «Table must be cleaned first». The table is marked dirty. Tap Clear status once it is clean.
Q: I cannot find the «Mark dirty» button. It appears only when Use table cleaning (Dirty/Clean) is switched on for the venue.
Q: How do I rename a table? Venues › Places, pencil icon on the table, change Identifier, Save.
Q: Can I arrange the tables freely on a floor drawing? No. The floor plan shows the tables as a grid, sorted by area and name. You set the number of columns under ☰ › Table display settings.
Q: When does a reserved table turn orange? Shortly before the reservation starts (15 minutes before), provided the table is not occupied then.
Q: What is a «TakeoutCounter»? A place for takeaway or counter orders. With Unlimited it has no status and always stays free.
Q: Why are some dialogs in English? Some administration dialogs are labelled in English only. They work the same way.