09 Printers
Vectis prints receipts, kitchen tickets, interim bills and reports in the background on the printers that are set up in Windows on the till PC. You decide which printer prints what on the Receipt Options page. This chapter shows how to set up a printer, how to split kitchen and bar printing, what a kitchen ticket looks like, and what to do when nothing prints.
Set up the printer in Windows first
Goal: Install the receipt printer in Windows so that Vectis can find it.
Who can do this: Whoever has Windows administrator rights on the till PC (usually your Vectis service partner).
- Connect the printer (USB or network) and switch it on.
- Install the manufacturer's driver, following the printer's instructions.
- In Windows, open Settings › Bluetooth & devices › Printers & scanners and check that the printer is listed.
- Print a Windows test page from there. If the test page does not come out, the problem is the printer or its driver, not Vectis.
- Give the printer a clear name, for example "Kitchen" or "Bar". You will see this name in Vectis.
Note: Vectis only lists the printers that the Vectis service on the till PC can see ("Listed printers come from the Vectis Windows service context used for background printing."). Set the printer up directly on the till PC.
Caution: Vectis cannot use "Microsoft Print to PDF", because that printer asks for a file name. If it is the Windows default printer and Vectis is set to System default printer, nothing prints. Always select your real receipt printer in Vectis.
Open Receipt Options
Goal: Open the page with all print settings.
Who can do this: Admin, Manager (the menu item is shown only to Admin and Manager).
- Open Menu › POS Setup › Receipt Options.
- A blue badge at the top right shows when the settings were last saved (Updated …). A red Not saved means the receipt options have never been saved.
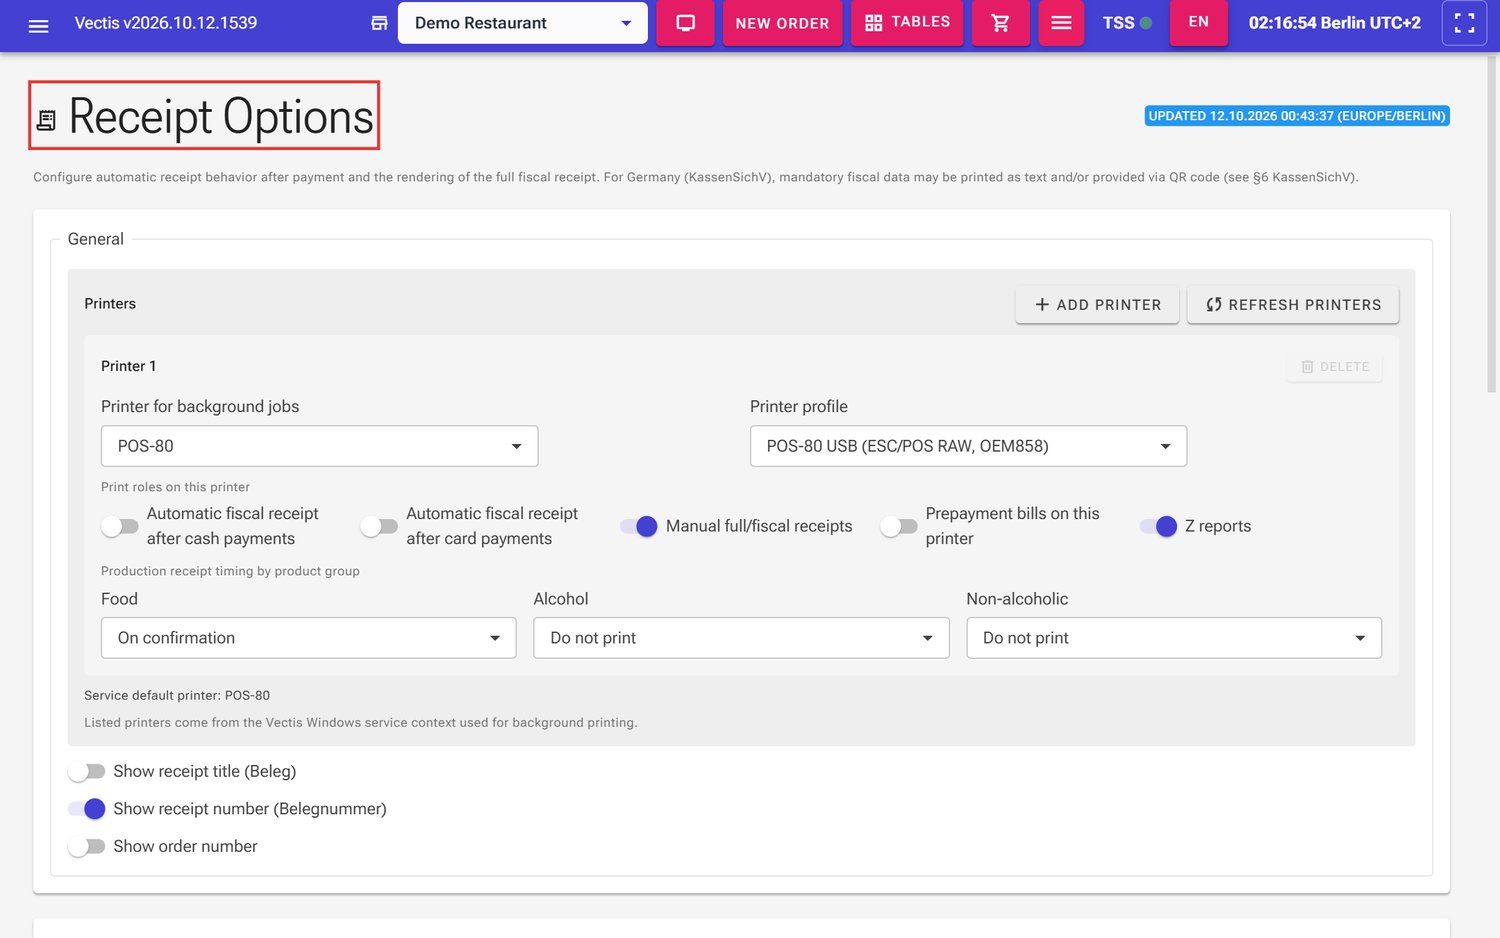 Receipt Options page with the card Printer 1
Below the printer card you see which printer is the Vectis service's default (Service default printer: …).
The page has these sections: General (printers and receipt header), Merchant identifiers (optional), Payments (optional), Fiscal data (TSE / KassenSichV), Storno, and Actions with Save and Refresh.
Note: Changes only take effect when you tap Save at the bottom. Refresh reloads the saved values and discards your changes.
Choose the receipt printer
Goal: Choose which Windows printer Vectis prints on.
Who can do this: Admin, Manager (the menu item is shown only to Admin and Manager).
- Open Menu › POS Setup › Receipt Options.
- Under General › Printers you see a card Printer 1.
- If you have just installed a printer in Windows, tap Refresh printers.
- In Printer for background jobs, select your printer. The list contains all Windows printers and the entry System default printer (…) with the name of the current Windows default printer.
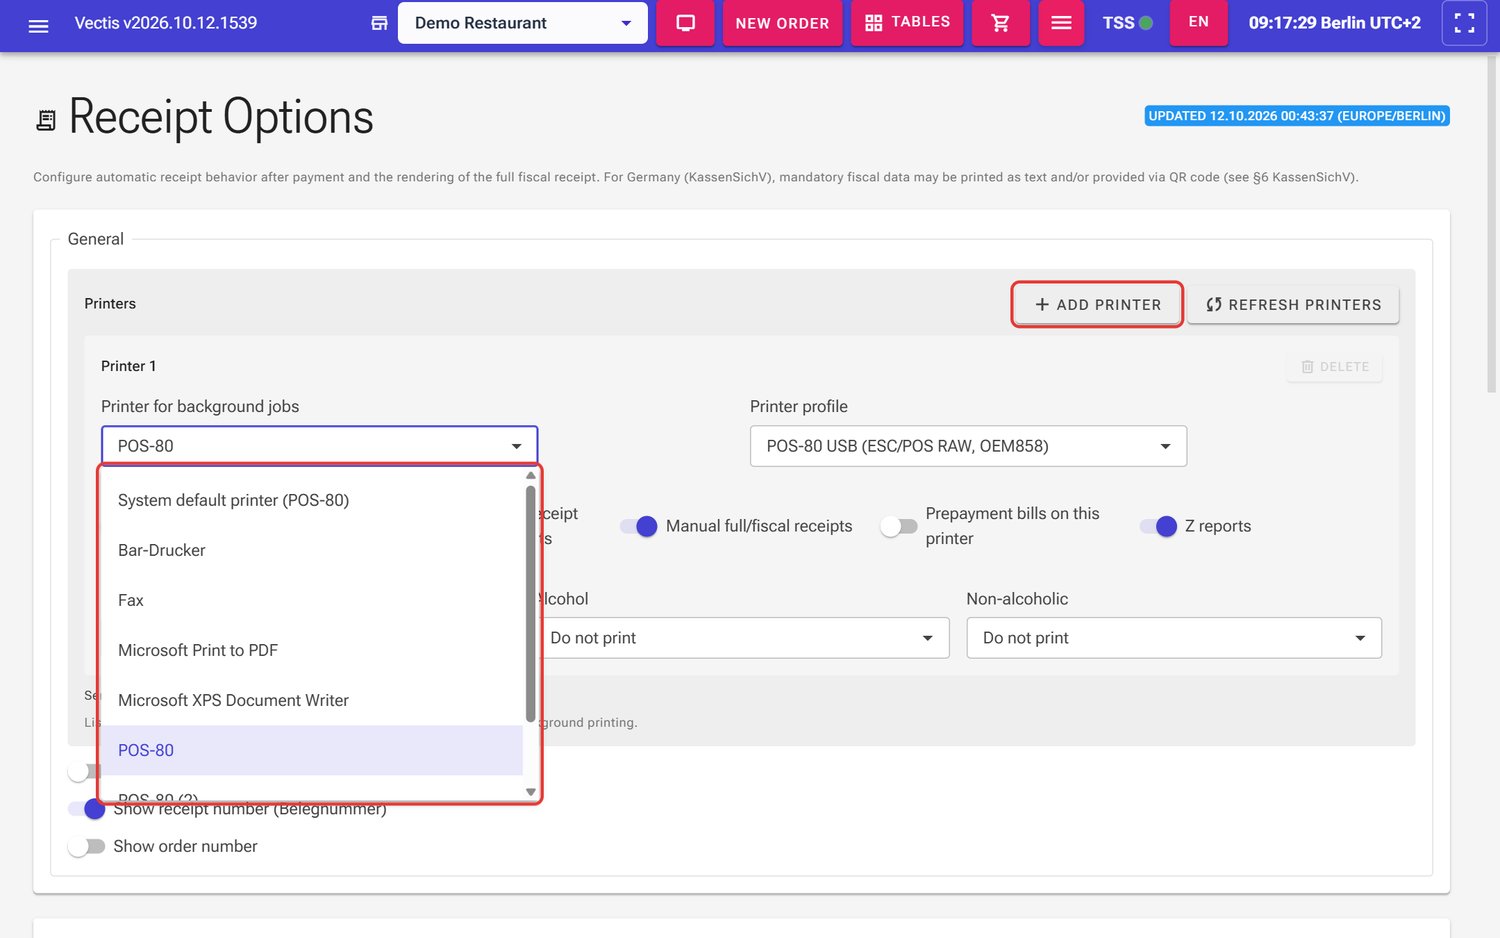 Printer list open, with System default printer (POS-80) and all Windows printers
 - In Printer profile, choose:
- POS-80 USB (ESC/POS RAW, OEM858) or Partner RP-700 USB (ESC/POS RAW, OEM858) for these 80 mm receipt printers,
- Generic printer for any other printer.
- Only for Generic printer more fields appear:
- Background print engine: WinSpool (TEXT / RAW) or Windows driver raster (auto-fit width).
- With WinSpool: Spool data type (RAW (as-is) or TEXT (driver text mode)).
- With raster: Reference layout width (80 mm (recommended baseline) or 60 mm (narrow baseline)). This is the only paper-width setting.
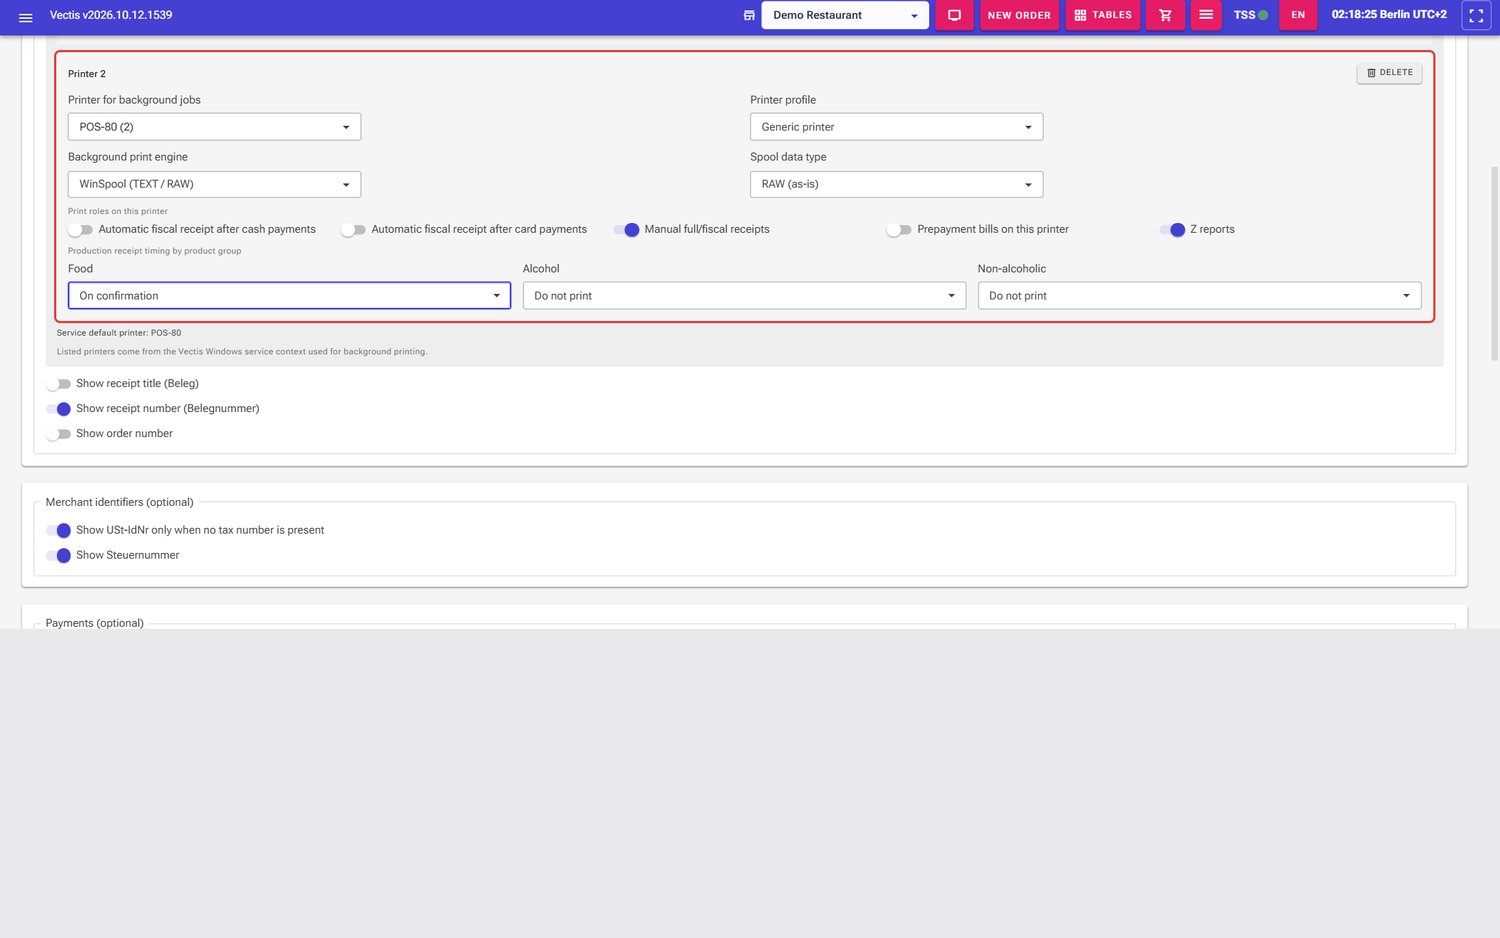 Printer card with the Generic printer profile: extra fields Background print engine and Spool data type
- Set the print roles (next section) and tap Save.
Note: If the printer list cannot be loaded, a text field Enter exact printer name appears instead. Type the name exactly as Windows shows it.
Note: Your Vectis service partner normally sets the printer profile, print engine and spool data type. Only change them if receipts are cut off or unreadable.
Note: There is no separate "test print" button. Check the printer with the Windows test page and then with a real receipt (for example Print receipt on a paid order).
Set the print roles
Goal: Decide which documents come out of this printer.
Who can do this: Admin, Manager (the menu item is shown only to Admin and Manager).
- Open Menu › POS Setup › Receipt Options.
- In the printer card, under Print roles on this printer, switch on what you need:
- Automatic fiscal receipt after cash payments: the full receipt prints automatically after every cash payment. Default: off.
- Automatic fiscal receipt after card payments: the same after card payments. Default: off.
- Manual full/fiscal receipts: receipts someone requests with Print receipt. Default: on.
- Prepayment bills on this printer: interim bills before payment. Default: off.
- Z reports: the X report and Z reports when you tap Print there. Default: on.
- Under Production receipt timing by product group, choose for Food, Alcohol and Non-alcoholic:
- Do not print – these items never print as a kitchen ticket on this printer,
- On confirmation – the kitchen ticket prints as soon as the order is confirmed / sent to the kitchen,
- After payment – the kitchen ticket prints only once the order is paid.
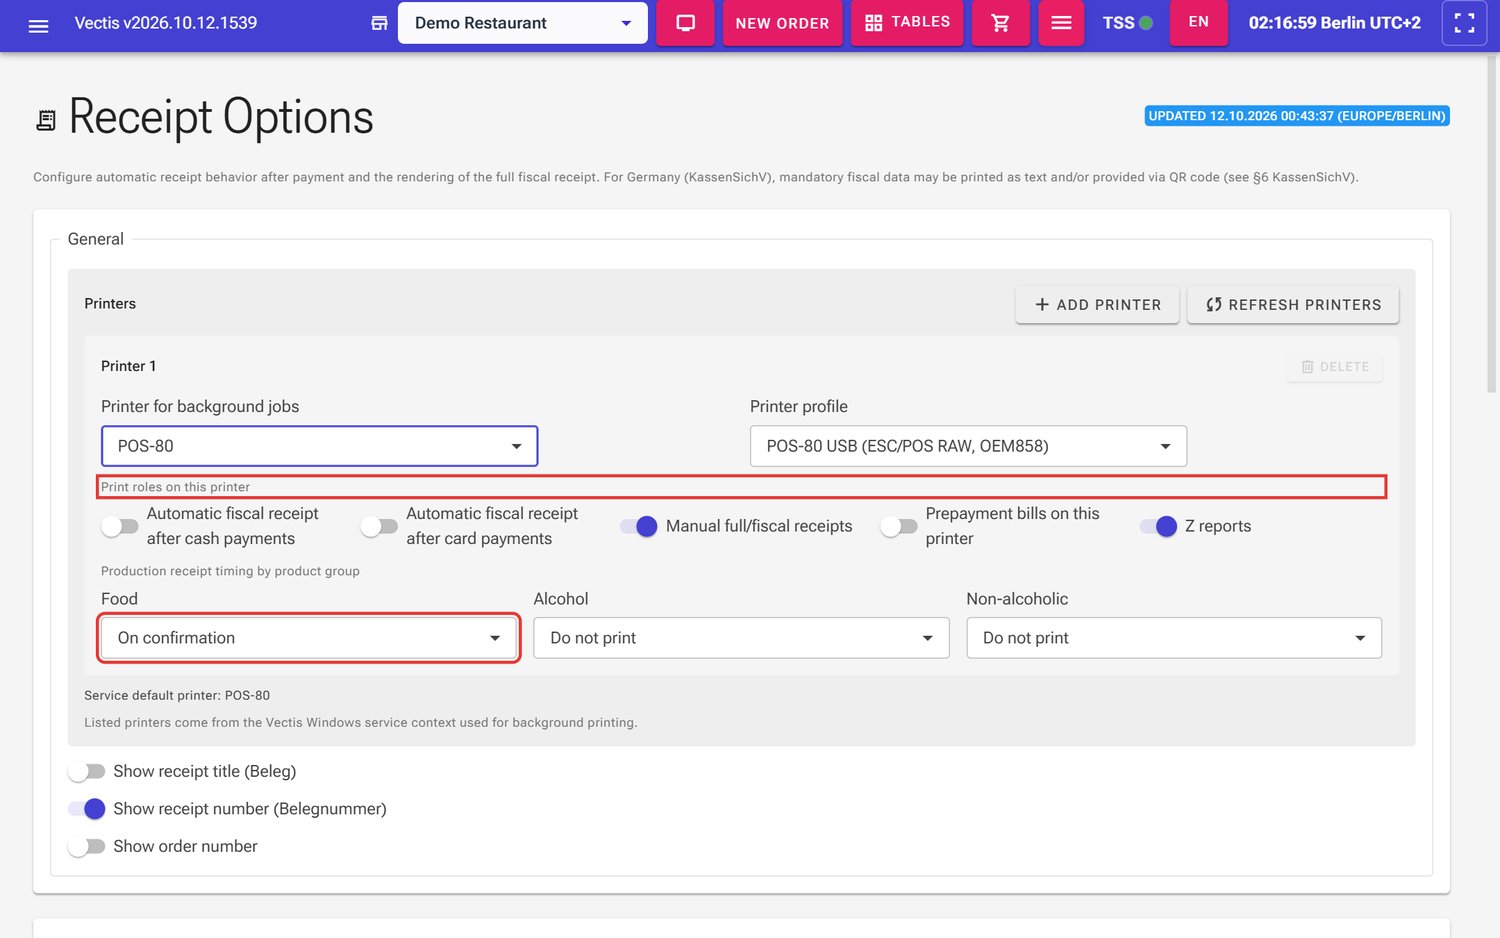 Print roles (outlined in red) and kitchen ticket timing; here Food is set to On confirmation
- Tap Save. The badge Updated … at the top right shows the new time. That tells you the settings were saved.
Note: Out of the box, Food is set to On confirmation and Alcohol and Non-alcoholic to Do not print. That is why drinks do not go to the kitchen.
Note: If both "Automatic fiscal receipt …" switches are off, the till prints no receipt by itself after payment. You can still print it at any time with Print receipt.
Separate kitchen and bar printers
Goal: Send food to the kitchen printer and drinks to the bar printer.
Who can do this: Admin, Manager (the menu item is shown only to Admin and Manager).
Vectis does not route kitchen tickets by category but by each product's Classification: Food, Alcohol or Non-alcoholic. You set the classification on the product (Menu › Catalog Management › Products, field Classification).
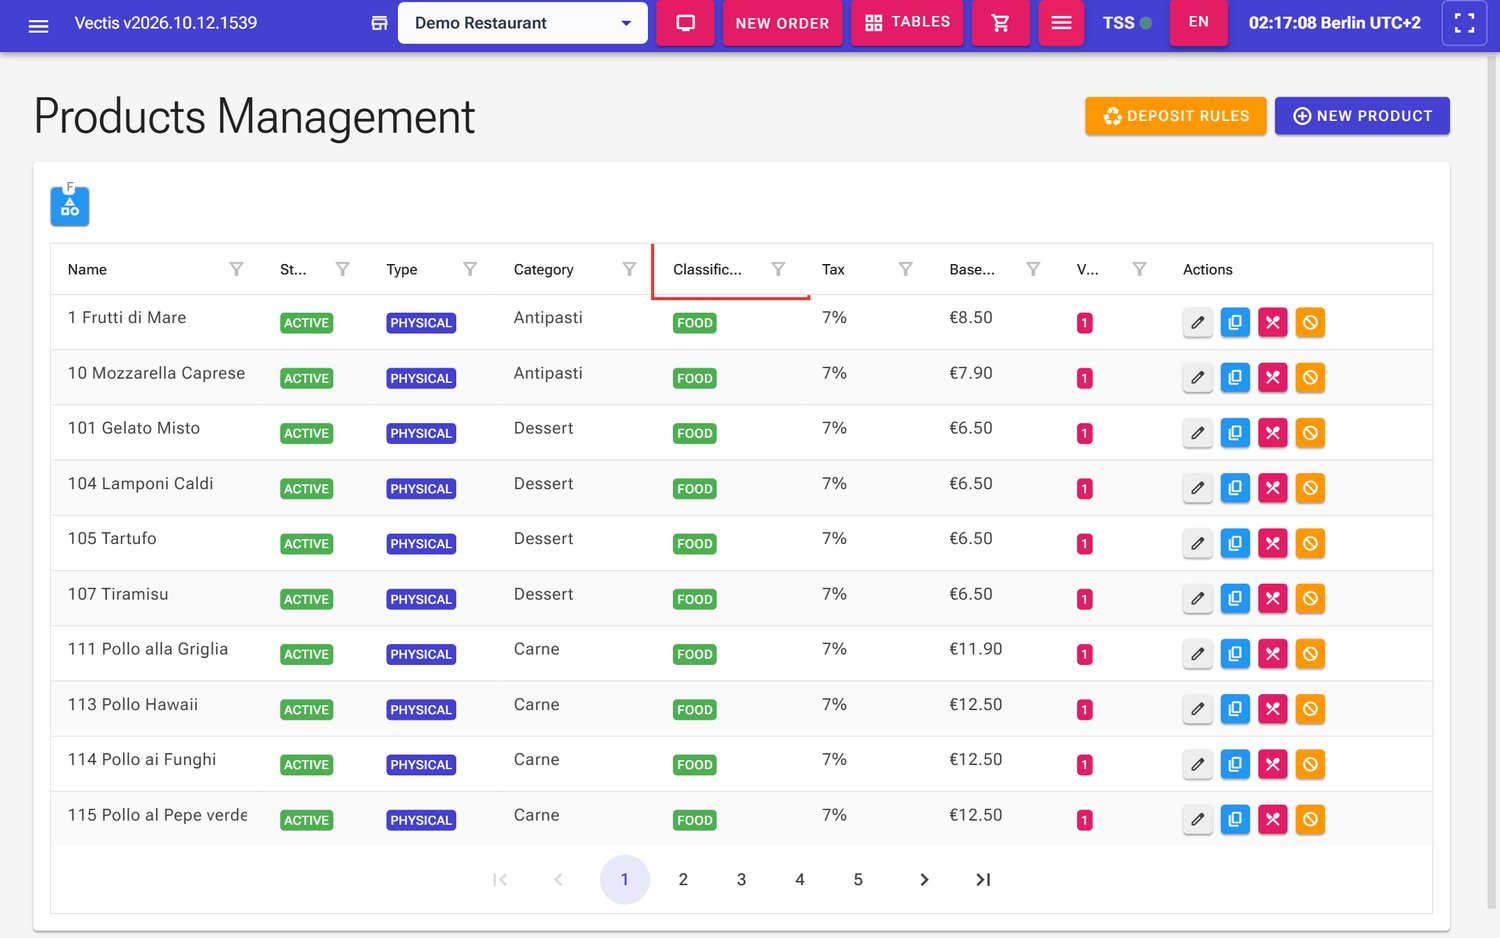 Products list with the Classification column (outlined in red), here all FOOD
- Open Menu › POS Setup › Receipt Options.
- Printer 1 is your kitchen printer: select the kitchen printer. Set Food to On confirmation, Alcohol and Non-alcoholic to Do not print.
- At the top of the Printers area, tap Add printer. A card Printer 2 appears below the first one, with its own Delete button.
- Select the bar printer there. Set Food to Do not print, Alcohol and Non-alcoholic to On confirmation.
- On each card, switch on only the print roles this printer really needs (for example customer receipts only at the till).
- Tap Save.
Note: An order with food and drinks is split automatically: each printer gets only the items of its product groups.
Note: Two cards may use the same printer only with different roles. Otherwise a red message "Two printer cards use the same printer with the same print roles. …" appears at the top when you save, and nothing is saved. Delete removes a card; the last card cannot be deleted.
Note: If a card has no printer selected, the red message "Select a printer or use the system default printer option." appears when you save, and nothing is saved.
Receipt header and fiscal data
Goal: Decide what is printed on the customer receipt.
Who can do this: Admin, Manager (the menu item is shown only to Admin and Manager).
- Open Menu › POS Setup › Receipt Options.
- Under General, switch Show receipt title (Beleg), Show receipt number (Belegnummer) and Show order number on or off.
- Under Merchant identifiers (optional), choose Show Steuernummer and Show USt-IdNr only when no tax number is present.
- Under Payments (optional), switch Show payment method section on or off.
- Under Fiscal data (TSE / KassenSichV), keep Print QR code (recommended) switched on.
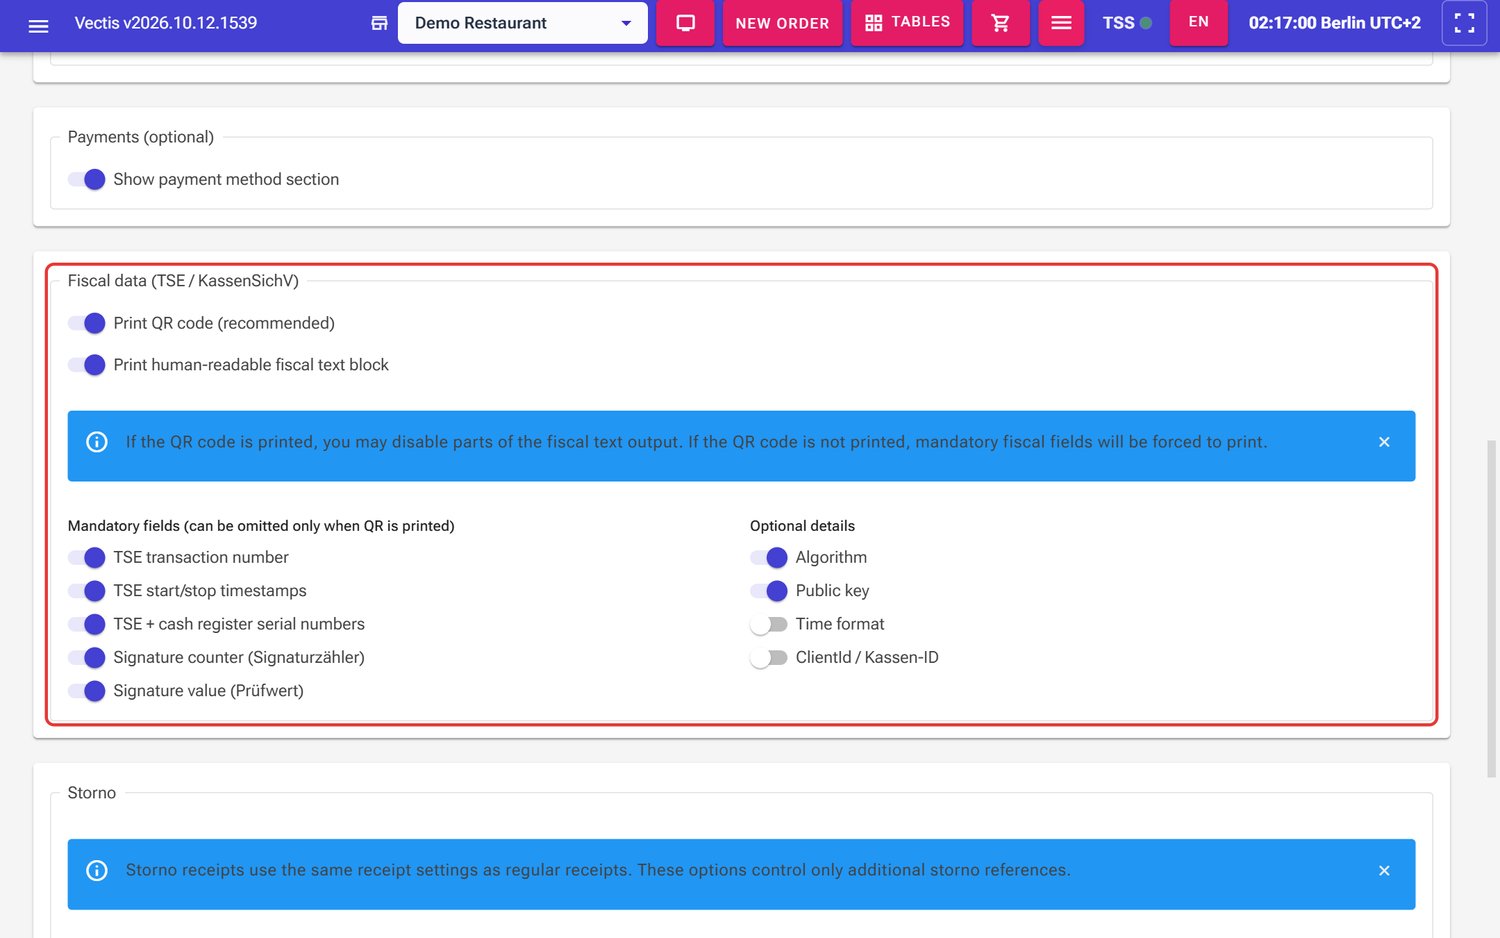 Fiscal data (TSE / KassenSichV) section with mandatory fields and optional details
 - Tap Save.
Note: The name and address in the receipt header come from Menu › POS Setup › Legal Entity Setup. Custom header or footer texts and a logo cannot be set.
Caution: The TSE data on the receipt is required by law (§ 6 KassenSichV). If you switch the QR code off, Vectis prints all mandatory fields as text. The mandatory fields can only be hidden while the QR code is printed.
Note: Storno receipts use the same settings. Under Storno you only choose which details of the original receipt are printed in addition.
What a kitchen ticket looks like
A kitchen ticket is made for the kitchen and has no prices:
- At the top, large: the table and the order number, for example "Tisch 5 #42". The cook sees at a glance where the food goes.
- Below it the time: "Zeit: 19:42:10".
- With courses, one heading per course, for example "=== Gang 1 ===" ("=== Course 1 ===" when the till runs in English).
- If one ticket has items from several product groups, each group gets a heading (Food, Alcohol, Non-alcoholic).
- One line per item with quantity and name, for example "2 Schnitzel". Add-ons are indented below.
- Notes from the waiter are indented with a star: "* no onions".
- A comment for the whole order is printed at the end.
- If items are removed later, the till prints "*** STORNO KÜCHE ***" and the lines with "STORNO", for example "STORNO 1 Schnitzel".
Note: When the guest orders more, the kitchen gets a new ticket with the new items.
Print a kitchen ticket again
Goal: Reprint a lost kitchen ticket.
Who can do this: Admin, Manager, Cashier, Waiter (cashiers and waiters see only the current business day in Orders).
- Open Menu › Order Management › Orders.
- In the order's row, tap Fiskal. This button exists only for paid orders. The dialog Order … opens.
- Tap Print short receipt. The ticket goes to every printer that prints kitchen tickets – each one gets only its product groups.
When the printer does not print
Goal: Find and fix print problems yourself.
Who can do this: Admin, Manager (settings); checks at the printer: everyone.
Kitchen tickets are not lost. If a kitchen ticket cannot be handed to Windows, Vectis retries automatically until Windows accepts the job. Once Windows has accepted it and the printer is off, the job waits in the Windows print queue.
Customer receipts and reports are not retried automatically. Print them again after the problem is fixed (Print receipt or Print in the report).
- Check the printer: power, paper, cover closed, cable or network.
- Open the printer's queue in Windows. If jobs are stuck, switch the printer off and on again.
- Open Menu › POS Setup › Receipt Options and check that every card has the right printer.
- If a card says System default printer, check the name in brackets. If it is "Microsoft Print to PDF" or another wrong printer, select your receipt printer directly and tap Save.
- If the printer was renamed or reinstalled in Windows, tap Refresh printers, select it again and save. A printer name that Windows no longer knows is rejected.
- If this does not help, contact your Vectis service partner.
Frequently asked questions
Q: Why do drinks not arrive in the kitchen? Because out of the box only Food goes to the kitchen printer. Alcohol and Non-alcoholic are set to Do not print. For a bar printer, add a second printer card.
Q: A drink prints in the kitchen. What is wrong? Check the product's classification. If it is Food, change it to Alcohol or Non-alcoholic.
Q: Can I route kitchen tickets by category (for example "Pizza" to the pizza oven)? No. Vectis routes only by the three product groups Food, Alcohol and Non-alcoholic.
Q: My new printer is missing from the list. Tap Refresh printers. If it is still missing, the Vectis service cannot see it – have it set up on the till PC.
Q: Why is no receipt printed after payment? The switches Automatic fiscal receipt after cash payments / … after card payments are off. Switch them on, or print with Print receipt.
Q: Where do I set a header, footer or logo? Not possible. The name and address come from Legal Entity Setup.
Q: Where do I set the paper width? Only with the Generic printer profile and Windows driver raster: field Reference layout width (80 mm or 60 mm). The POS-80 and RP-700 profiles are made for 80 mm.
Q: The printer was off for a moment. Are the kitchen tickets lost? No. Vectis retries kitchen tickets automatically until Windows accepts them.
Q: Can I leave the QR code off the receipt? Yes, but then Vectis prints all mandatory TSE data as text, and the receipt gets longer.
Q: Who can change the print settings? Only Admin and Manager. Cashiers and waiters do not see Receipt Options in the menu.